> ## Documentation Index
> Fetch the complete documentation index at: https://docs.gameball.co/llms.txt
> Use this file to discover all available pages before exploring further.
# How to Create an Automation Campaign?
> Learn how to use Gameball Automation Campaigns to create workflows that will increase productivity and efficiency.
Automated workflows streamline customer-business communications and activities. Gameball's automation engine offers a robust solution for creating pre-set actions triggered by specific events. [Learn more about Automation Campaigns](/product-documentation/automation-campaigns/introduction-to-automation-campaigns).
## Creating an Automated Workflow
### Create a New Automation Campaign
Open your Gameball Admin Dashboard.
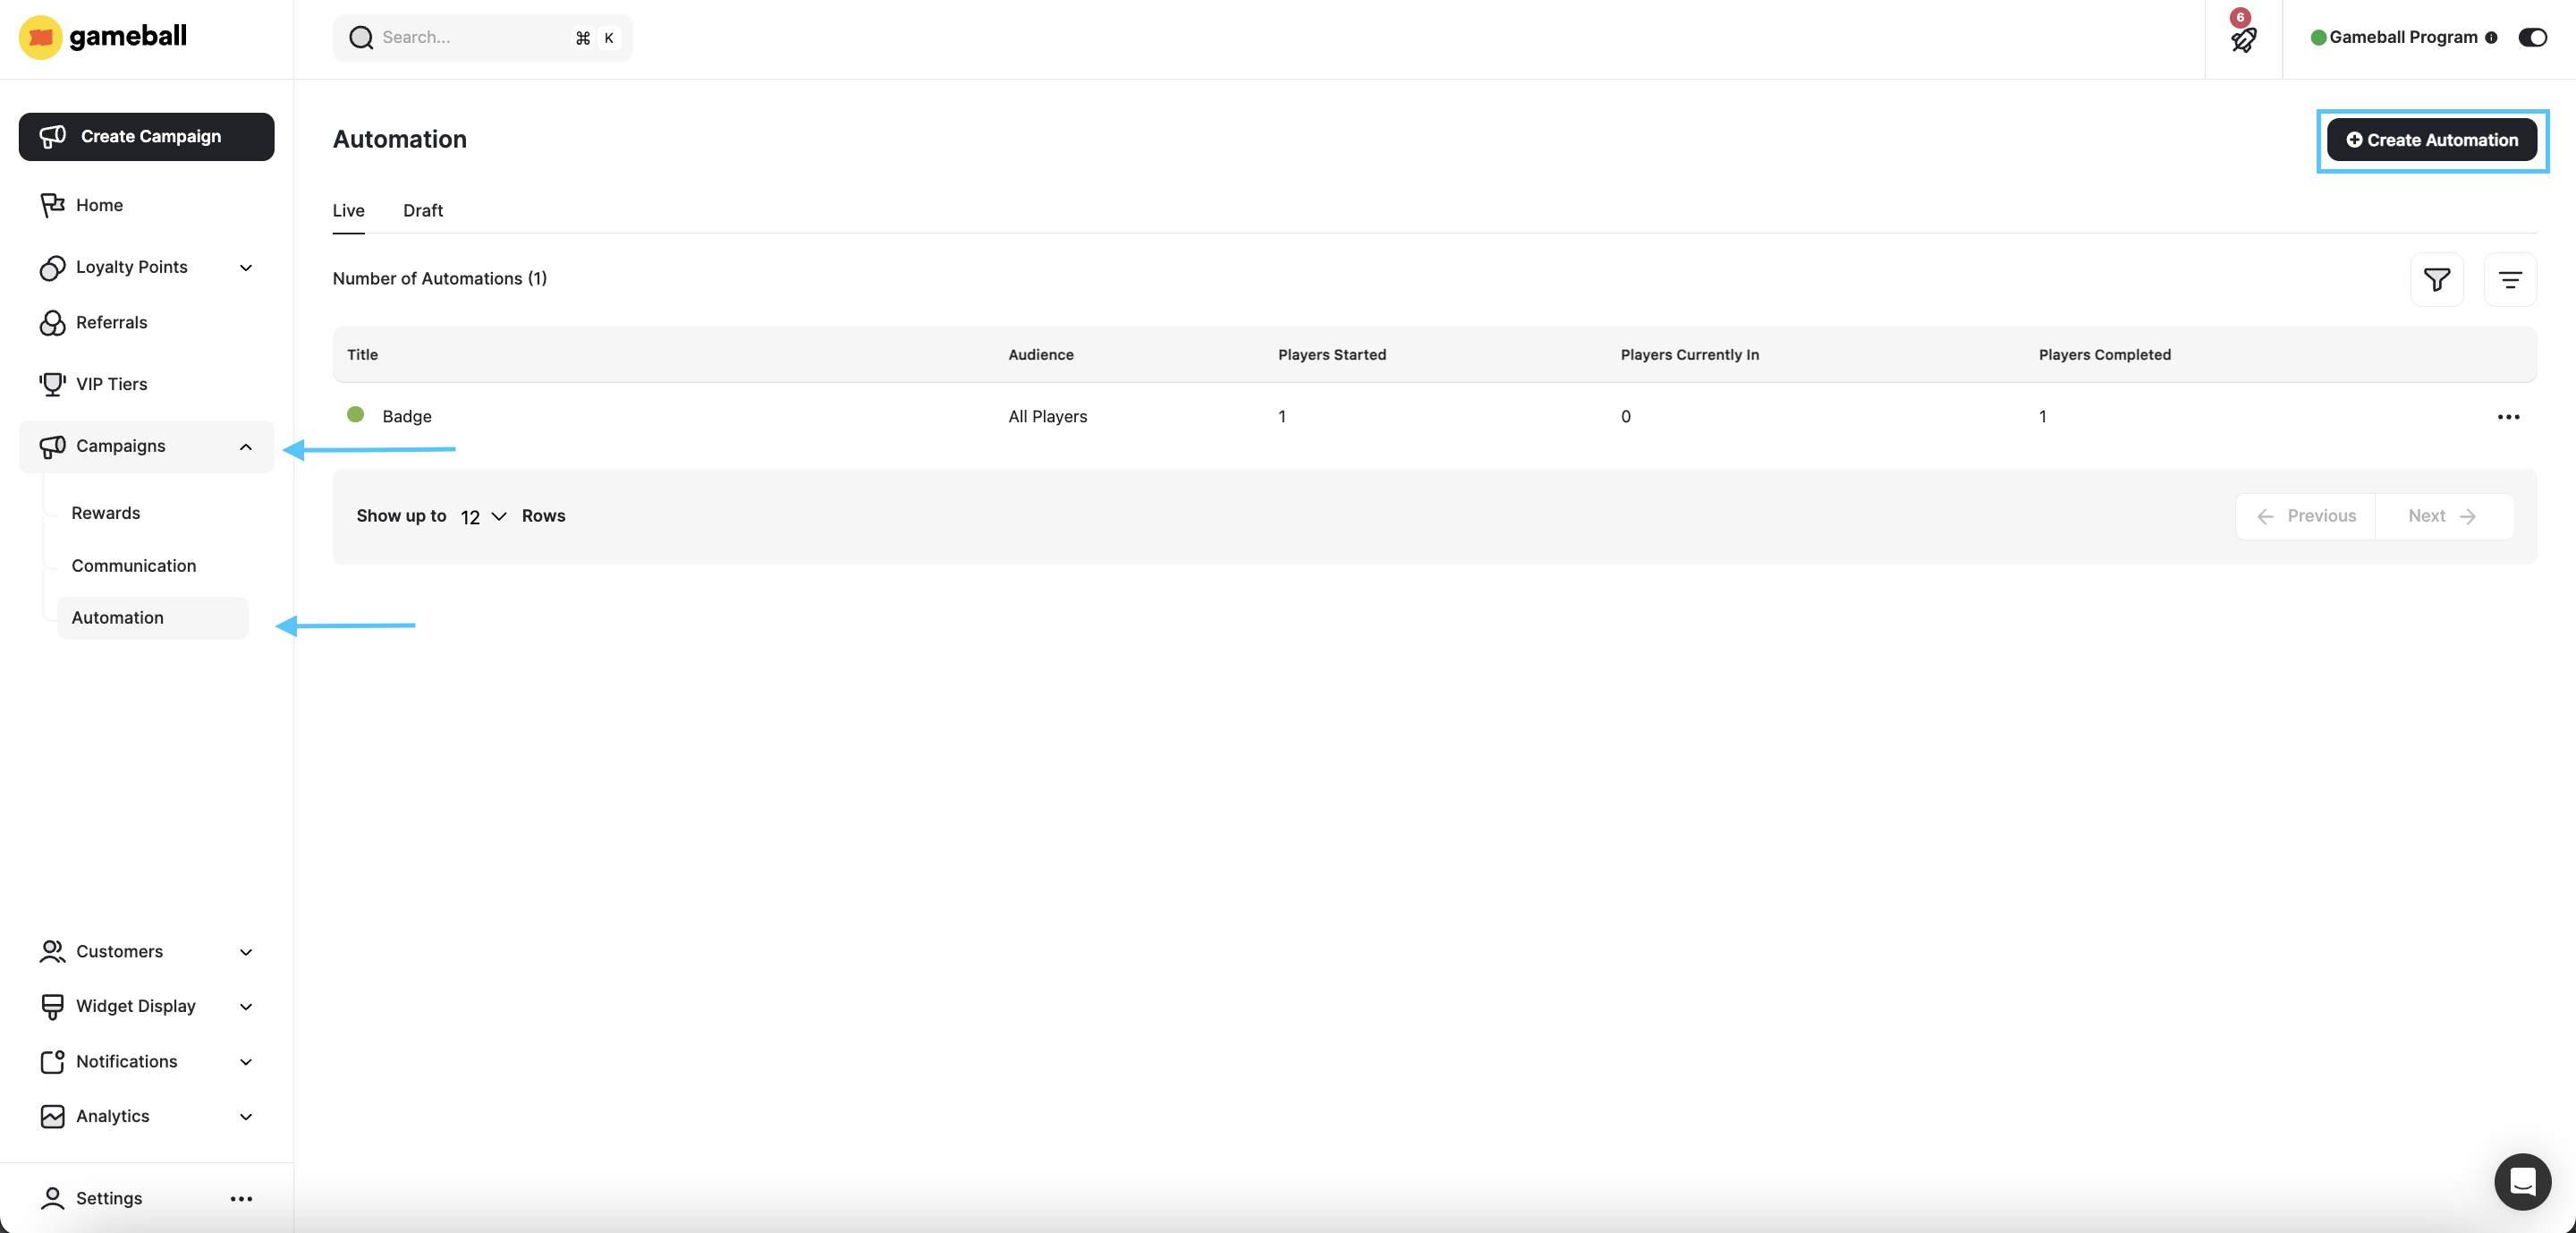
From the left bar, click on **Automation** under **Campaigns**. You will land on the page that displays all previously **configured** and **Live** Automations.
Click **Create Automation** from the top right of the Automation section. You will be taken to the **automation engine**, where you can create endless workflows.
 ***
### Choose Your Audience and Set Entry Frequency and Exit Rule
You can decide which of your customers this automation will apply to. You can also decide when a customer will exit this automation.
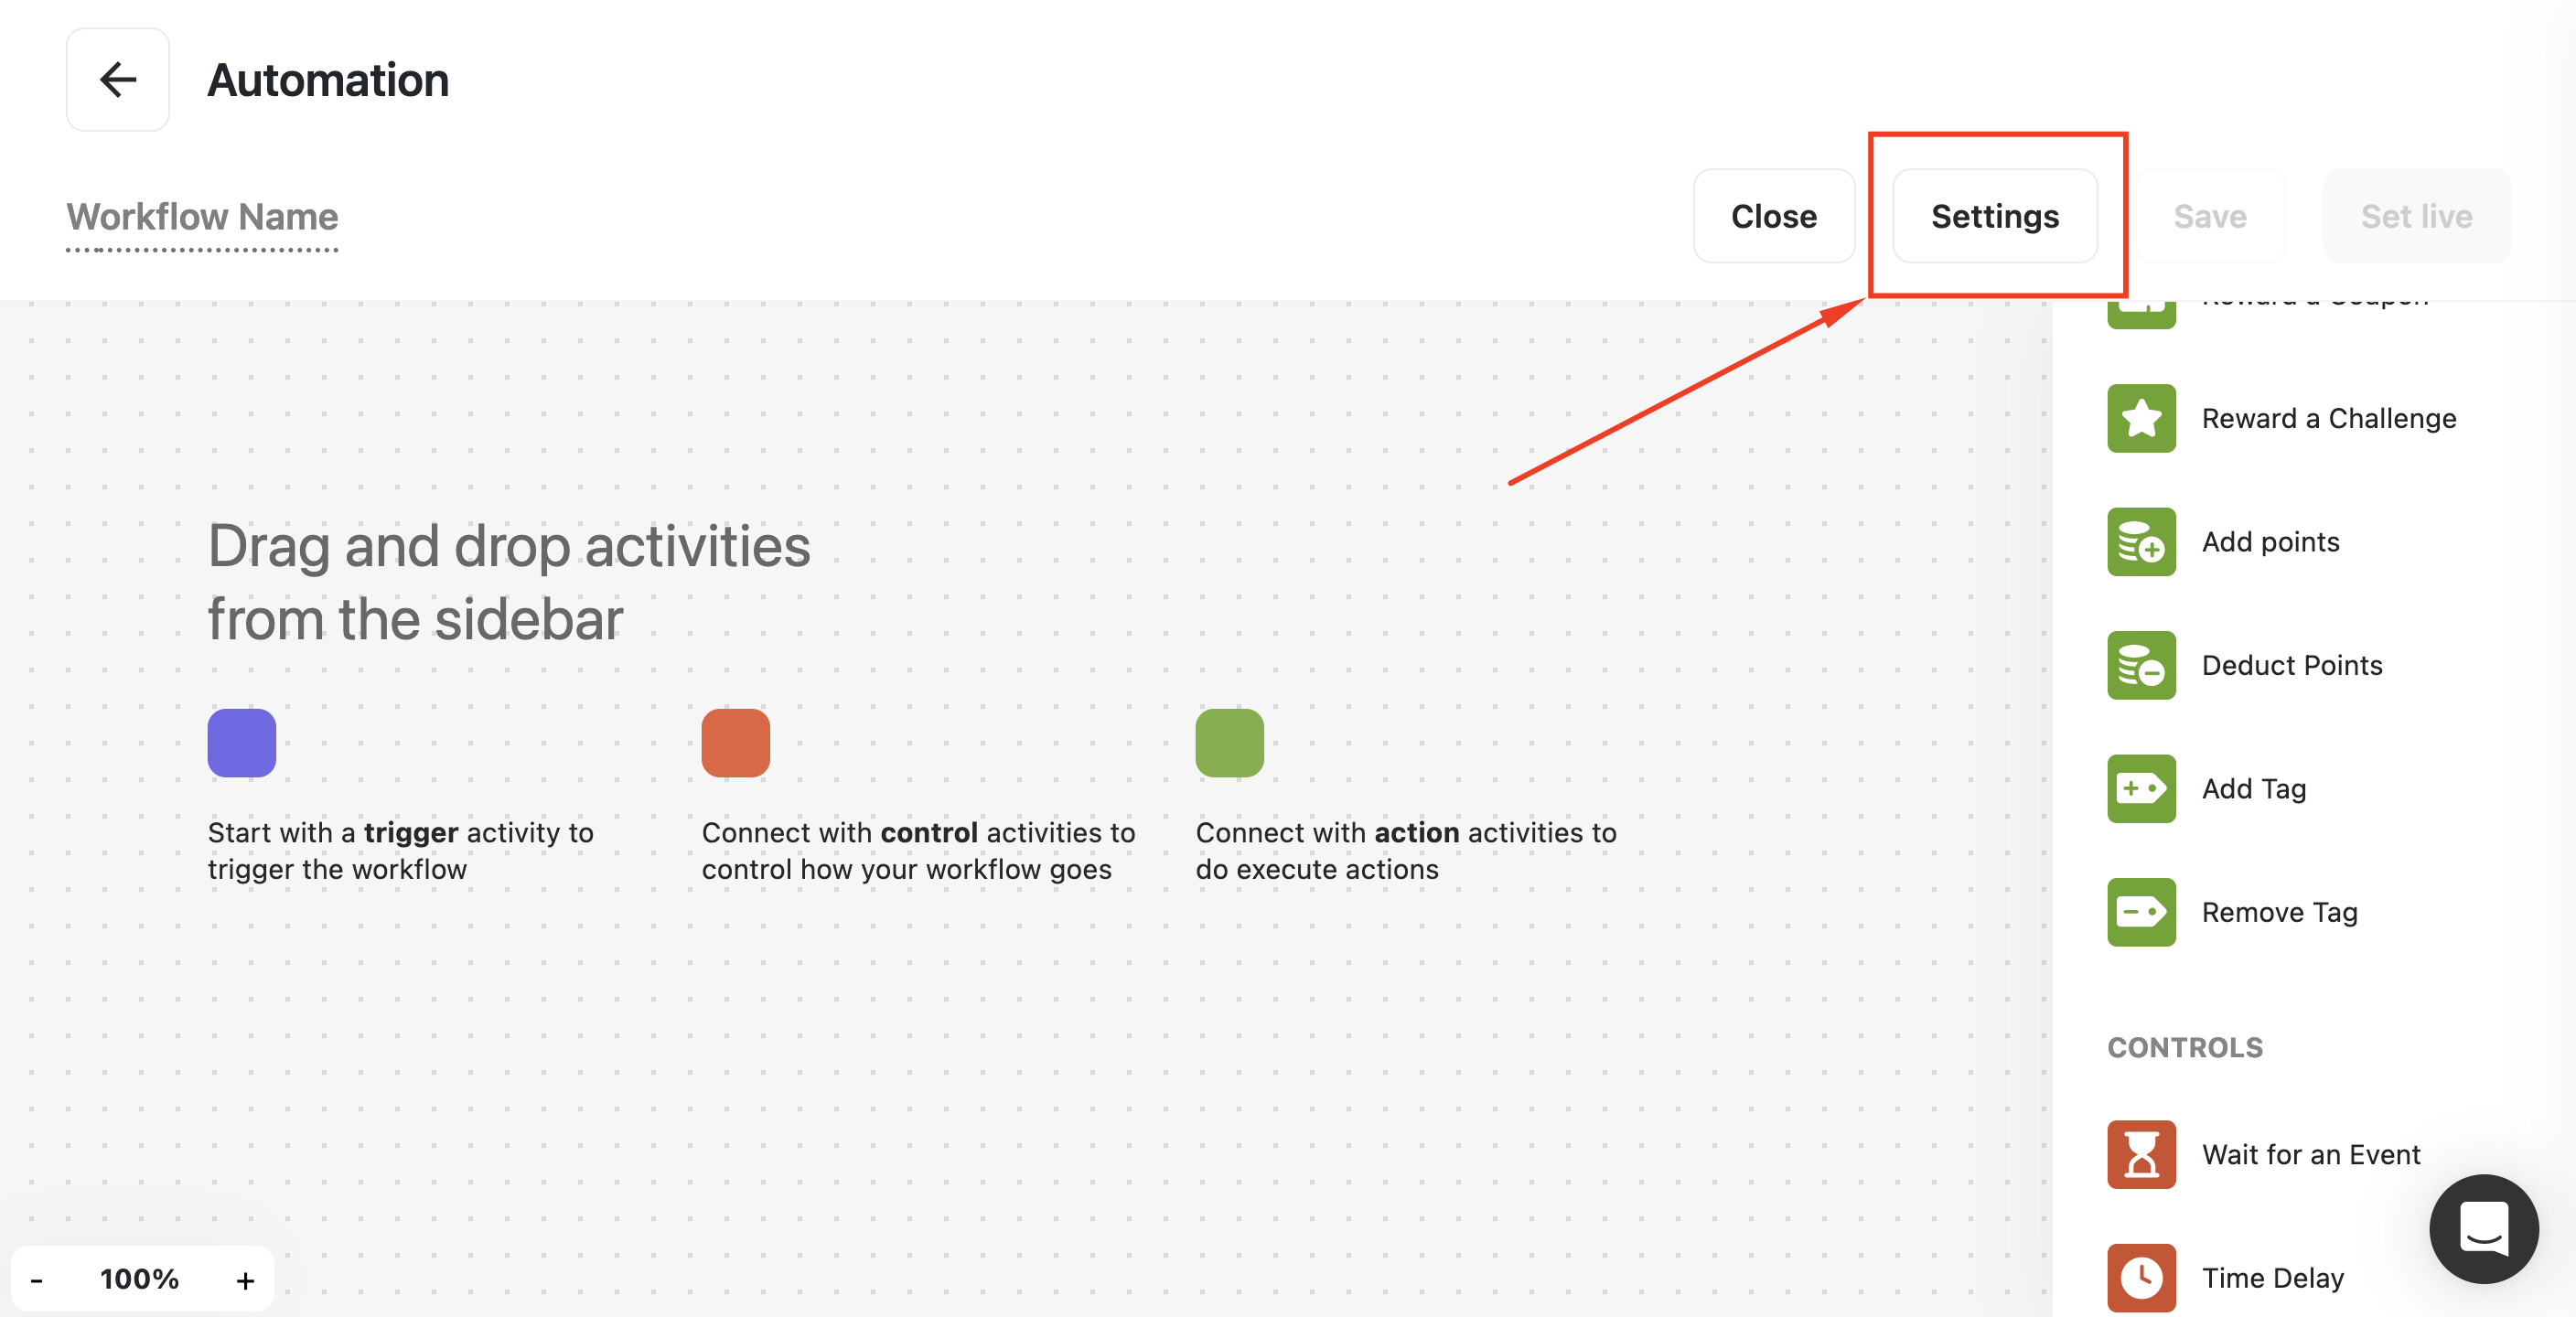
Click on **Settings**.
***
### Choose Your Audience and Set Entry Frequency and Exit Rule
You can decide which of your customers this automation will apply to. You can also decide when a customer will exit this automation.
Click on **Settings**.
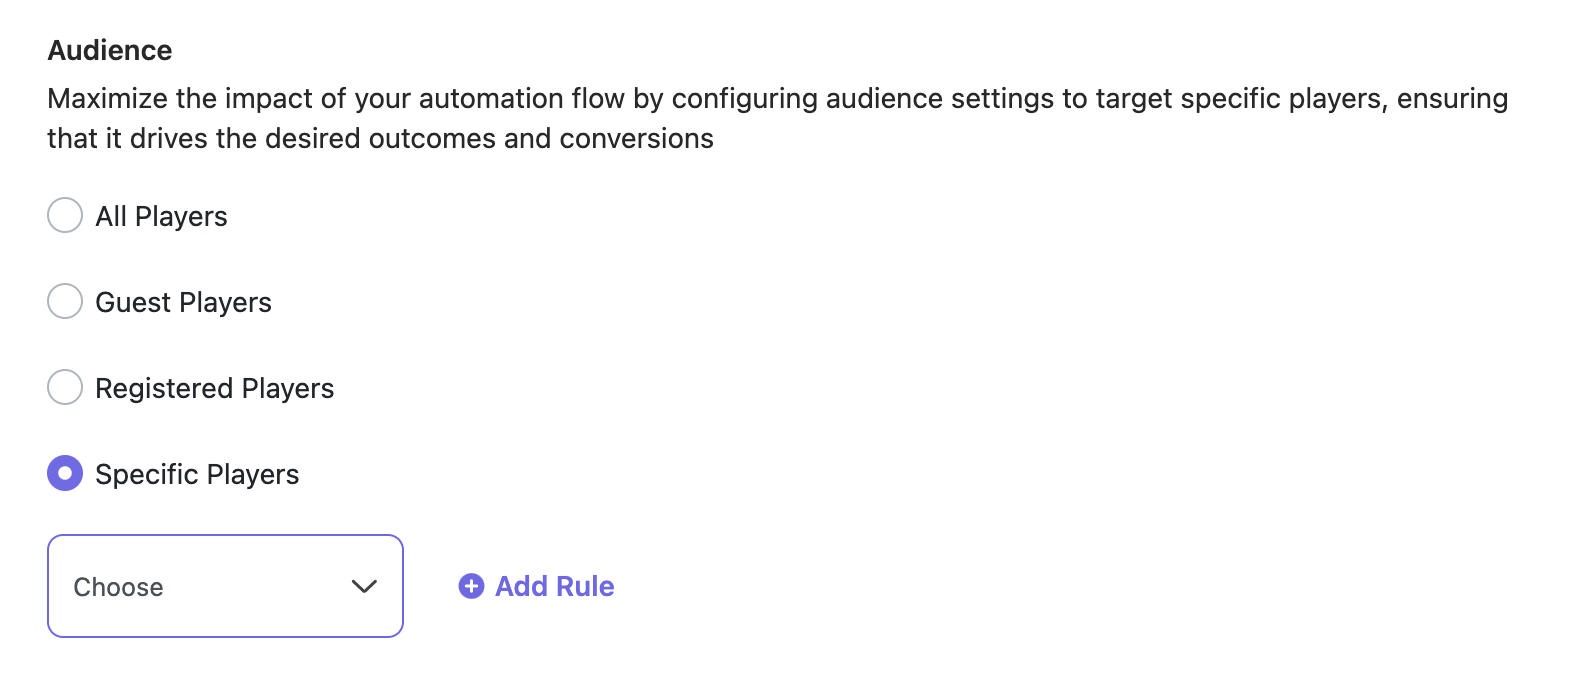
 Under **Audience**, choose between:
* All Customers
* Guest Customer
* Registered Customers
* Specific Customer (choosing specific Segments, RFM Segments, Tags, or Customer Attributes)
Under **Audience**, choose between:
* All Customers
* Guest Customer
* Registered Customers
* Specific Customer (choosing specific Segments, RFM Segments, Tags, or Customer Attributes)
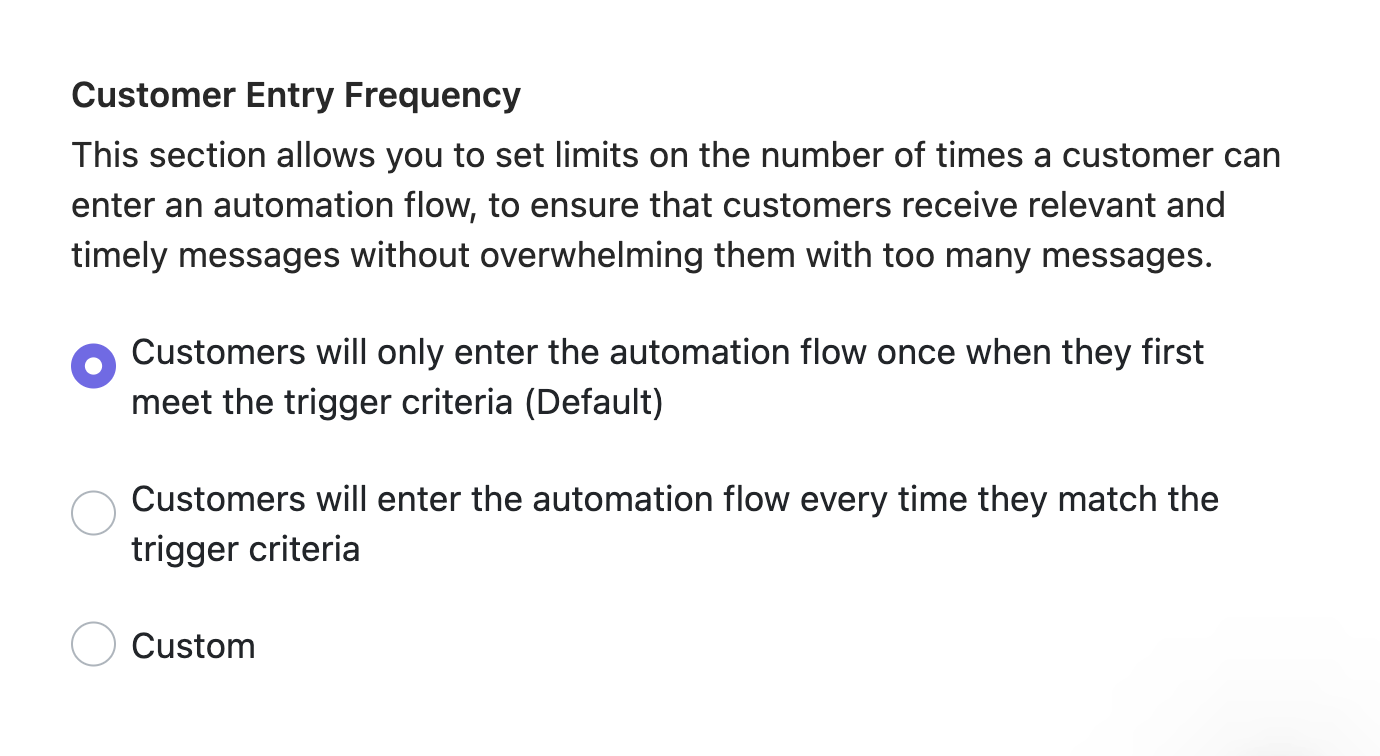
 Determine how frequently customers can enter the automation:
* Once (Default)
* Every Time the Criteria Met
* Custom Frequency
Determine how frequently customers can enter the automation:
* Once (Default)
* Every Time the Criteria Met
* Custom Frequency
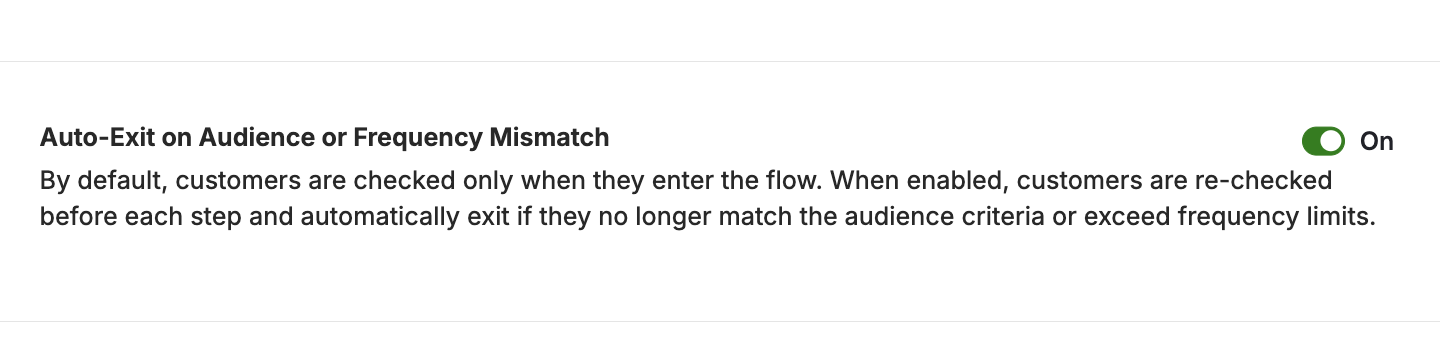
 * When **OFF**: Customers are evaluated **only once** with each cycle when they enter the flow (at the time the campaign is triggered).
* When **ON**: Customers are **re-evaluated before each step**. If they **no longer match the audience** criteria or have **exceeded their entry frequency**, they are **automatically exited** from the automation.
* When **OFF**: Customers are evaluated **only once** with each cycle when they enter the flow (at the time the campaign is triggered).
* When **ON**: Customers are **re-evaluated before each step**. If they **no longer match the audience** criteria or have **exceeded their entry frequency**, they are **automatically exited** from the automation.
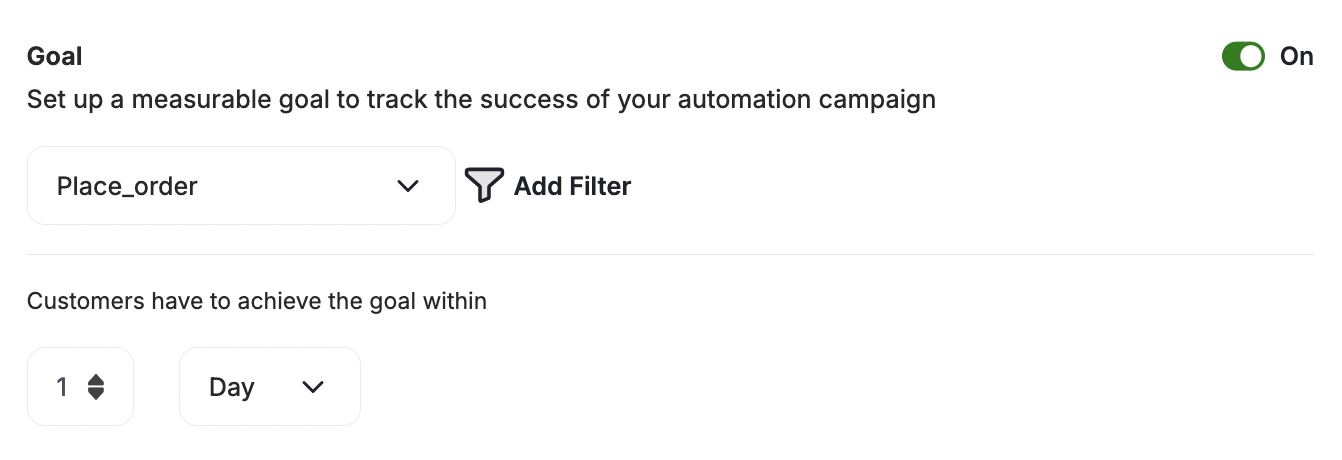
 Each automation supports defining **one goal** from any Gameball event (custom or predefined). You can add optional filters (e.g., order value, product category) and set a measurement window such as 7, 14, or 30 days. Goals can be added or edited in draft mode, with changes to published automations applying only to new participants.
 **Automated Goal Tracking for Each Customer:**
* After a customer completes the automation, Gameball automatically tracks whether they perform the defined goal event within the selected timeframe. Each customer is marked as **Achieved**, **Pending**, or **Not Achieved**, with full visibility inside customer logs.
**Goal Performance Analytics & Reports:**
* A new **Goal Performance** tab has been added to automation insights. It displays total participants, completions, goal achievements, and conversion trends over time. All goal results can be exported to CSV for deeper analysis.
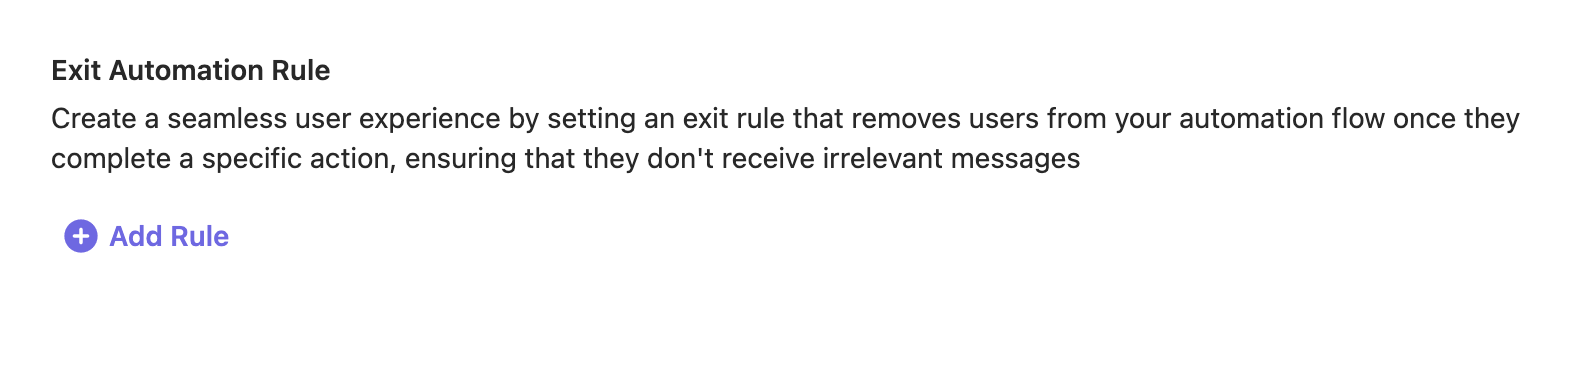
Click **Add Rule** under **Exit Automation Rule.**
**What is an Exit Rule?**
It is a condition or a set of conditions that, if met by a member of the audience, the automation will no longer be applied. For example, if a guest registers and becomes a registered customer, the automation events will no longer be applied to them.
**Automated Goal Tracking for Each Customer:**
* After a customer completes the automation, Gameball automatically tracks whether they perform the defined goal event within the selected timeframe. Each customer is marked as **Achieved**, **Pending**, or **Not Achieved**, with full visibility inside customer logs.
**Goal Performance Analytics & Reports:**
* A new **Goal Performance** tab has been added to automation insights. It displays total participants, completions, goal achievements, and conversion trends over time. All goal results can be exported to CSV for deeper analysis.
Click **Add Rule** under **Exit Automation Rule.**
**What is an Exit Rule?**
It is a condition or a set of conditions that, if met by a member of the audience, the automation will no longer be applied. For example, if a guest registers and becomes a registered customer, the automation events will no longer be applied to them.
 From the dropdown list, choose between:
* **Event:** The customer will exit the automation when they complete a specified action.
* **Profile Attribute:** The customer will exit the automation when their profile has a specified type of information.
***
## How to Create an Automated Workflow
Before diving into your first automated workflow, here's what you need to understand:
Automated workflows comprise three key elements: Triggers, Actions, and Controls.
A workflow always begins with a trigger initiated by the customer.
These are the responses or actions you define when triggers are activated by the customer.
Optionally, you can incorporate conditions before executing actions using controls.
Now, let's walk through the steps to build an automation:
Start by giving your automation a distinct name to easily identify it on the dashboard.
From the dropdown list, choose between:
* **Event:** The customer will exit the automation when they complete a specified action.
* **Profile Attribute:** The customer will exit the automation when their profile has a specified type of information.
***
## How to Create an Automated Workflow
Before diving into your first automated workflow, here's what you need to understand:
Automated workflows comprise three key elements: Triggers, Actions, and Controls.
A workflow always begins with a trigger initiated by the customer.
These are the responses or actions you define when triggers are activated by the customer.
Optionally, you can incorporate conditions before executing actions using controls.
Now, let's walk through the steps to build an automation:
Start by giving your automation a distinct name to easily identify it on the dashboard.
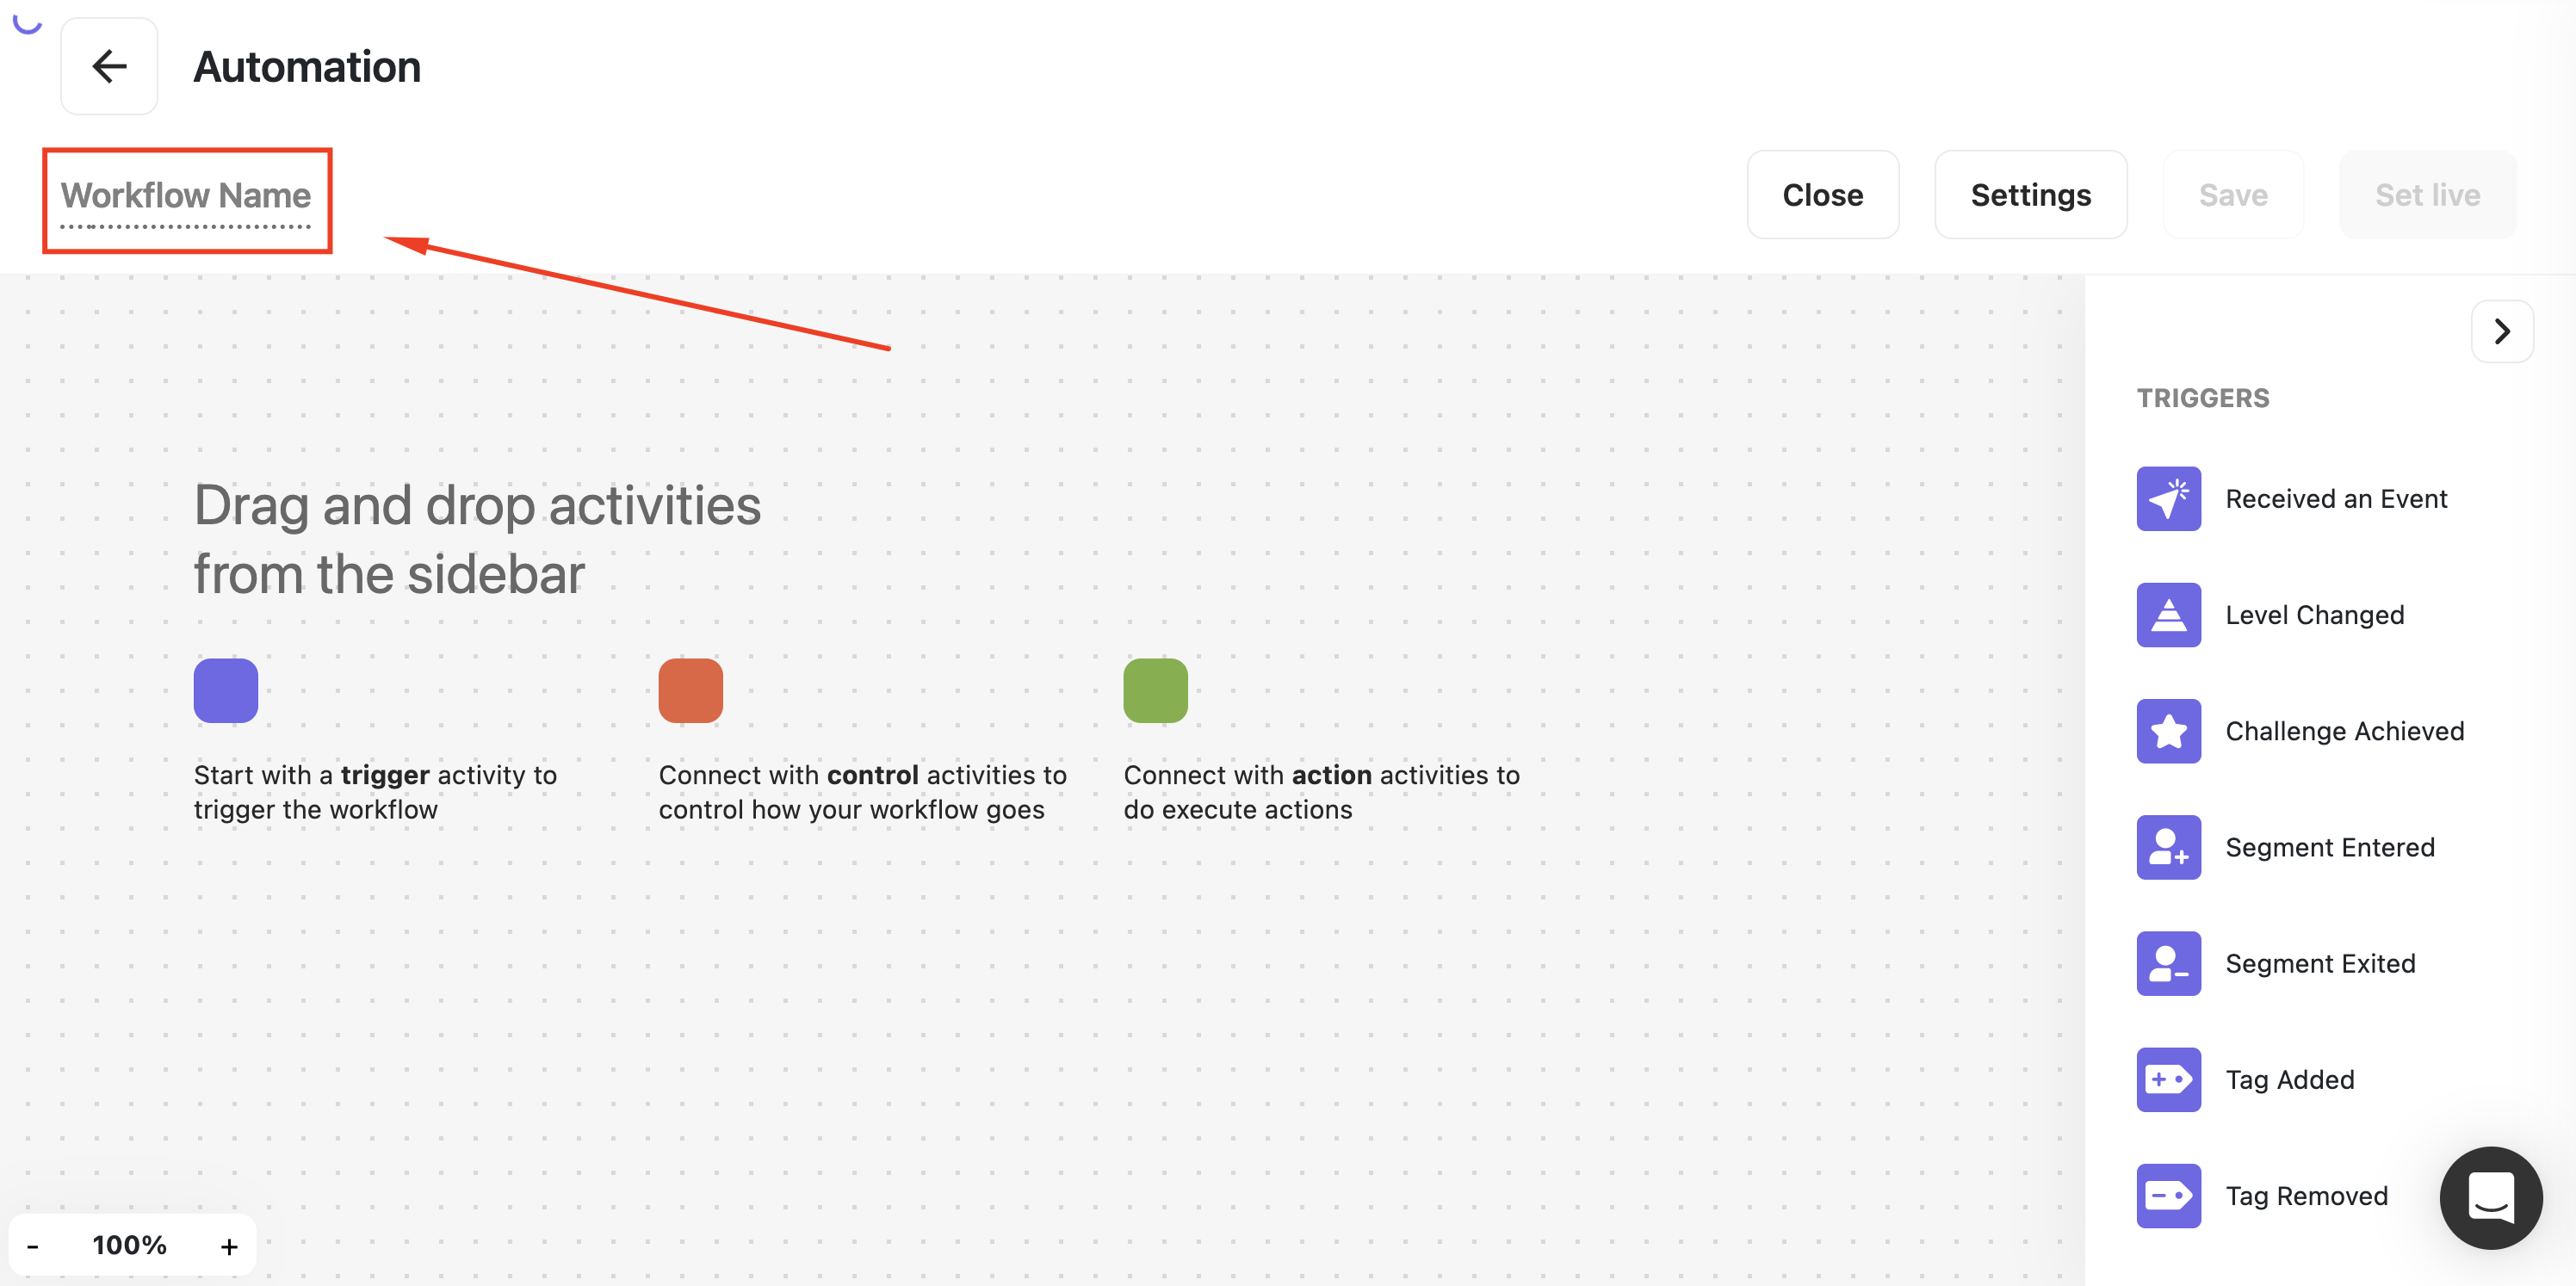 Select a trigger event to kickstart your automation. Simply drag and drop your preferred trigger from the list. Available triggers include:
* **Account Created**
* **Receive Event**
* **Level Changed**
* **Challenge Achieved**
* **Segment Entered**
* **Segment Exited**
* **Tag Added**
* **Tag Removed**
* **Webhook Trigger**
* **OnDate Trigger**
* **Automation Completed**
* **Expiring Points**
Select a trigger event to kickstart your automation. Simply drag and drop your preferred trigger from the list. Available triggers include:
* **Account Created**
* **Receive Event**
* **Level Changed**
* **Challenge Achieved**
* **Segment Entered**
* **Segment Exited**
* **Tag Added**
* **Tag Removed**
* **Webhook Trigger**
* **OnDate Trigger**
* **Automation Completed**
* **Expiring Points**
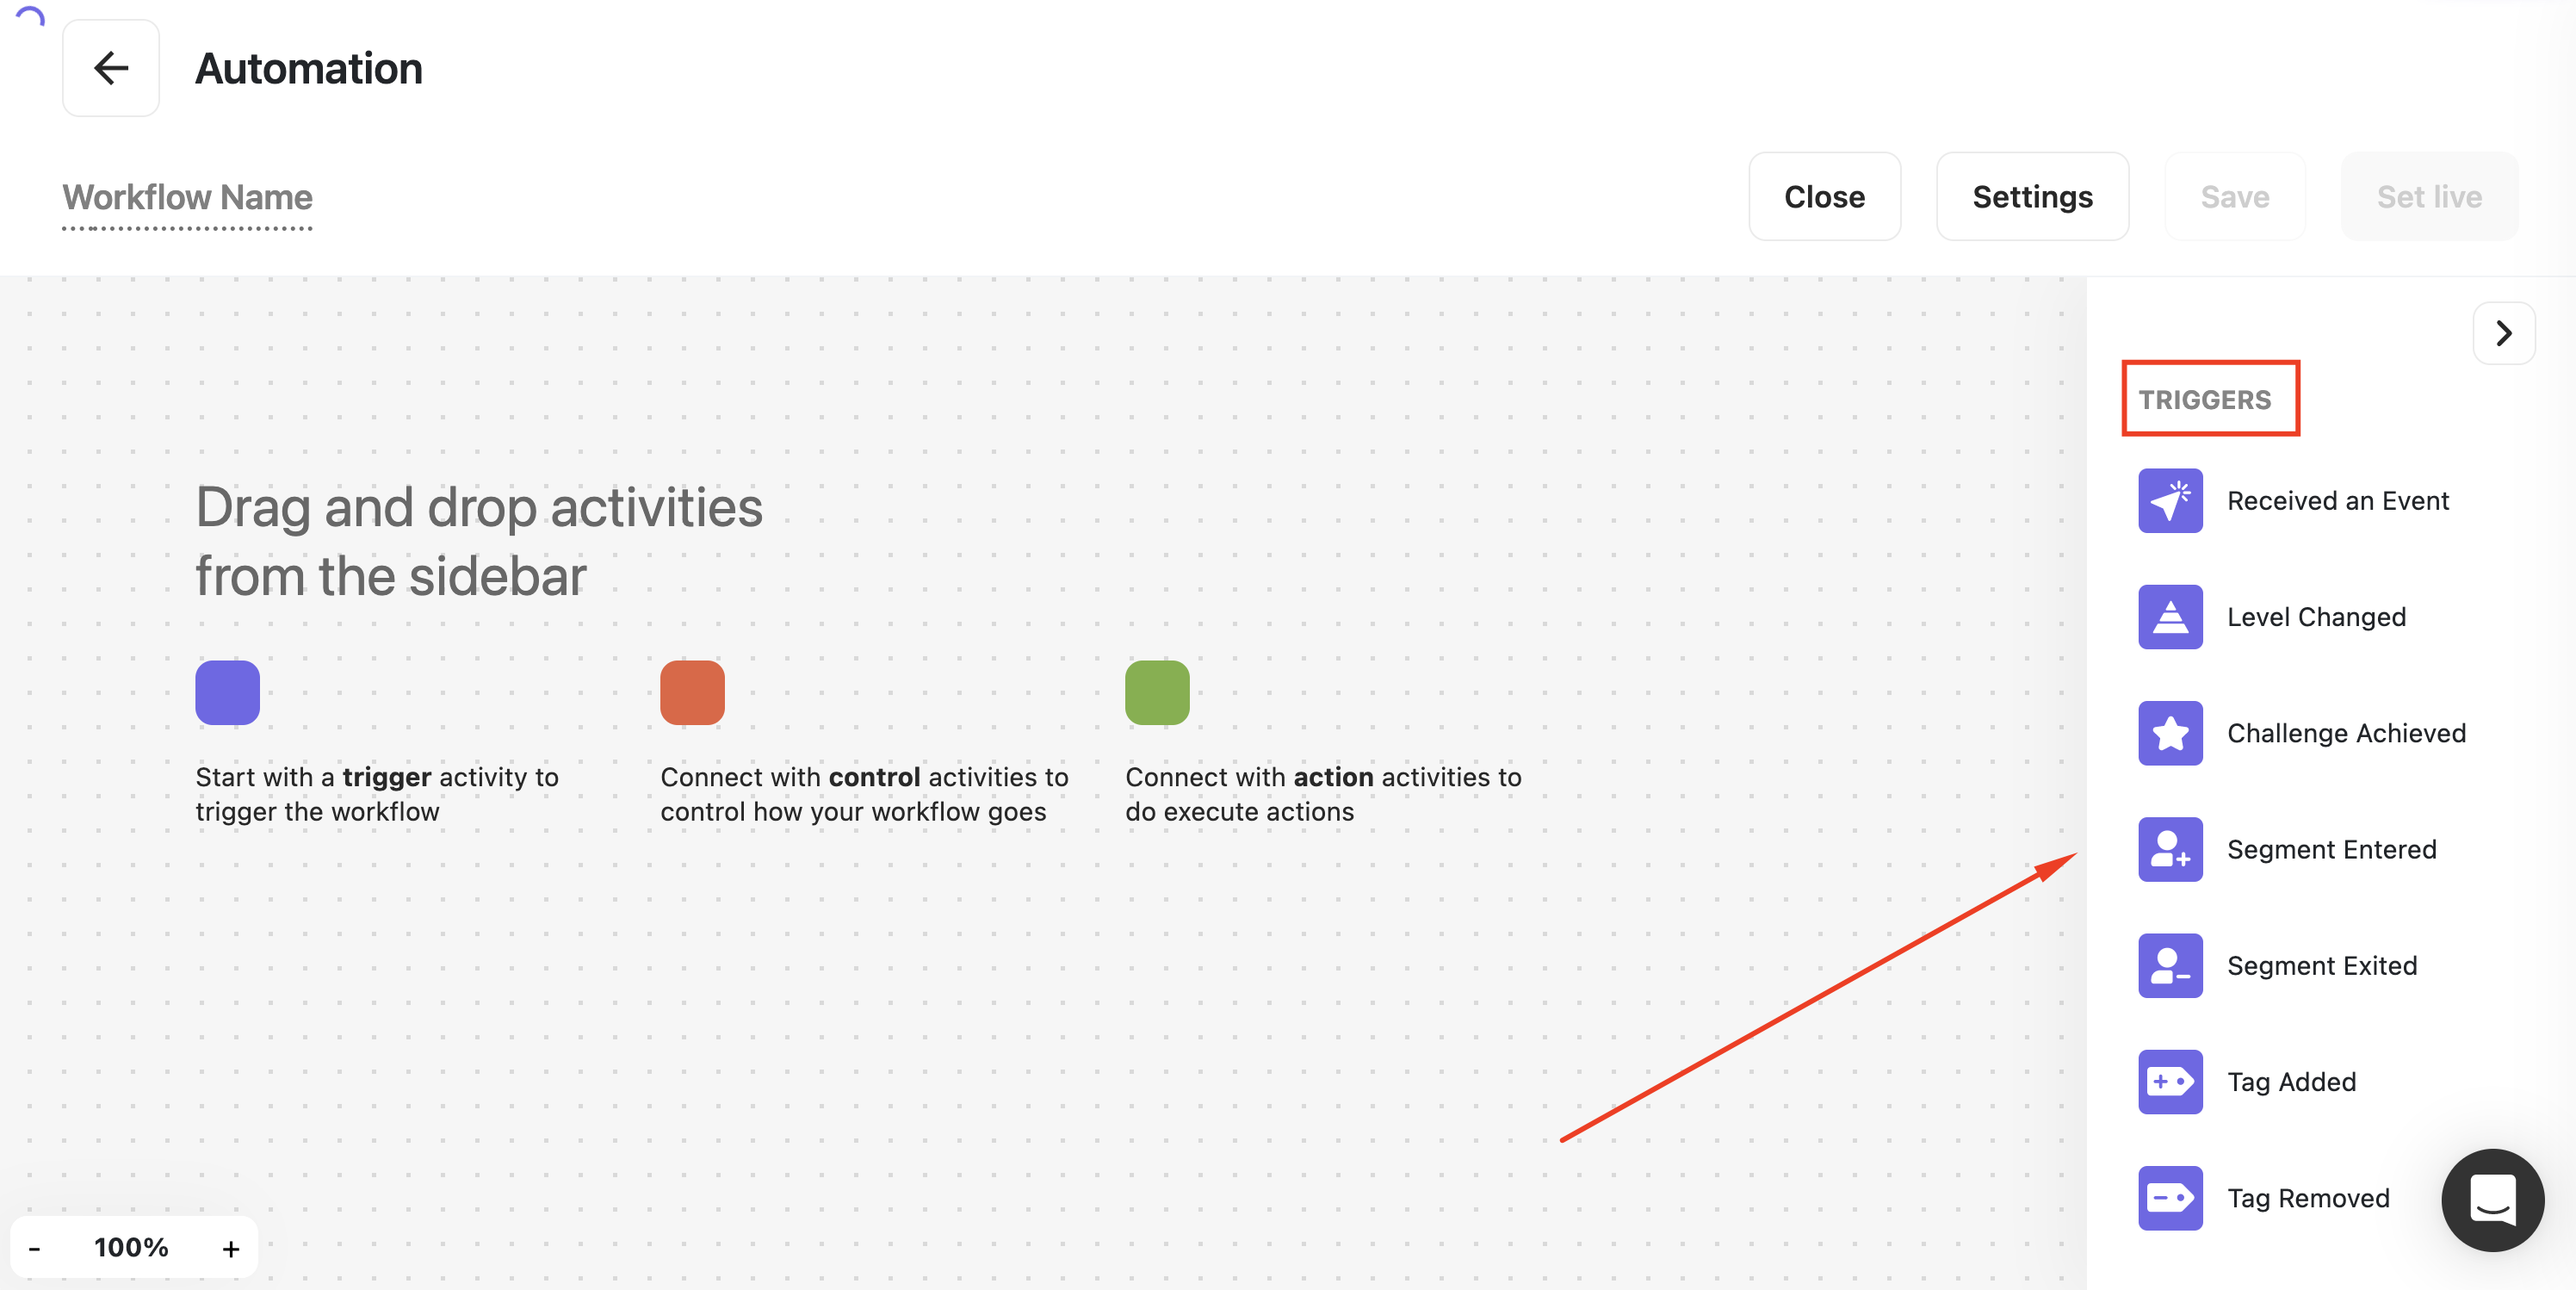 Define specific criteria for the chosen trigger event. Click on the selected trigger and choose criteria from the dropdown list. Remember to save your selections. [Learn more about Triggers and their criteria](/product-documentation/automation-campaigns/automation-triggers).
At this stage, you have two choices:
* **Direct Action**: Add an action to be executed immediately after the trigger is activated.
* **Control Mechanisms**: Alternatively, you can use control mechanisms to manage the workflow before executing actions. Choose from:
1. **Wait for Event**: Delay the next action until a specific event is completed by the customer.
2. **Time Delay**: Introduce a waiting period before the next action is triggered.
3. **Conditional Split**: Create divergent paths within the workflow based on different conditions.
4. **A/B Test:** Split audiences into groups (A & B) with a fully customizable ratio (e.g., 50/50, 70/30).
[Learn how each of the controls works.](/product-documentation/automation-campaigns/automation-controls)
Actions are commands executed by Gameball when specific conditions are met within the workflow. These actions can be triggered when the workflow is initiated or when predetermined criteria are fulfilled.
Available actions include:
* **Send Email**
* **Send Mobile Push**
* **Send Web Message**
* **Reward a Coupon**
* **Reward a Challenge**
* **Add Points**
* **Deduct Points**
* **Add Tag**
* **Remove Tag**
* **Send Webhook**
[Learn more about the actions and how you can set them up.](/product-documentation/automation-campaigns/automation-actions)
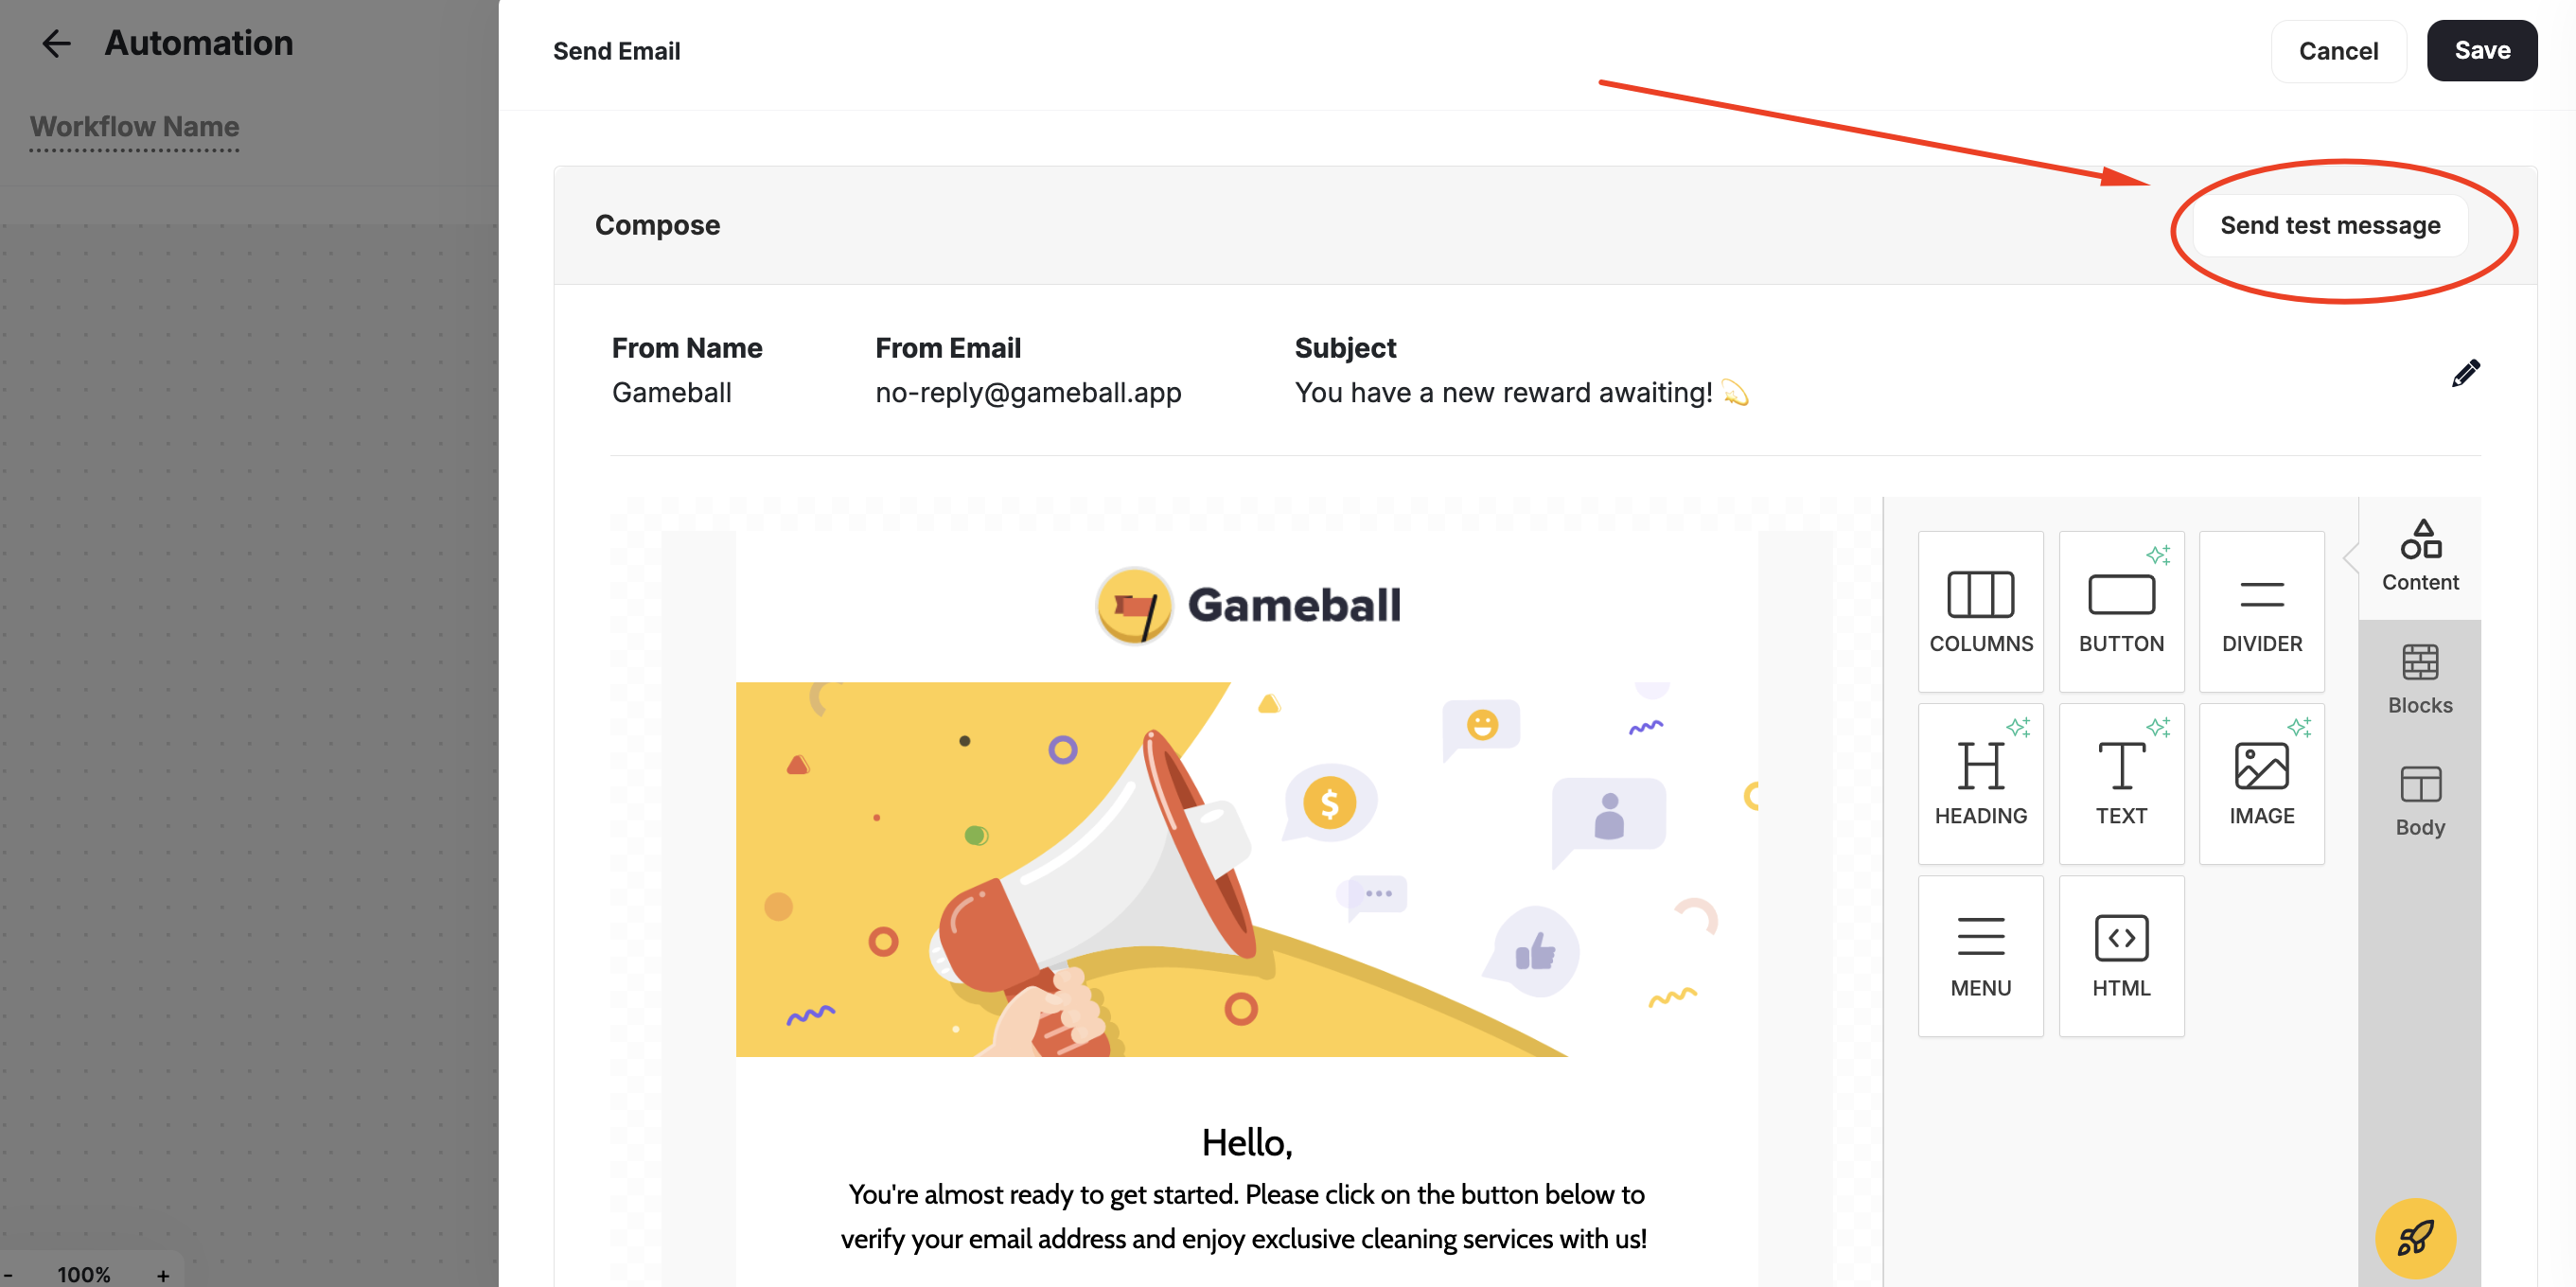
You can send a test email to yourself when using the "**Send Email**" as an action to a trigger in an automation.
Define specific criteria for the chosen trigger event. Click on the selected trigger and choose criteria from the dropdown list. Remember to save your selections. [Learn more about Triggers and their criteria](/product-documentation/automation-campaigns/automation-triggers).
At this stage, you have two choices:
* **Direct Action**: Add an action to be executed immediately after the trigger is activated.
* **Control Mechanisms**: Alternatively, you can use control mechanisms to manage the workflow before executing actions. Choose from:
1. **Wait for Event**: Delay the next action until a specific event is completed by the customer.
2. **Time Delay**: Introduce a waiting period before the next action is triggered.
3. **Conditional Split**: Create divergent paths within the workflow based on different conditions.
4. **A/B Test:** Split audiences into groups (A & B) with a fully customizable ratio (e.g., 50/50, 70/30).
[Learn how each of the controls works.](/product-documentation/automation-campaigns/automation-controls)
Actions are commands executed by Gameball when specific conditions are met within the workflow. These actions can be triggered when the workflow is initiated or when predetermined criteria are fulfilled.
Available actions include:
* **Send Email**
* **Send Mobile Push**
* **Send Web Message**
* **Reward a Coupon**
* **Reward a Challenge**
* **Add Points**
* **Deduct Points**
* **Add Tag**
* **Remove Tag**
* **Send Webhook**
[Learn more about the actions and how you can set them up.](/product-documentation/automation-campaigns/automation-actions)
You can send a test email to yourself when using the "**Send Email**" as an action to a trigger in an automation.
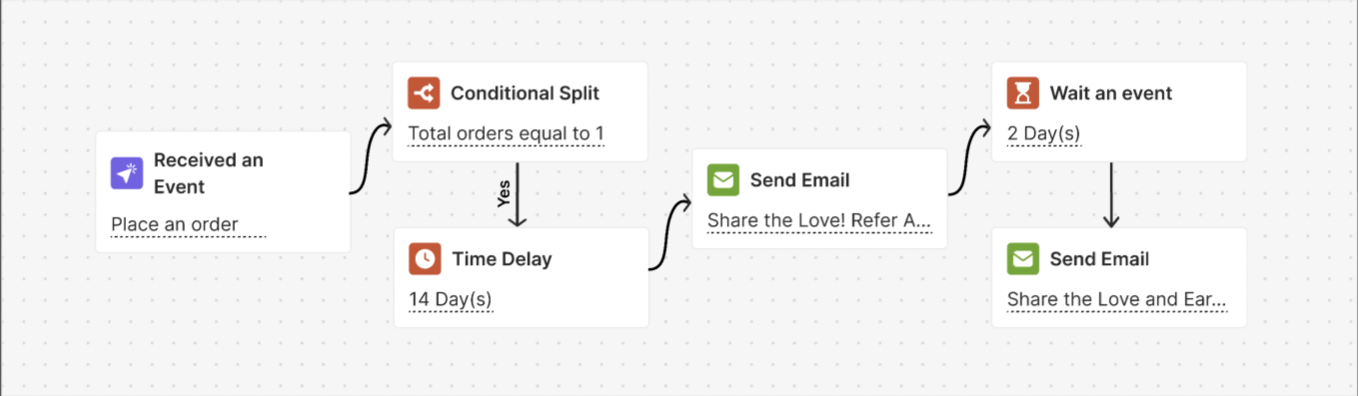
 You can expand your automation as necessary, as long as it maintains coherence, streamlines manual tasks, saves time, and serves its intended purpose. Below is an illustrative example of an interconnected workflow.
 ***
## Using Attributes in Automation
You can use attributes to set your own rules for each trigger, action, or control. Here is how attributes work in automations.
By clicking the **Plus Icon** inside any trigger or actions, a small pop-up will appear giving you a list of attributes under 3 different tabs:
* **Previous Steps:** Dynamic attributes passed by previously chosen Event, Condition, or API (such as Order ID, Points Earned, or Friend Name) from one node to another inside your automations. Variables here will be dependant on attributes used in the previous trigger or action.
* **Customer Variables:** All customer-related variables such as name, ID, number, referral link, etc.
* **Global Variables:** Variables that have to do with your general configurations, like chosen currency, points name, score name, etc.
***
## Using Attributes in Automation
You can use attributes to set your own rules for each trigger, action, or control. Here is how attributes work in automations.
By clicking the **Plus Icon** inside any trigger or actions, a small pop-up will appear giving you a list of attributes under 3 different tabs:
* **Previous Steps:** Dynamic attributes passed by previously chosen Event, Condition, or API (such as Order ID, Points Earned, or Friend Name) from one node to another inside your automations. Variables here will be dependant on attributes used in the previous trigger or action.
* **Customer Variables:** All customer-related variables such as name, ID, number, referral link, etc.
* **Global Variables:** Variables that have to do with your general configurations, like chosen currency, points name, score name, etc.
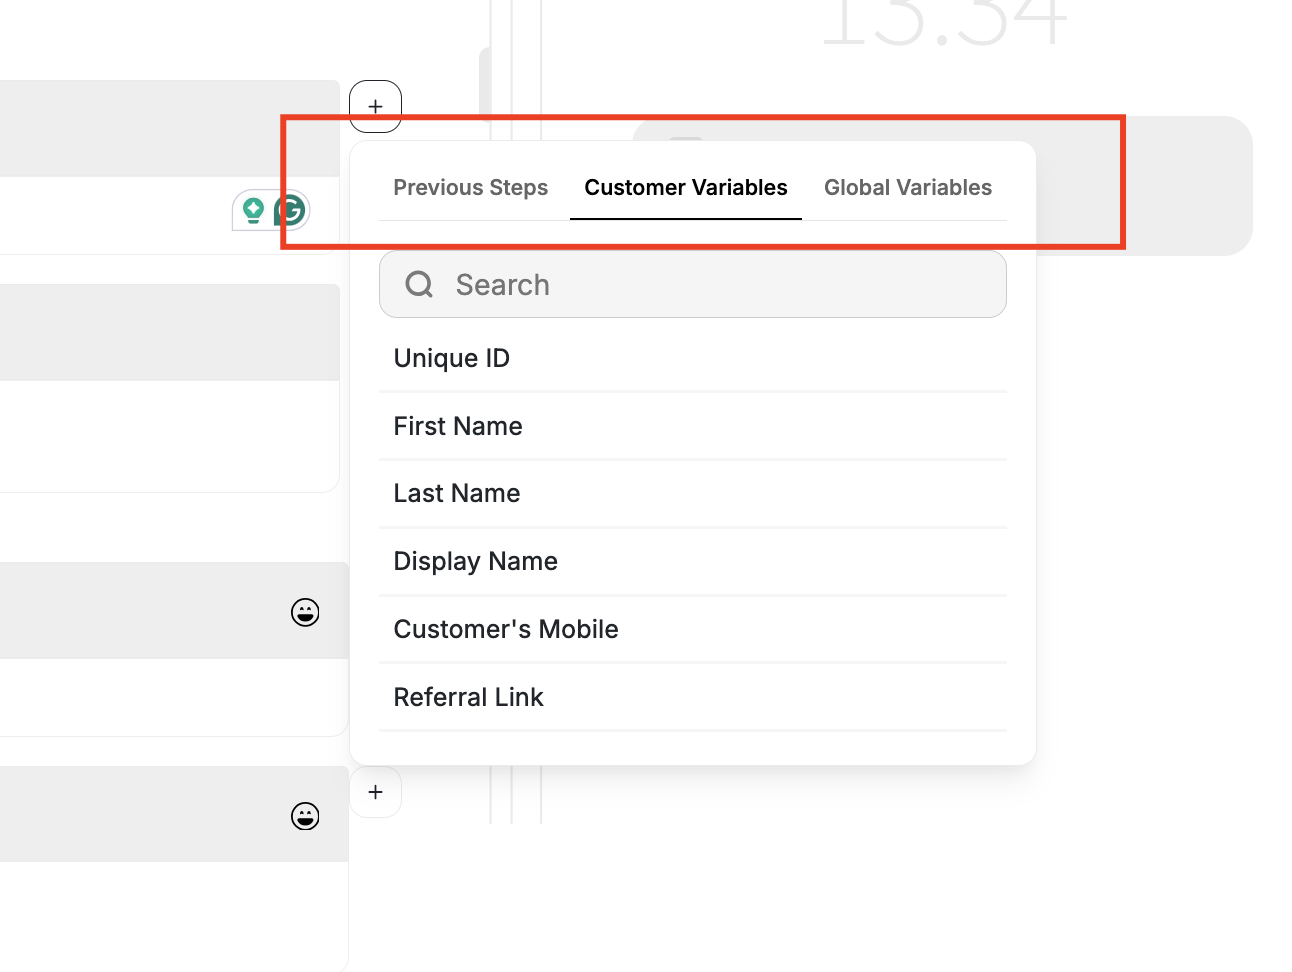 Here is a list of attributes you will find while creating your automation:
| Previous Steps | Customer Variables | Global Variables |
| ------------------------------------------------------------------------------------------------------------------------------------------------------------------------------------ | ------------------------------------------------------------------------------------------------------------------------------------------------------------------------------------------------------------------------------------------------------------------------------------------------------------------------------------------ | -------------------------------------------------------------------------------------------- |
| Depends on the previously used variables in the former step. ([Check this article for more details](/product-documentation/automation-campaigns/attributes-across-automation-nodes)) | Unique ID, First Name, Last Name, Display Name, Customer's Mobile, Referral Link, Mobile Referral Link, Points, Tier Up total progress, Score Name, Points, Coupon Code, Coupon Value, Reward Campaign Reward, Tier Entry Reward, Tier Lifetime Reward, location, membershipLevel, graduationDate, isMarried, occupation, company, hobbies | Equivalent value of total points, Currency, Points Name, Referral Link, Mobile Referral Link |
***
## Email Customization with Block Variables
Now, you have the ability to incorporate block variables directly into your email variables, enabling the creation of highly personalized and contextually relevant email content.
Each block within the automation is assigned a unique identifier in the form of a 4-digit ID, displayed in uppercase. For instance, if a block rewards a coupon, users can easily reference the coupon code variable under the email variables section, denoted by its ID, such as \[CP02] Reward a coupon.
Here is a list of attributes you will find while creating your automation:
| Previous Steps | Customer Variables | Global Variables |
| ------------------------------------------------------------------------------------------------------------------------------------------------------------------------------------ | ------------------------------------------------------------------------------------------------------------------------------------------------------------------------------------------------------------------------------------------------------------------------------------------------------------------------------------------ | -------------------------------------------------------------------------------------------- |
| Depends on the previously used variables in the former step. ([Check this article for more details](/product-documentation/automation-campaigns/attributes-across-automation-nodes)) | Unique ID, First Name, Last Name, Display Name, Customer's Mobile, Referral Link, Mobile Referral Link, Points, Tier Up total progress, Score Name, Points, Coupon Code, Coupon Value, Reward Campaign Reward, Tier Entry Reward, Tier Lifetime Reward, location, membershipLevel, graduationDate, isMarried, occupation, company, hobbies | Equivalent value of total points, Currency, Points Name, Referral Link, Mobile Referral Link |
***
## Email Customization with Block Variables
Now, you have the ability to incorporate block variables directly into your email variables, enabling the creation of highly personalized and contextually relevant email content.
Each block within the automation is assigned a unique identifier in the form of a 4-digit ID, displayed in uppercase. For instance, if a block rewards a coupon, users can easily reference the coupon code variable under the email variables section, denoted by its ID, such as \[CP02] Reward a coupon.
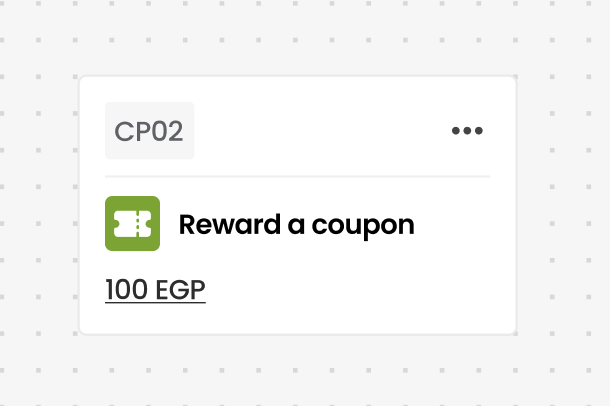 Moreover, if there are multiple instances of the "Reward a coupon" block within the automation, all relevant coupon code variables are conveniently listed under the email variables, allowing for comprehensive customization.
These variables will only appear in the email variables list if they precede the block being edited.
***
## Tracking Customers' Progress in Automation
### On the Main Automation Page
Moreover, if there are multiple instances of the "Reward a coupon" block within the automation, all relevant coupon code variables are conveniently listed under the email variables, allowing for comprehensive customization.
These variables will only appear in the email variables list if they precede the block being edited.
***
## Tracking Customers' Progress in Automation
### On the Main Automation Page
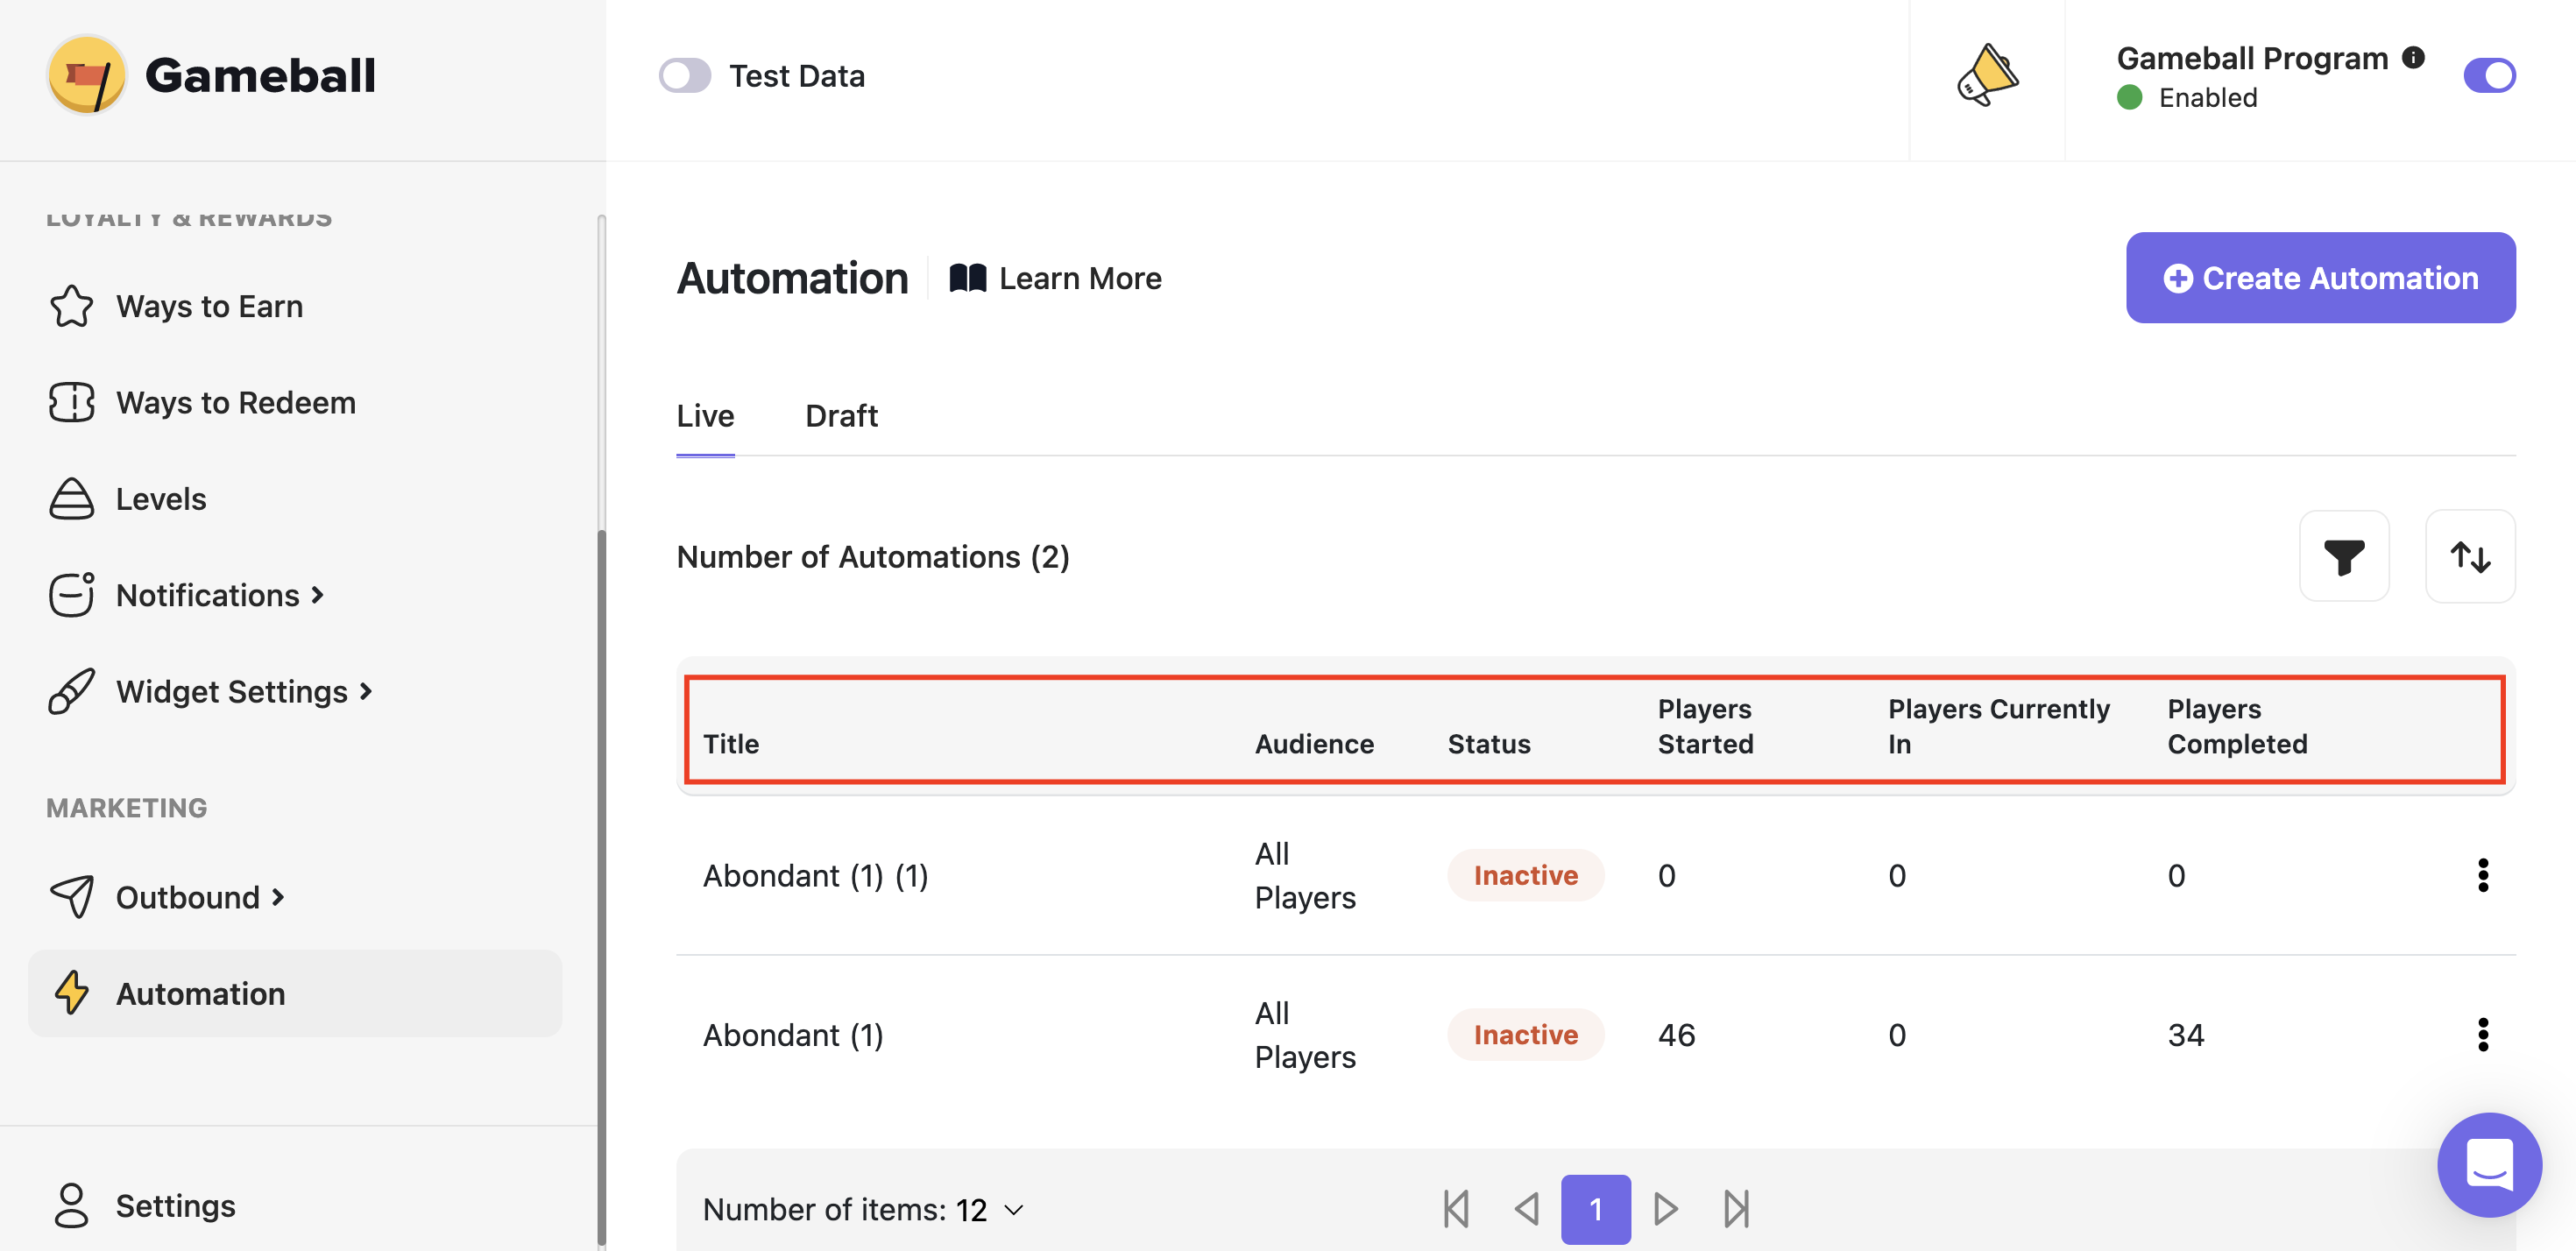 Check the data list beside each automation. This bar displays:
* The targeted audience chosen under **Audience**.
* The number of customers who started or had the automation applied to them under **Customers Started**.
* Information about which stage of the automation the customers have reached under **Customers Currently in**.
* The count of customers who have completed all automation stages under **Customers Completed**.
### Detailed View
To check a detailed view, select an **automation** and click **Show More Details**.
Check the data list beside each automation. This bar displays:
* The targeted audience chosen under **Audience**.
* The number of customers who started or had the automation applied to them under **Customers Started**.
* Information about which stage of the automation the customers have reached under **Customers Currently in**.
* The count of customers who have completed all automation stages under **Customers Completed**.
### Detailed View
To check a detailed view, select an **automation** and click **Show More Details**.
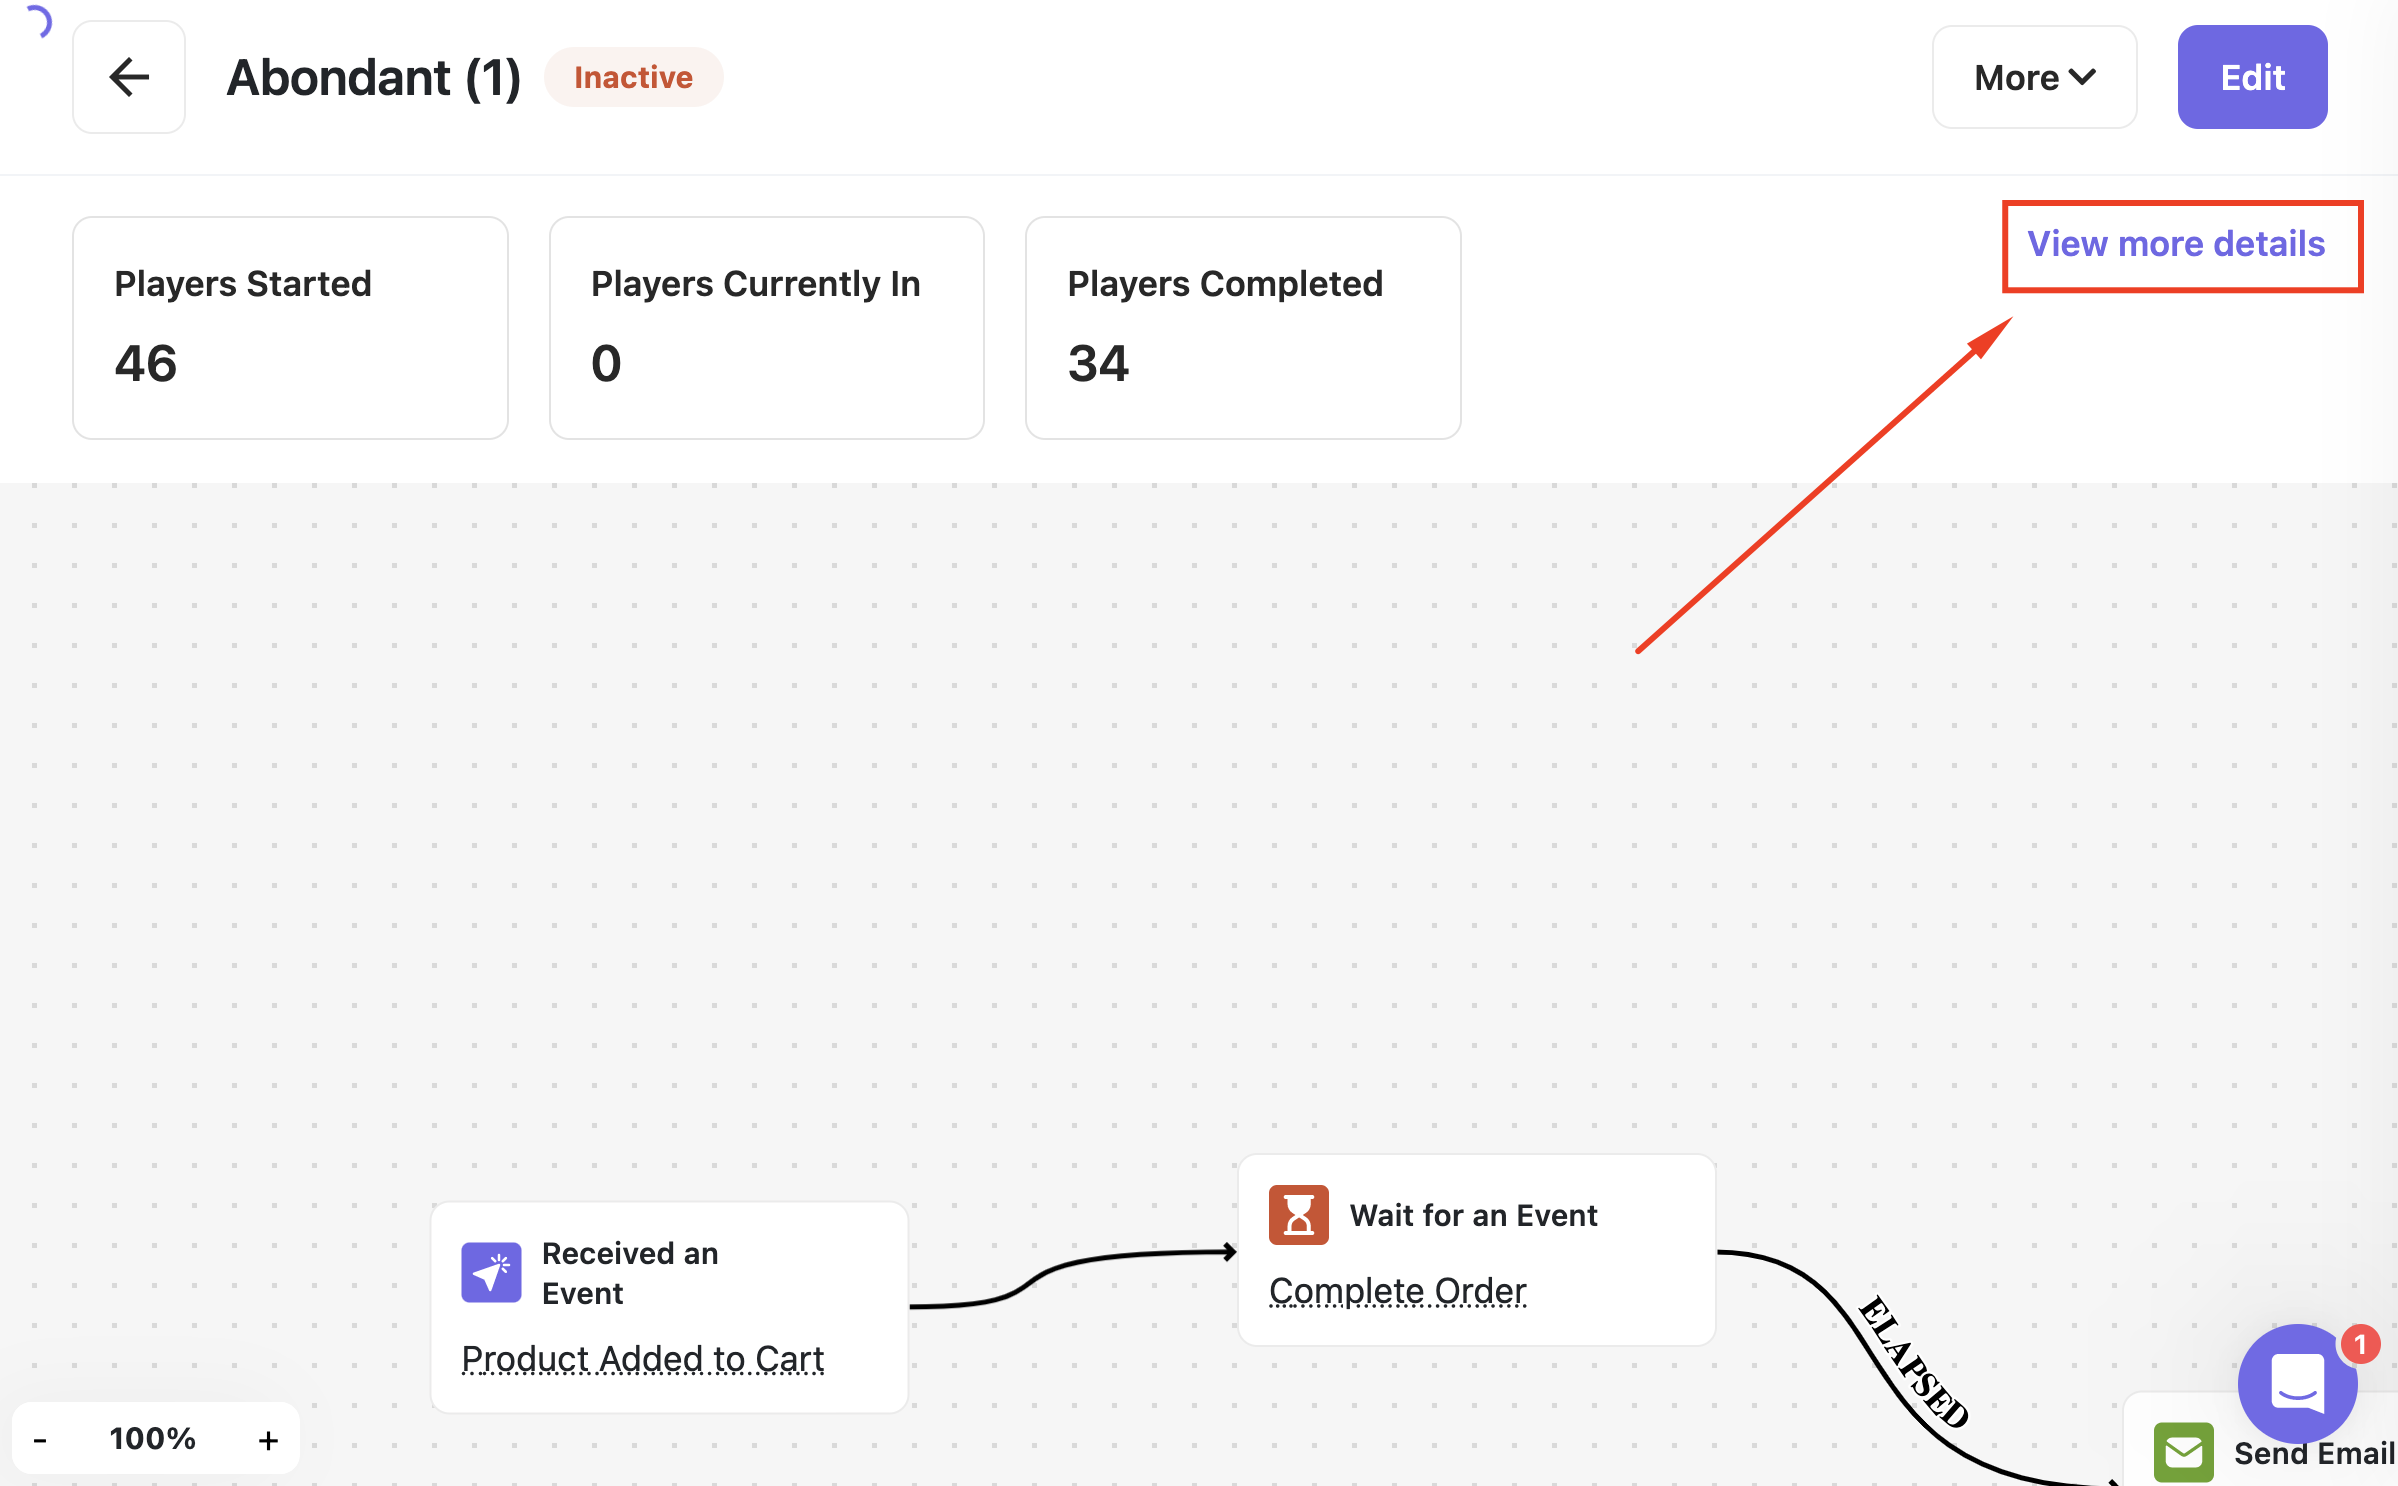 You'll be directed to a page showing details of all customers who entered the automation flow and their current stage.
***
## Where to Find the Inactive Automation
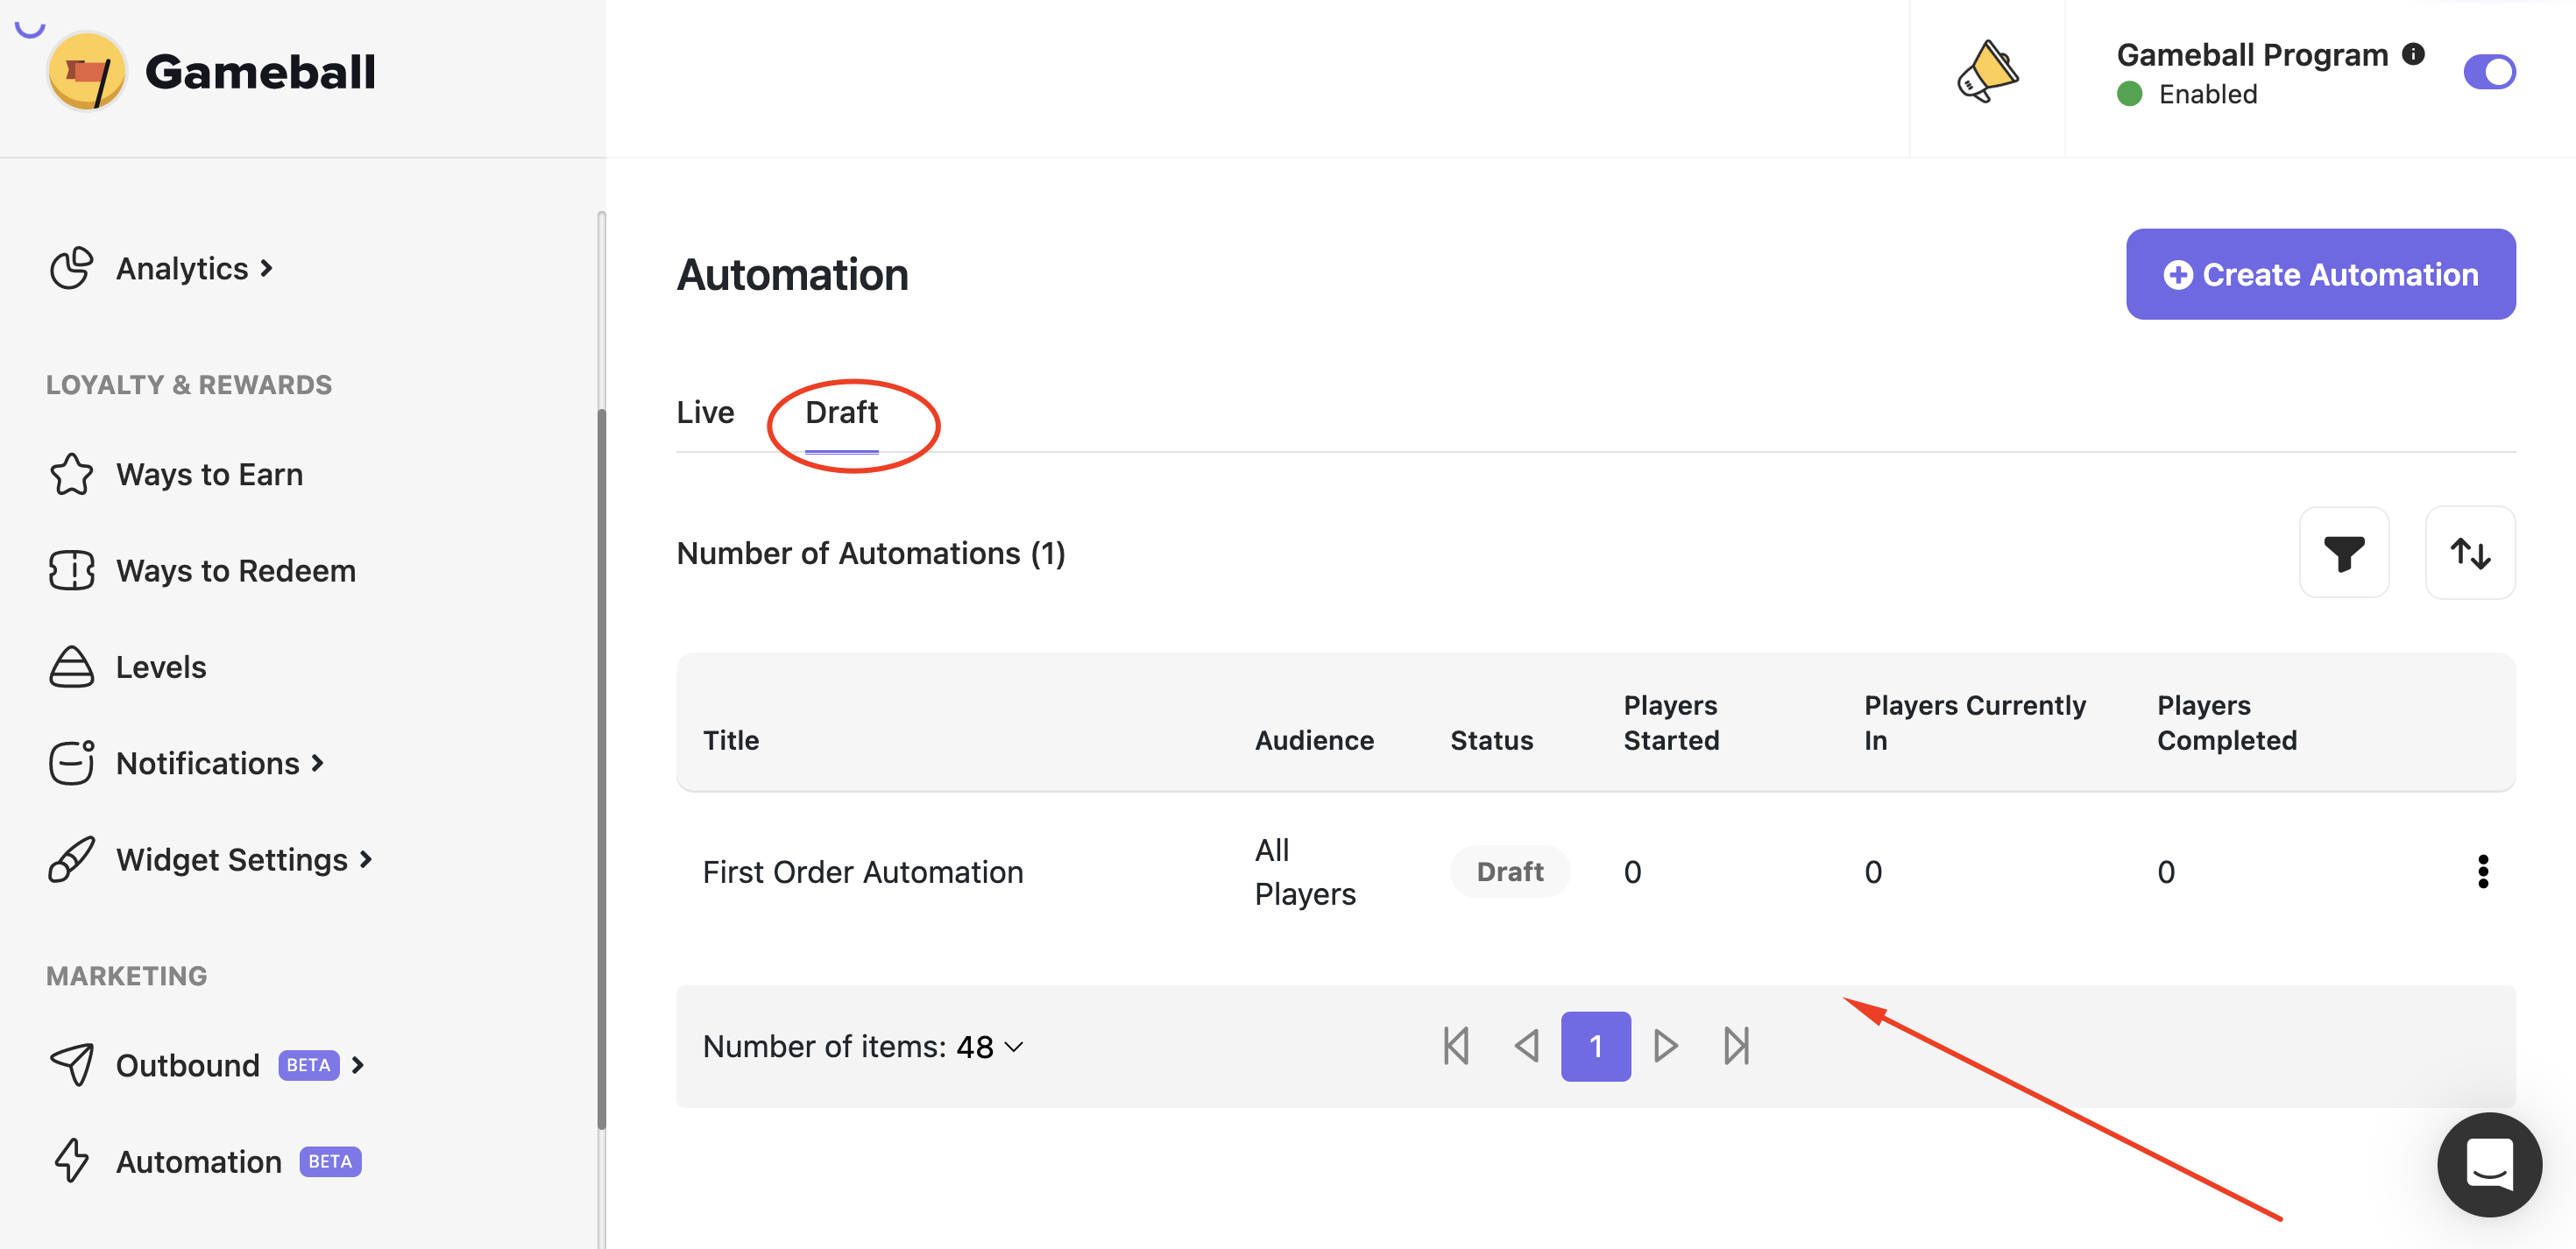
Navigate to the Automation main page from the left sidebar.
Click **Draft** to filter to inactive automations.
You will find a list of all your saved inactive automations.
You'll be directed to a page showing details of all customers who entered the automation flow and their current stage.
***
## Where to Find the Inactive Automation
Navigate to the Automation main page from the left sidebar.
Click **Draft** to filter to inactive automations.
You will find a list of all your saved inactive automations.
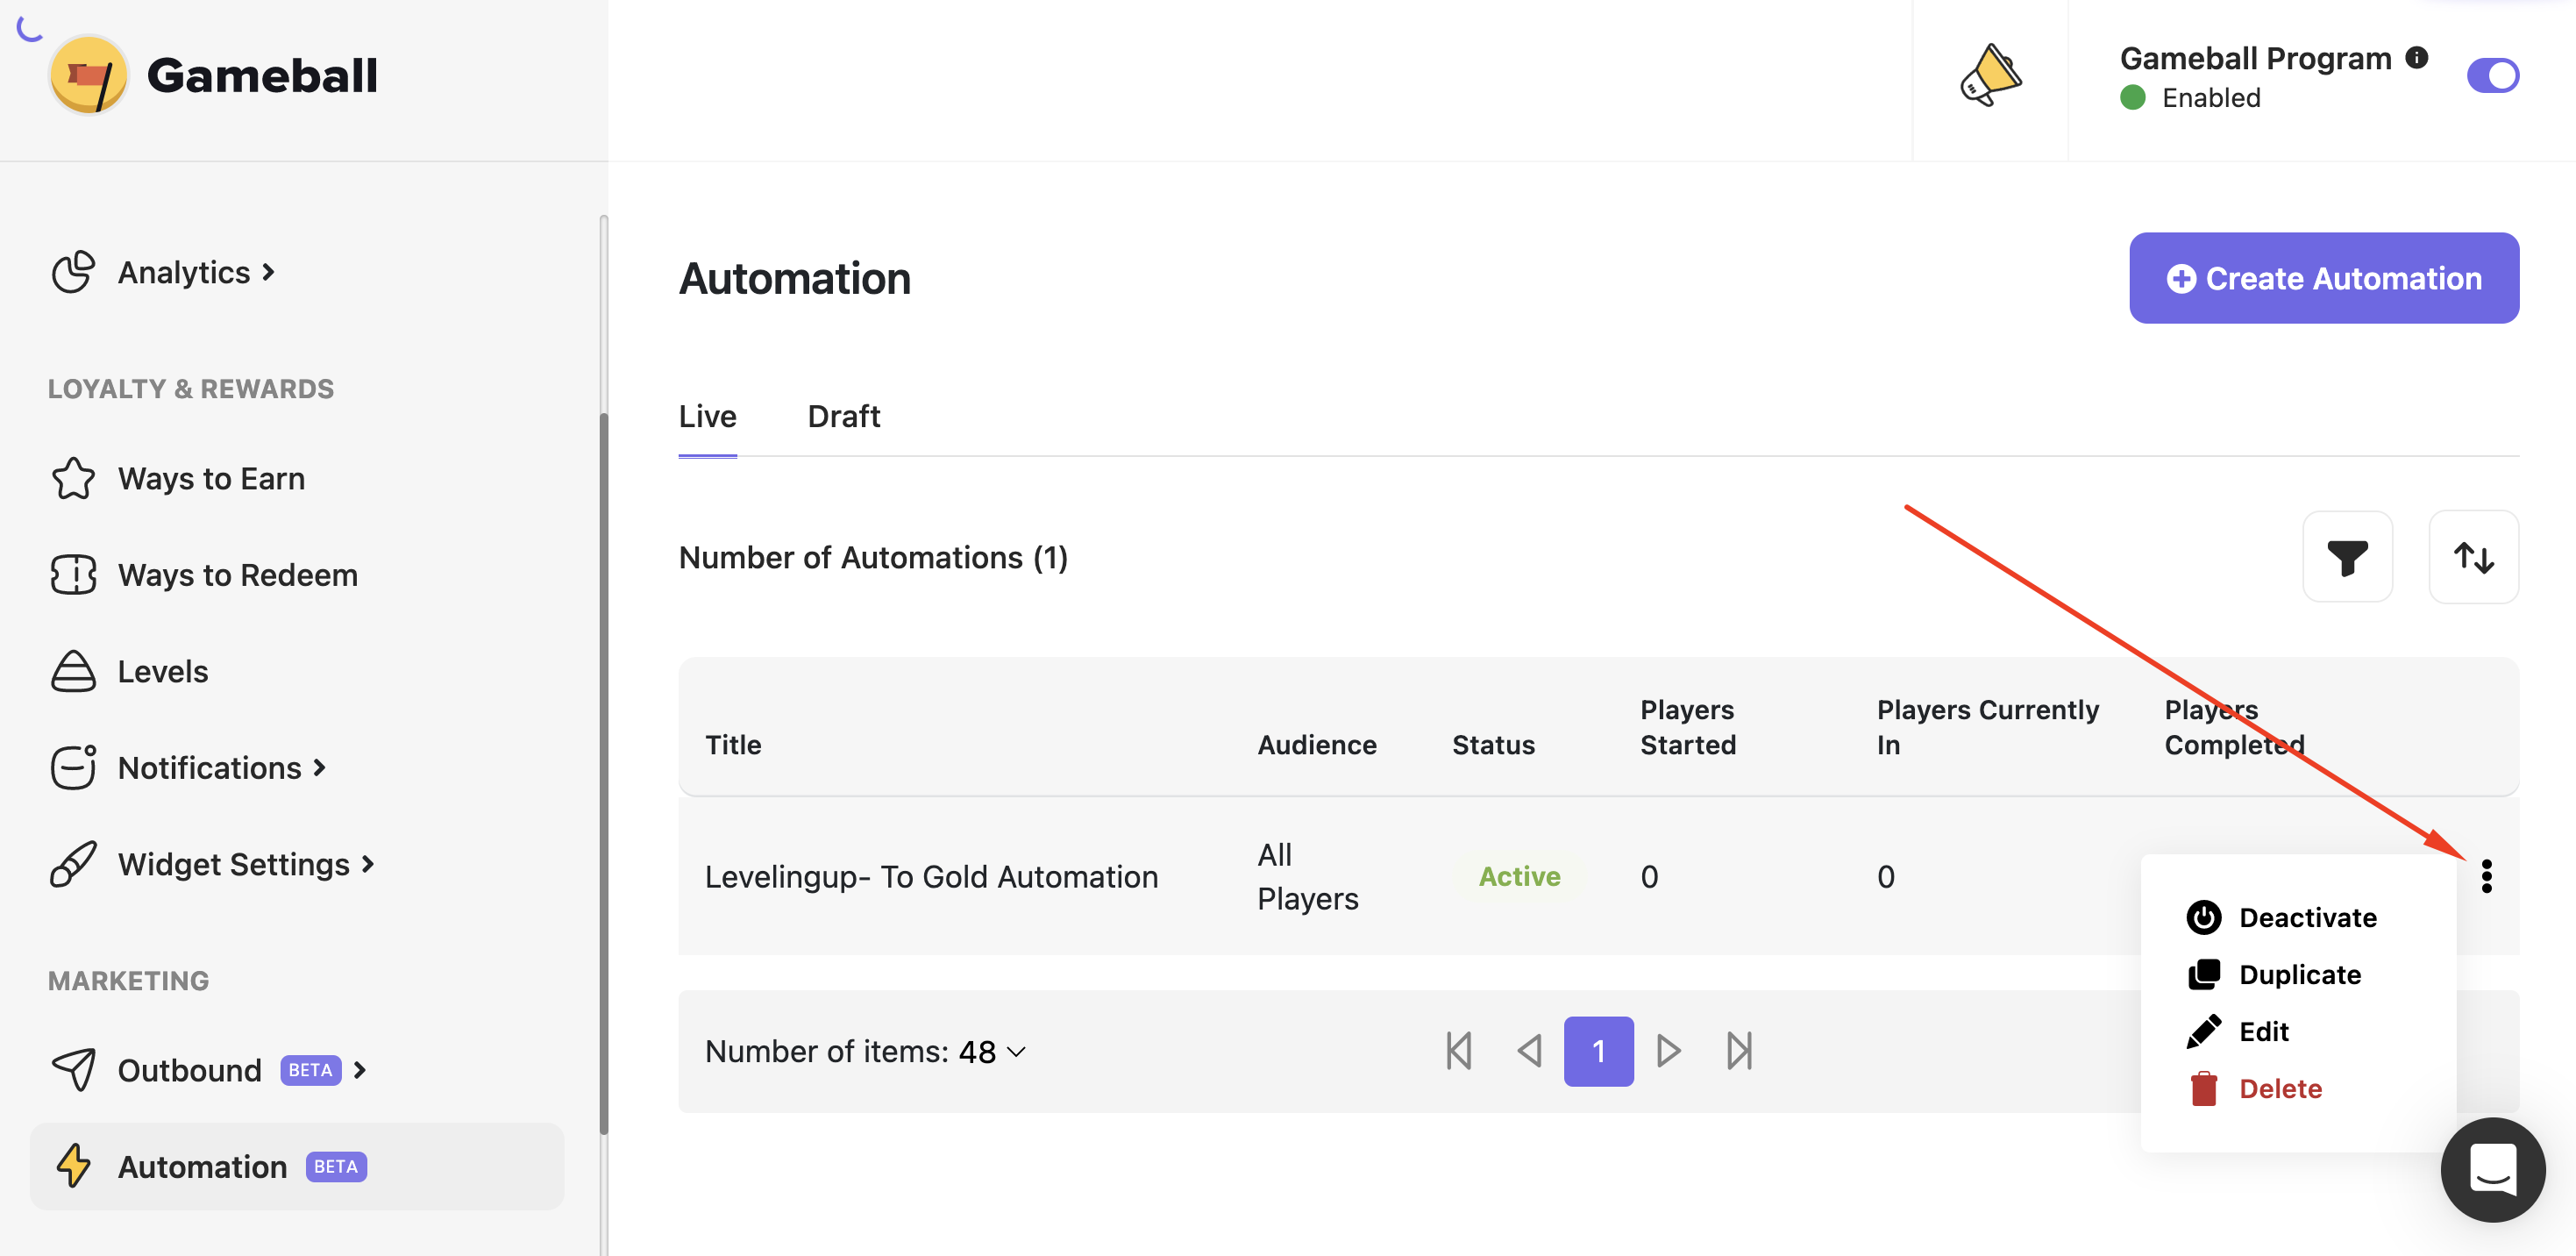
 ### Managing Existing Automation
For Automation **Deactivation, Duplication, Editing, or Deletion**:
Hover over the **3 dots icon** next to any existing automation.
Choose from the **menu** the action that you want to do:
* Deactivate
* Duplicate
* Edit
* Delete
### Managing Existing Automation
For Automation **Deactivation, Duplication, Editing, or Deletion**:
Hover over the **3 dots icon** next to any existing automation.
Choose from the **menu** the action that you want to do:
* Deactivate
* Duplicate
* Edit
* Delete
 By following these steps, you can efficiently create, track, and manage automated workflows using Gameball's Automation Campaigns.
***
## Export Customers from All Automation Action & Control Nodes
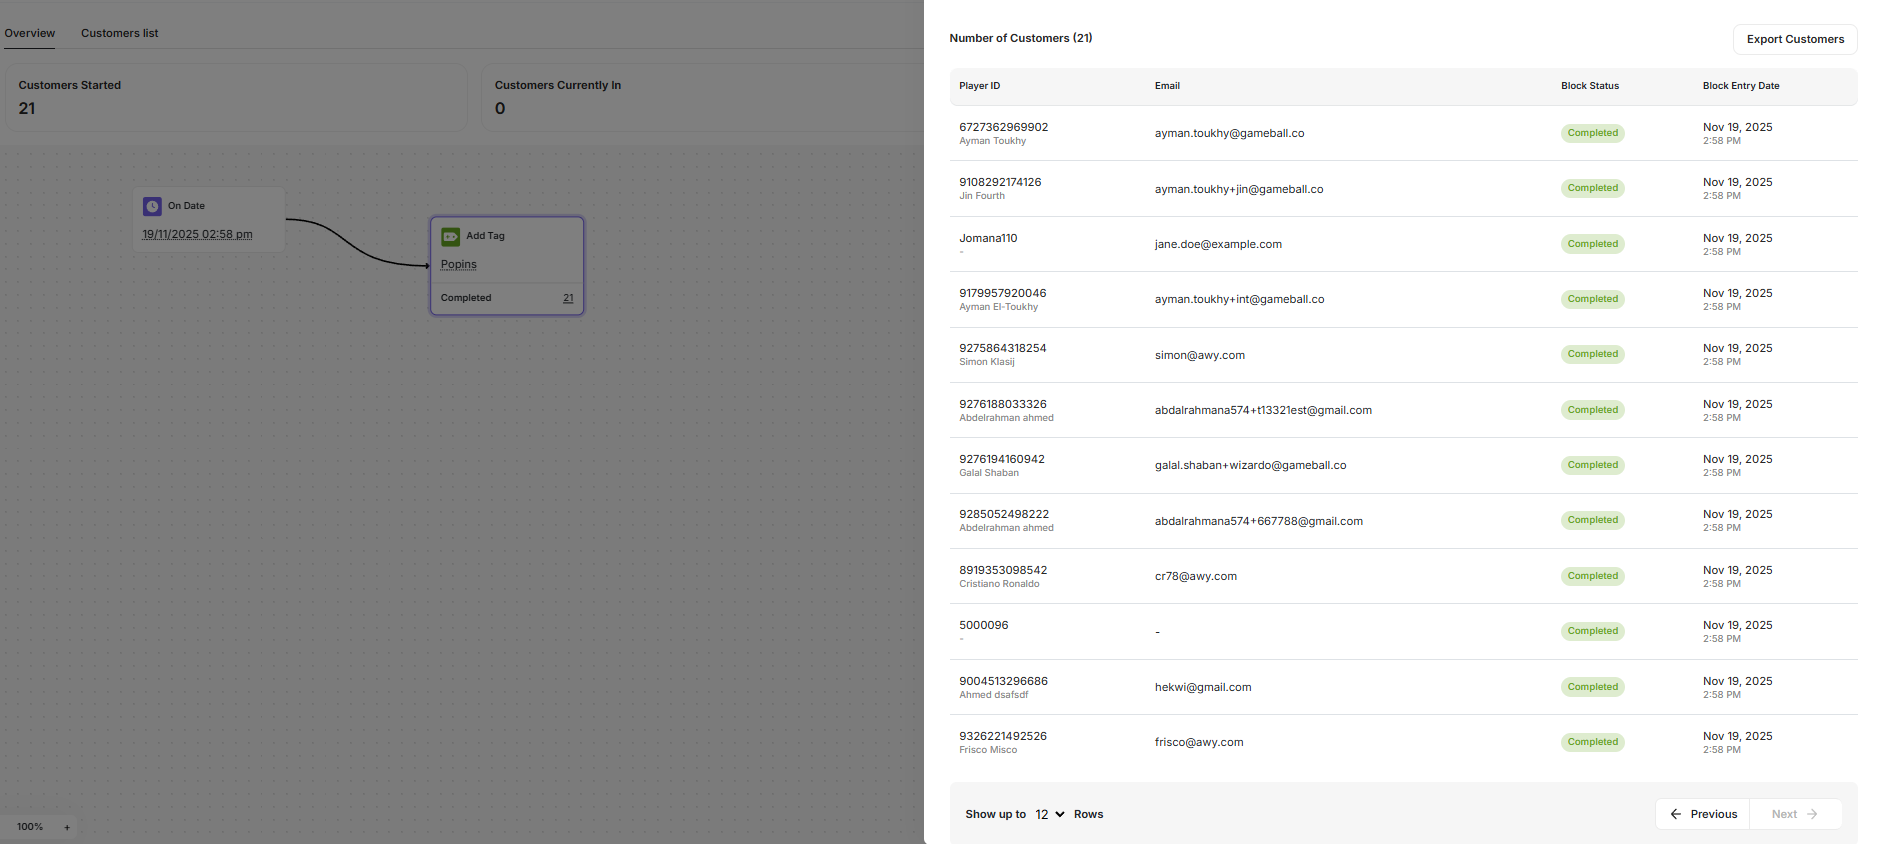
You can now export customers who reach any **Action** or **Control** node inside an automation flow.
This enhancement allows teams to run deeper analysis, build external segments, integrate with other tools, or take manual actions outside Gameball.
By following these steps, you can efficiently create, track, and manage automated workflows using Gameball's Automation Campaigns.
***
## Export Customers from All Automation Action & Control Nodes
You can now export customers who reach any **Action** or **Control** node inside an automation flow.
This enhancement allows teams to run deeper analysis, build external segments, integrate with other tools, or take manual actions outside Gameball.
 ### Export Availability
All **Action** and **Control** nodes now include a new option: **Export Customers**. Supported node types:
Send Email, Send Web Message, Grant Reward, and others.
Wait, Time Delay, Condition, A/B Test.
### Export Behavior
* Selecting **Export Customers** initiates a CSV file export of all customers who have **successfully reached** the selected node.
* The export includes **full historical data**, not just recent activity.
* Once prepared, the system sends the CSV file to you via **email**.
### Export Availability
All **Action** and **Control** nodes now include a new option: **Export Customers**. Supported node types:
Send Email, Send Web Message, Grant Reward, and others.
Wait, Time Delay, Condition, A/B Test.
### Export Behavior
* Selecting **Export Customers** initiates a CSV file export of all customers who have **successfully reached** the selected node.
* The export includes **full historical data**, not just recent activity.
* Once prepared, the system sends the CSV file to you via **email**.