> ## Documentation Index
> Fetch the complete documentation index at: https://docs.gameball.co/llms.txt
> Use this file to discover all available pages before exploring further.
# How Do I Create and Configure Email Campaigns?
> A Step-by-Step guide to create and configure an Email Communication Campaign with Gameball.
Email marketing remains a cornerstone strategy for businesses, especially in e-commerce, offering a direct line of communication with customers. It's a vital tool for sharing updates on new products, collections, promo codes, and flash sales, fostering lasting relationships with buyers.
***
## Utilizing Gameball's Email Communication Campaigns
Gameball empowers you to customize email communication campaigns, including Guest emails, to enhance the customers' journey and drive engagement. With Gameball's Email Communication Campaign feature, you can create personalized emails for various scenarios, such as:
Announce new product lines and collections to keep customers informed and excited.
Highlight featured or top-selling products to drive customer interest.
Deliver exclusive discount codes directly to customers' inboxes.
Send thank-you messages to strengthen customer relationships and loyalty.
***
## Configuring an Email Campaign
To set up an email communication campaign from scratch in Gameball, follow these steps:
Navigate to the **Gameball Dashboard**.
Click on **Campaigns**.
Choose **Communication**, then click on the **Create Communication Campaign** button.
From the **Start from Scratch** section, choose **Emails**.
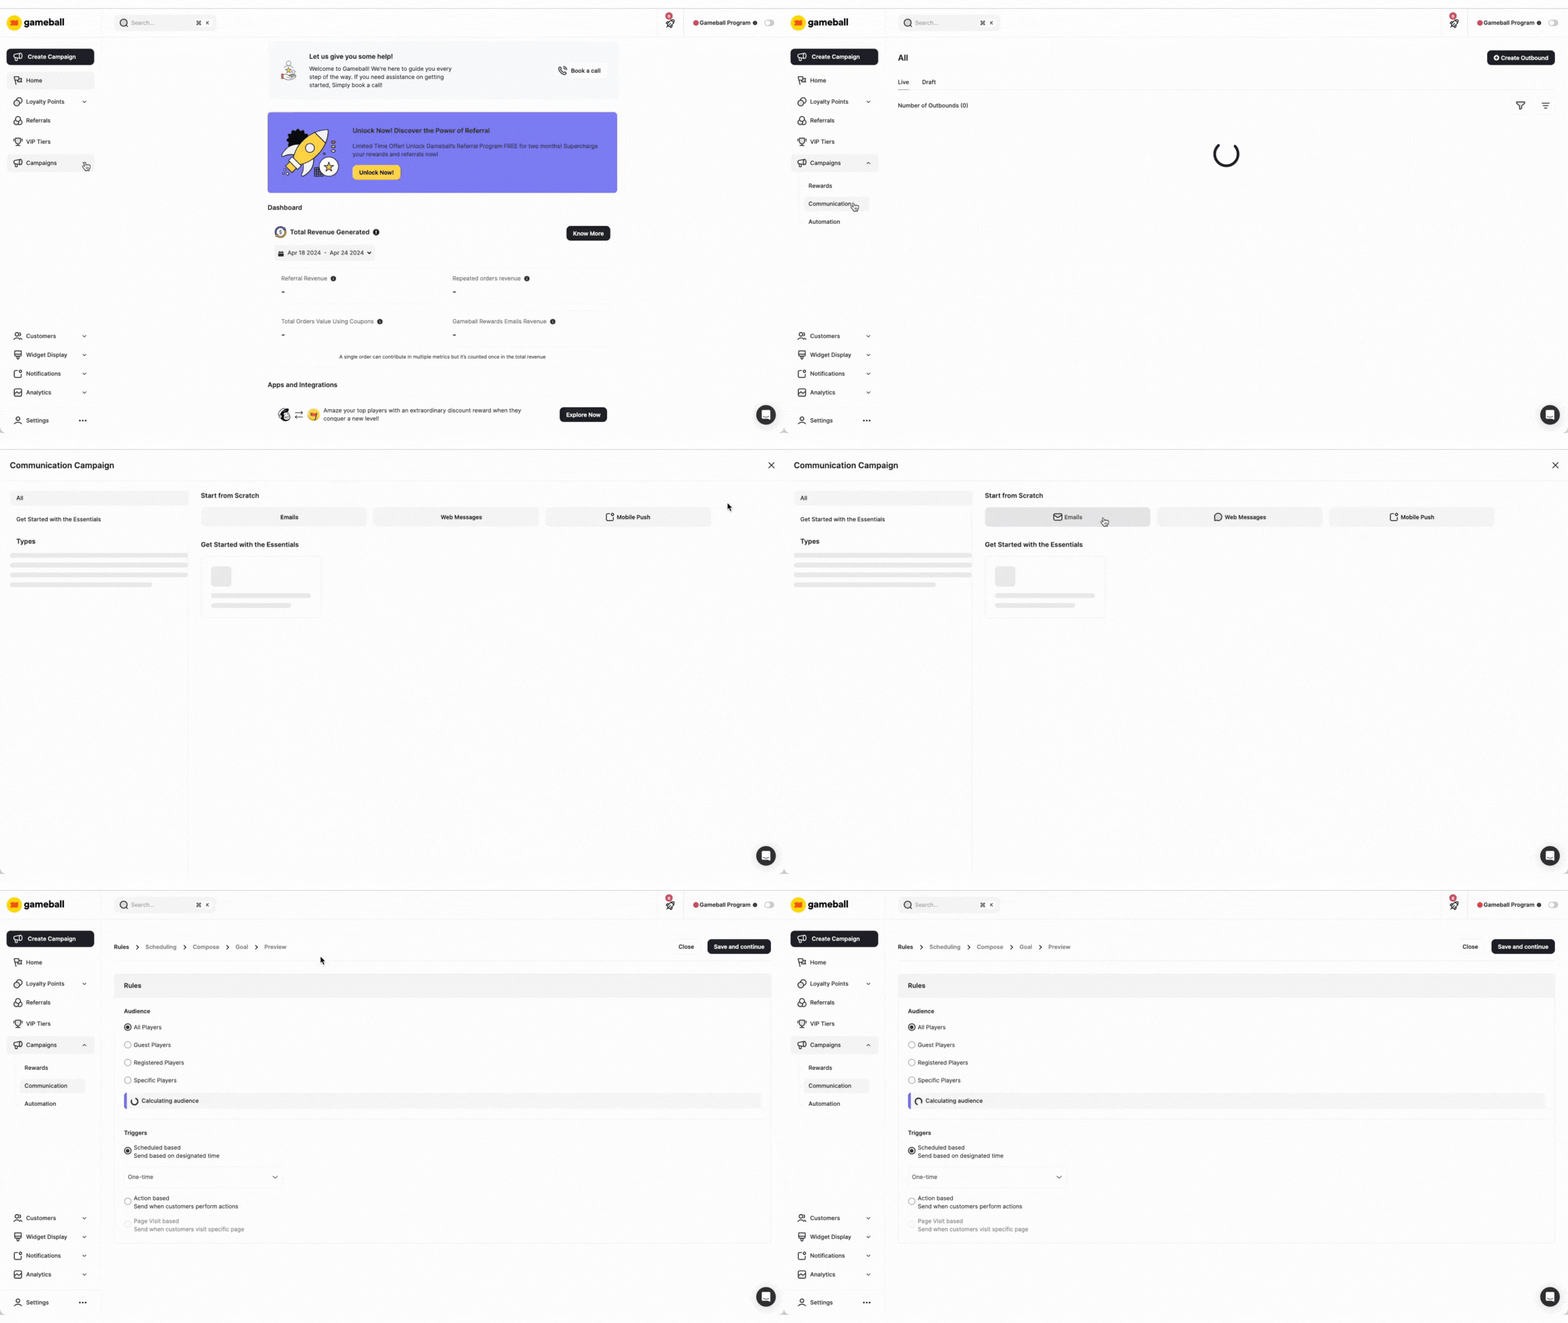 Now you have created a new Email communication campaign. Follow these steps to customize it based on your preferences:
***
### Step 1: Rules
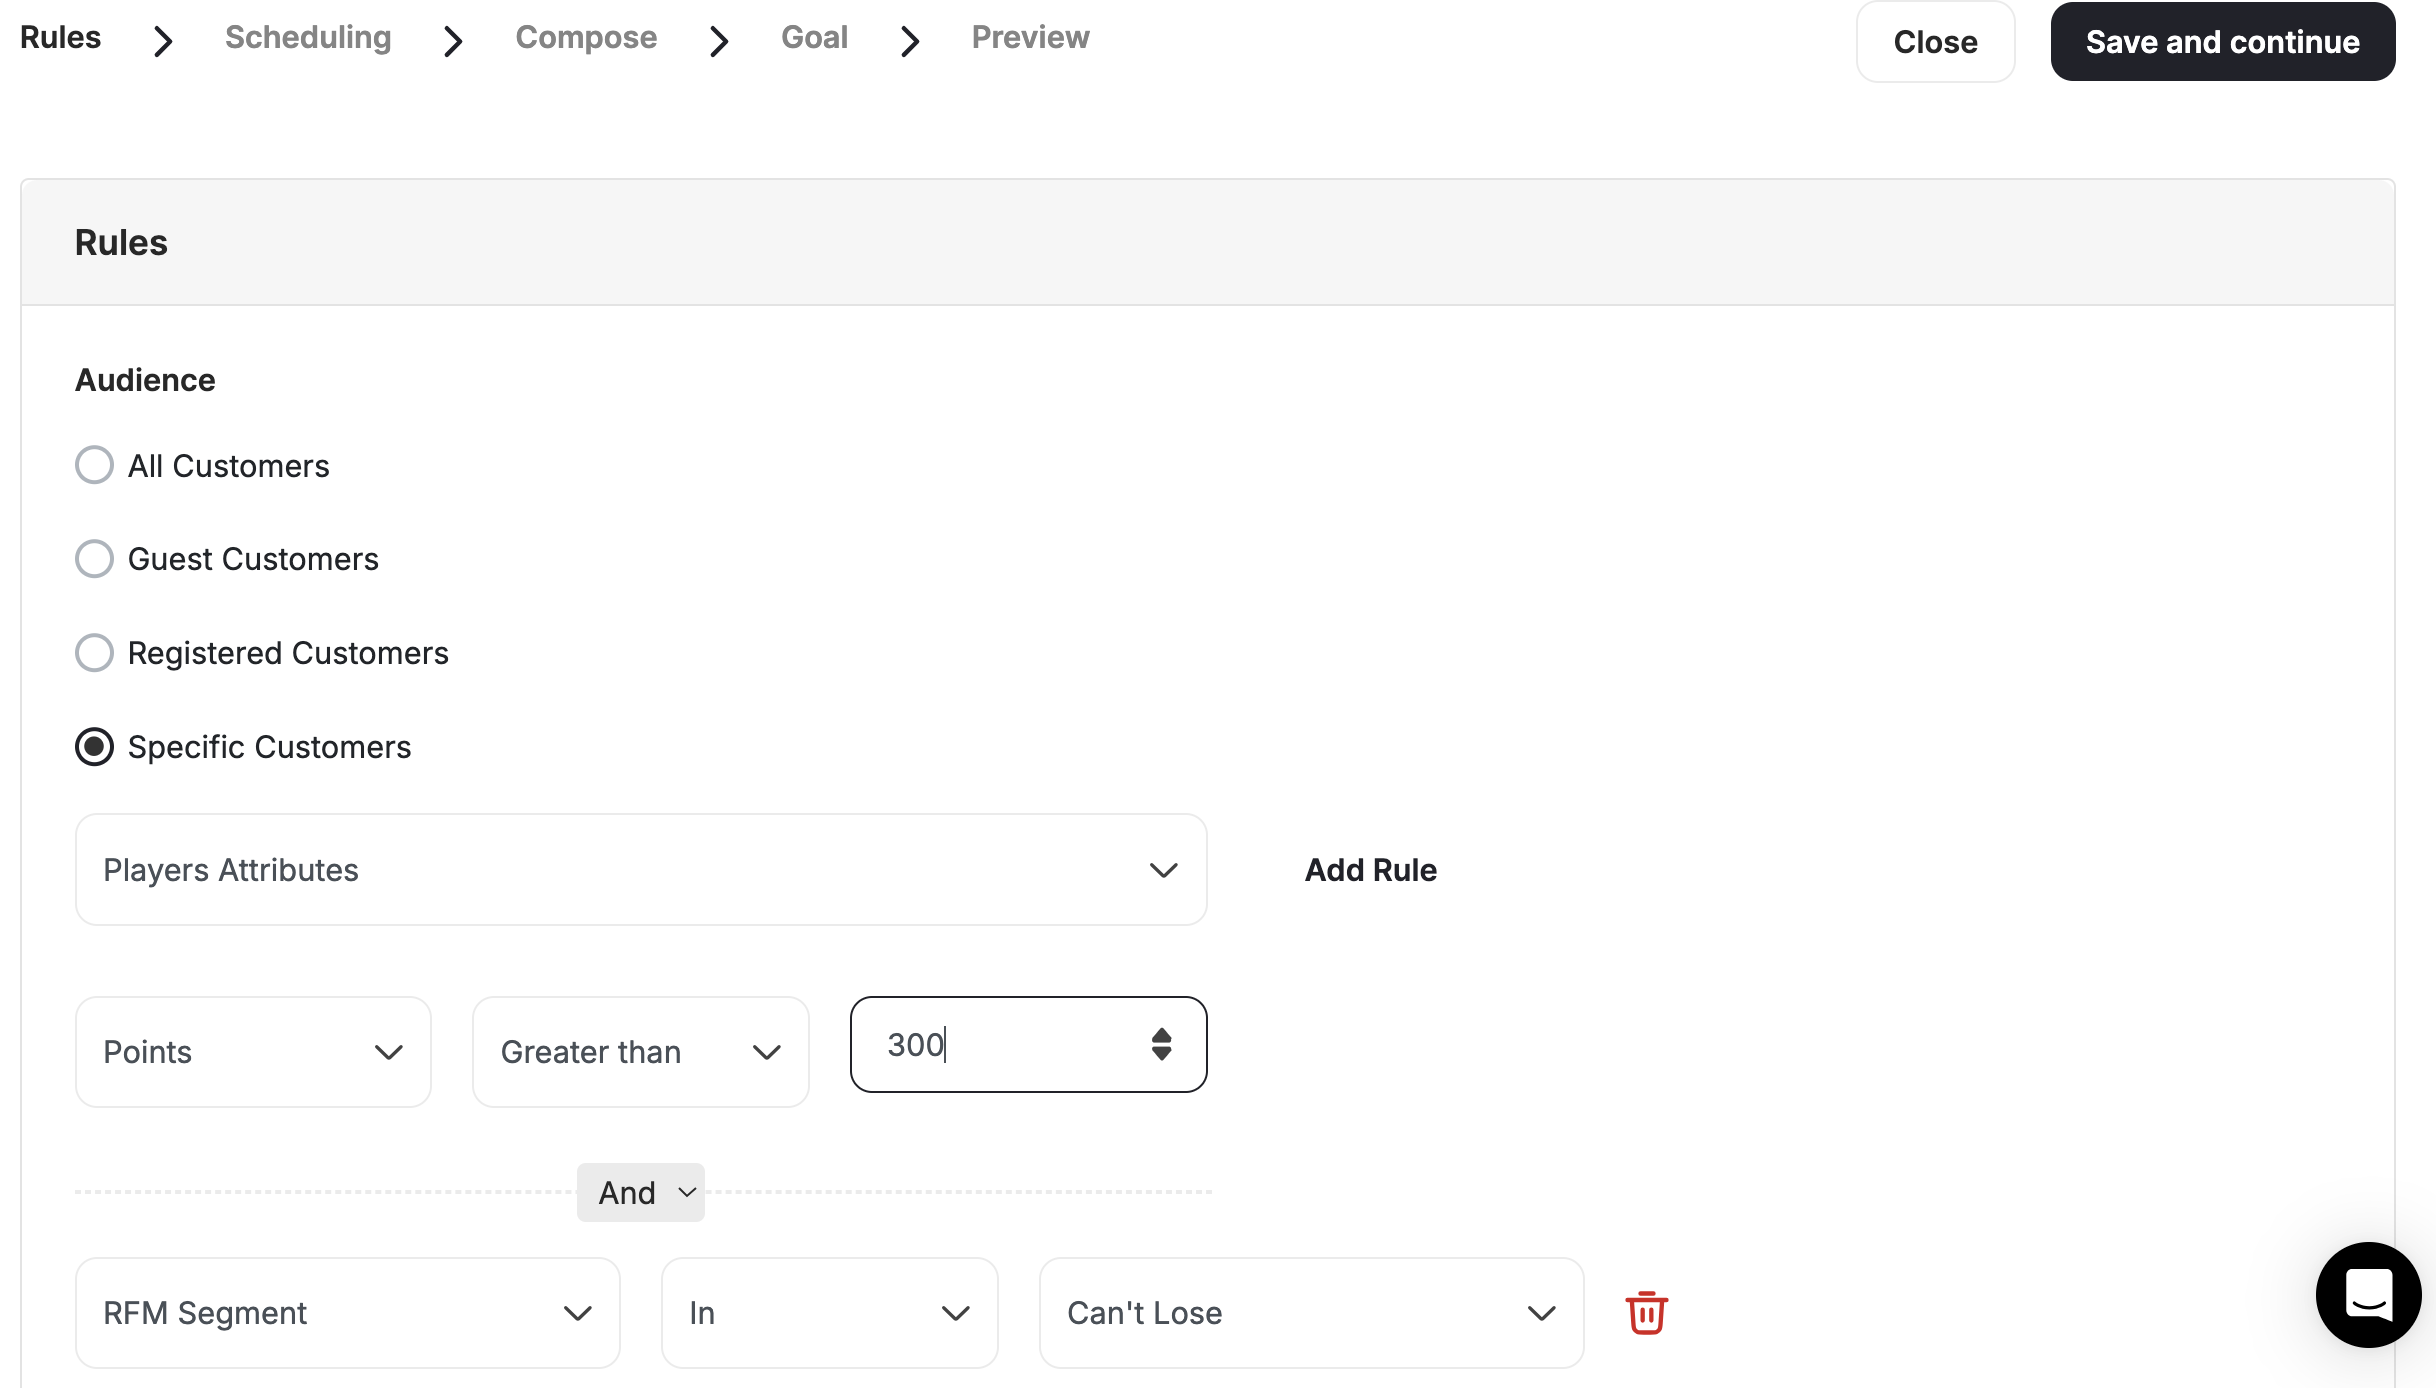
In the **Audience** section, choose who will receive this email:
* **All Customers** (Registered & Unregistered)
* **Guest customers** (Unregistered Customer)
* **Registered Customers** (Customers with Accounts)
* **Specific Customers** based on:
* Segments
* RFM Segments
* Tags
* Customer Attributes
* Combination for Segments, Tags, or Customer Attributes
Now you have created a new Email communication campaign. Follow these steps to customize it based on your preferences:
***
### Step 1: Rules
In the **Audience** section, choose who will receive this email:
* **All Customers** (Registered & Unregistered)
* **Guest customers** (Unregistered Customer)
* **Registered Customers** (Customers with Accounts)
* **Specific Customers** based on:
* Segments
* RFM Segments
* Tags
* Customer Attributes
* Combination for Segments, Tags, or Customer Attributes
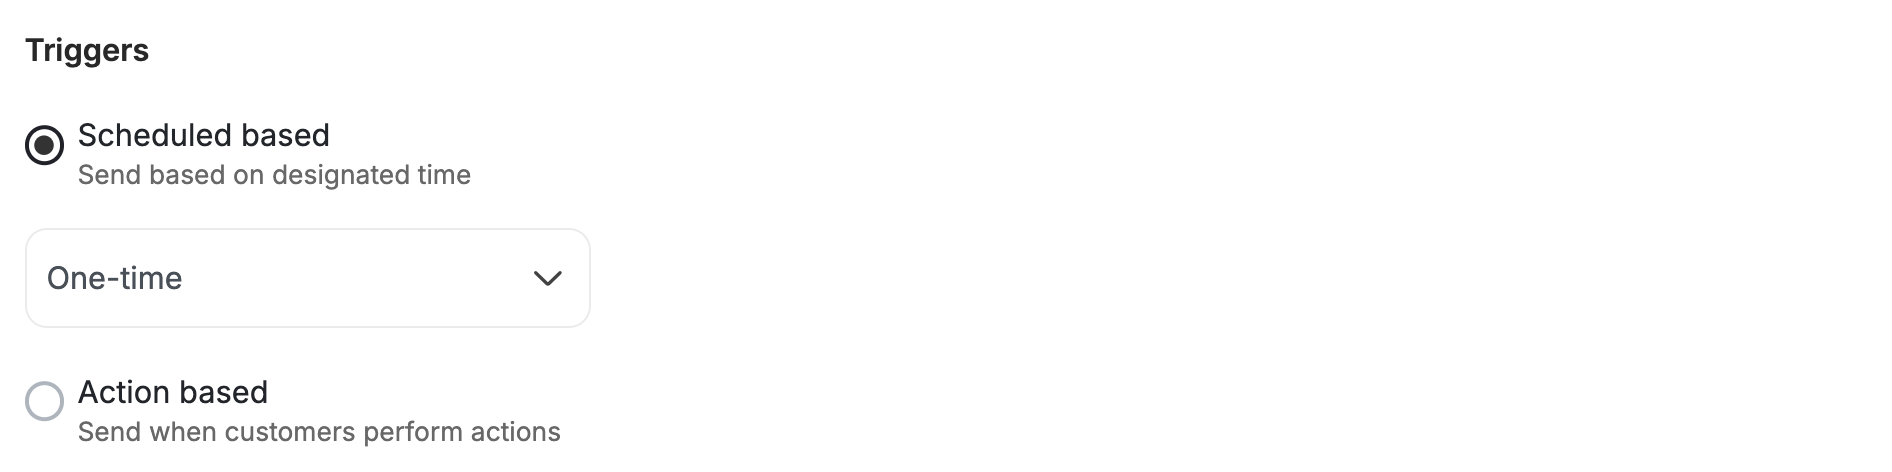
 Define what **Triggers** sending this email to your audience. You can choose between:
* **Scheduled Based:** All your audience will receive this email at a scheduled time. You can decide between:
* **One-time:** Email will be sent only once
* **Recurring:** Email will be sent more than once
* **Action Based:** All of your audience will receive this email once they complete a specific action. All you have to do is select the event from the drop-down and add its filters.
Define what **Triggers** sending this email to your audience. You can choose between:
* **Scheduled Based:** All your audience will receive this email at a scheduled time. You can decide between:
* **One-time:** Email will be sent only once
* **Recurring:** Email will be sent more than once
* **Action Based:** All of your audience will receive this email once they complete a specific action. All you have to do is select the event from the drop-down and add its filters.
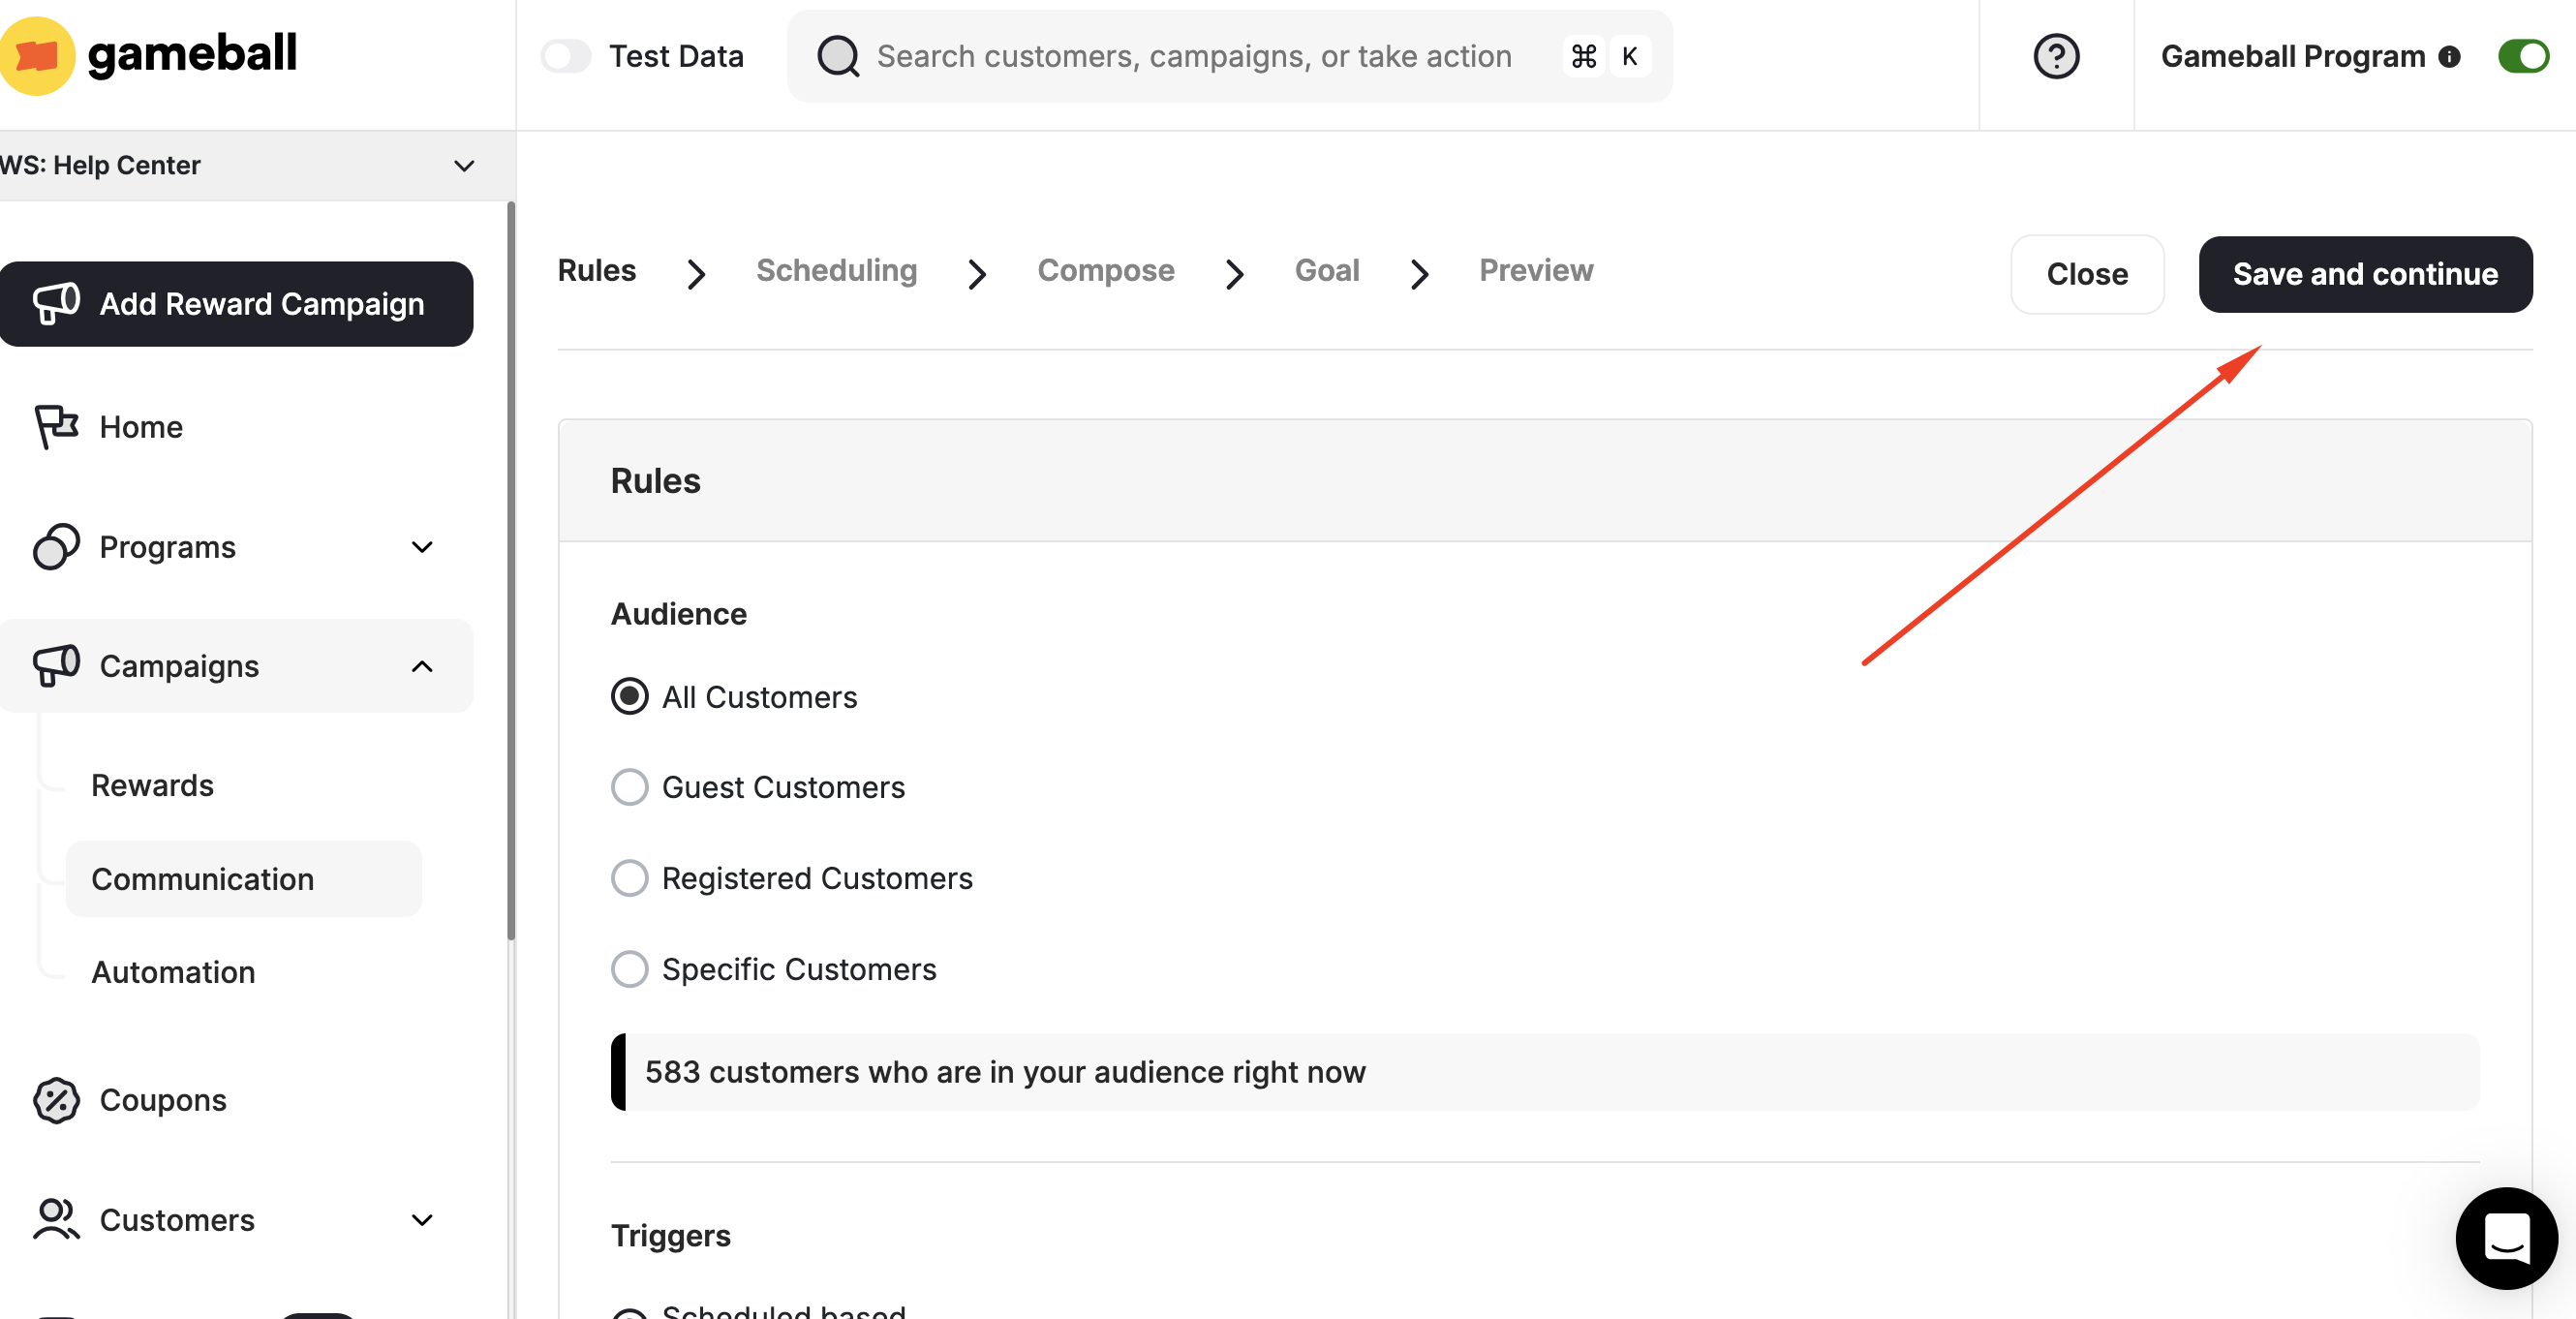
 Click **Save and Continue**.
 ***
### Step 2: Scheduling
Now let's set the timing for sending the email, based on the trigger that you chose in the previous step.
Choose one of these options:
* **Now**: The email will be sent once the campaign is set live
* **Later**: The email will be sent on the Start Date that you choose
***
### Step 2: Scheduling
Now let's set the timing for sending the email, based on the trigger that you chose in the previous step.
Choose one of these options:
* **Now**: The email will be sent once the campaign is set live
* **Later**: The email will be sent on the Start Date that you choose
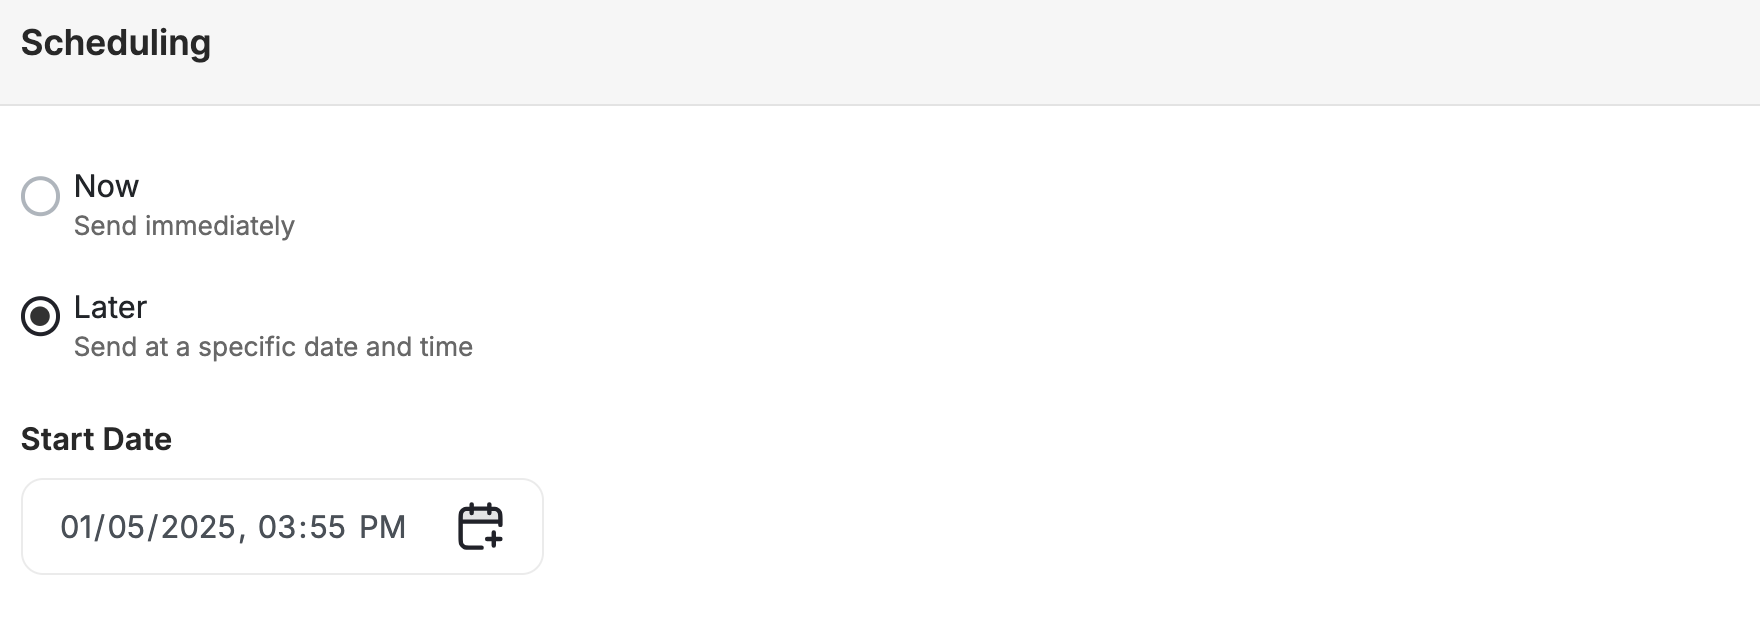 Set up the following:
* **Start Date:** The date that we will start sending the emails
* **Repetition:** The number of times that the email should be sent, and the duration between each one.
* **End Date:** The date when we should stop sending the emails. You can choose:
* **Never**: the emails will always be sent out
* **Till**: A certain date after which the emails will stop being sent out.
* **Configure frequency:** Specify how often customers will receive the email:
* Unlimited number of messages per customer (Default)
* Limit the Number of messages per customer (Choose the Maximum number)
Set up the following:
* **Start Date:** The date that we will start sending the emails
* **End Date:** The date when we should stop sending the emails. You can choose:
* **Never**: the emails will always be sent out
* **Till**: A certain date after which the emails will stop being sent out.
* **Configure frequency:** Specify how often customers will receive the email:
* **Default**: Each customer will keep receiving messages without any capping until the end of the campaign
* **Custom**: Choose the number of times the email should be sent out, the duration between each email, and the maximum number of times the email should be sent.
Set up the following:
* **Start Date:** The date that we will start sending the emails
* **Repetition:** The number of times that the email should be sent, and the duration between each one.
* **End Date:** The date when we should stop sending the emails. You can choose:
* **Never**: the emails will always be sent out
* **Till**: A certain date after which the emails will stop being sent out.
* **Configure frequency:** Specify how often customers will receive the email:
* Unlimited number of messages per customer (Default)
* Limit the Number of messages per customer (Choose the Maximum number)
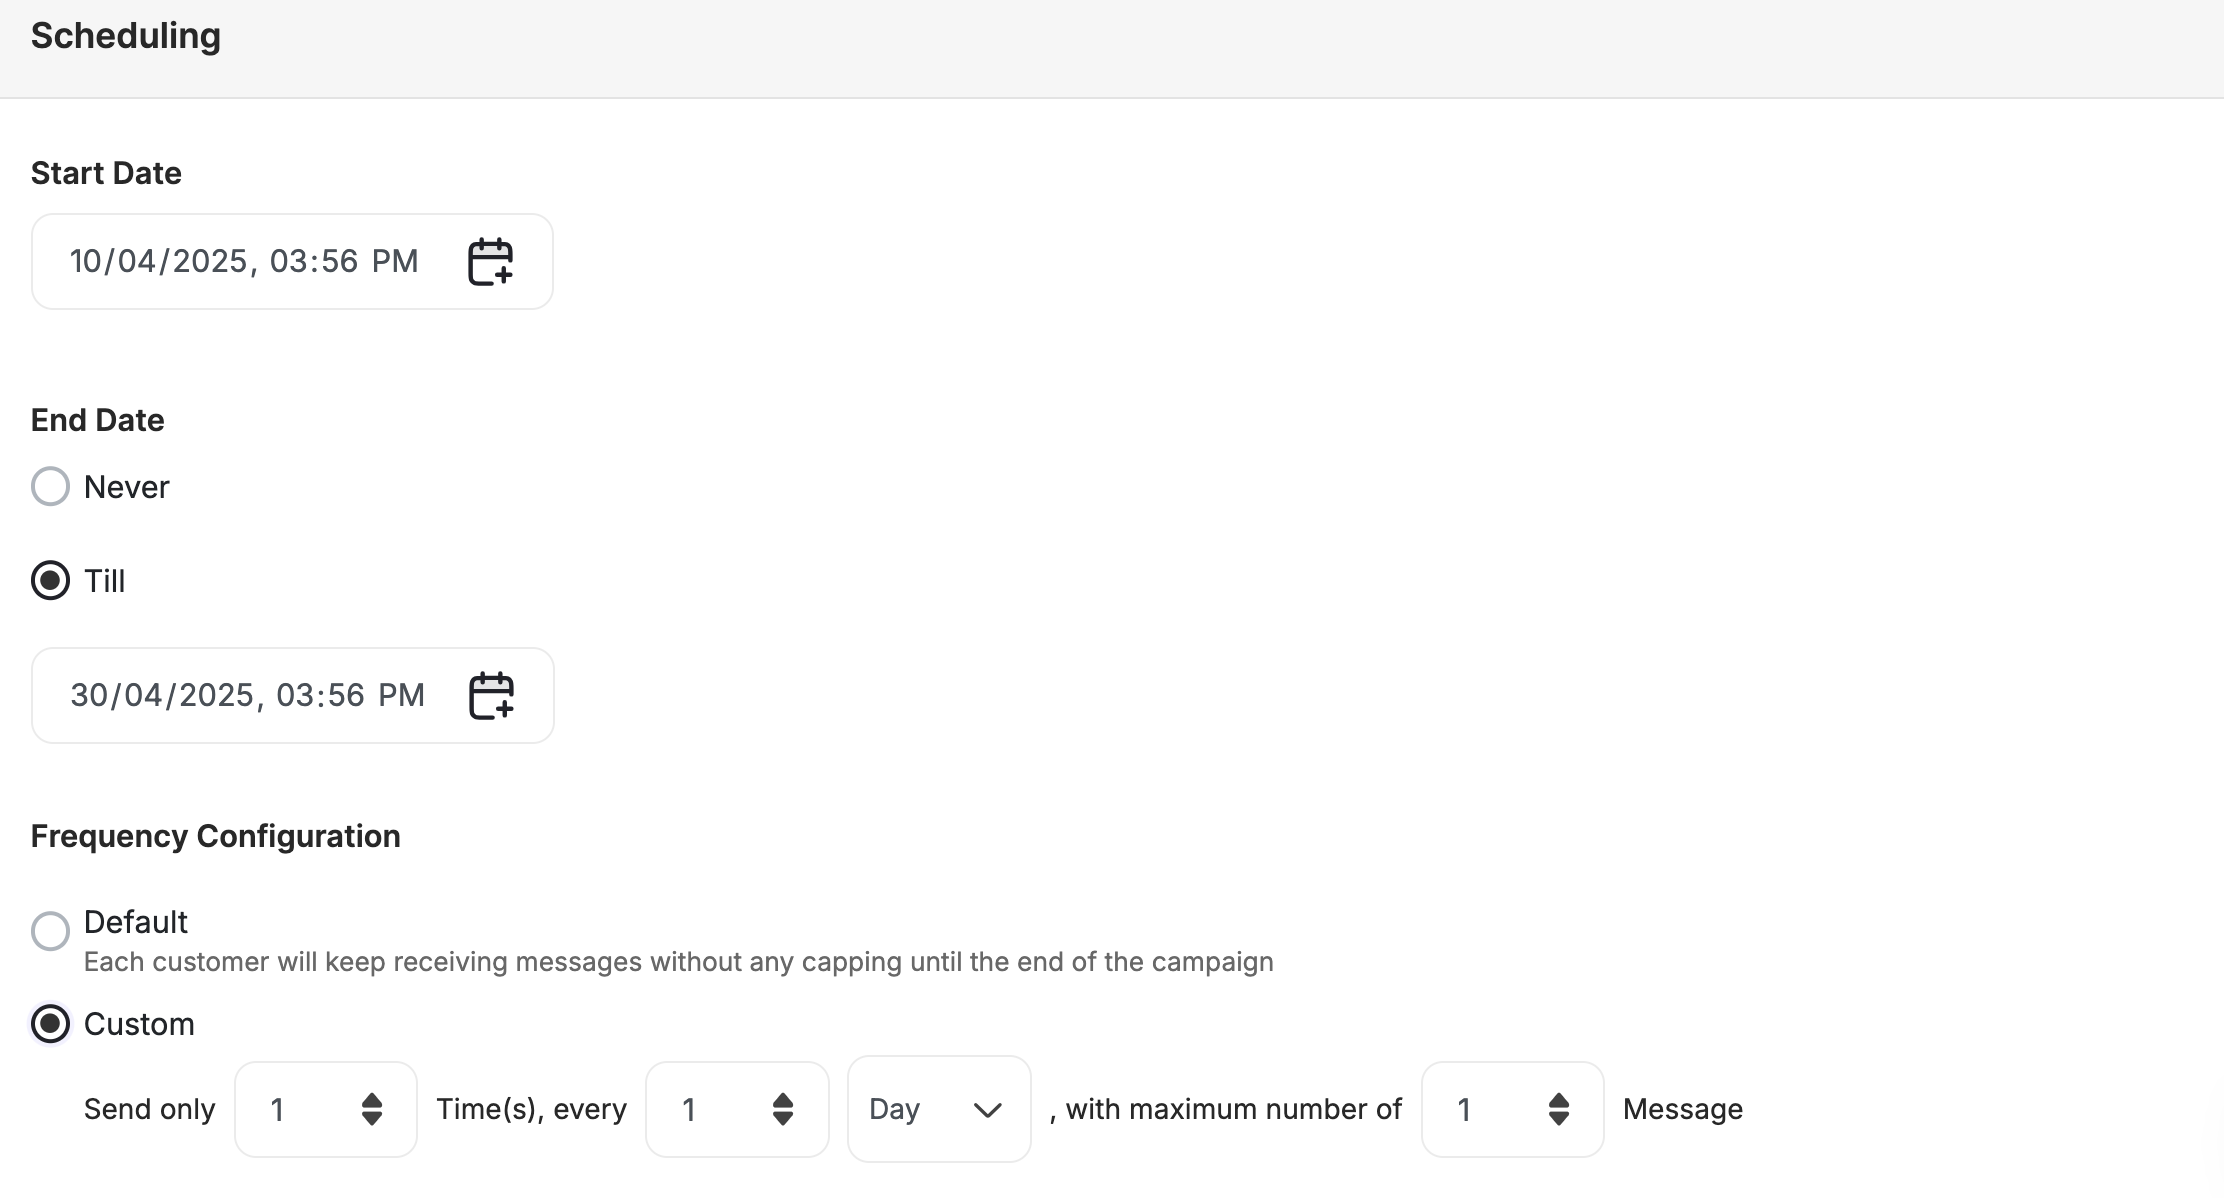
Set up the following:
* **Start Date:** The date that we will start sending the emails
* **End Date:** The date when we should stop sending the emails. You can choose:
* **Never**: the emails will always be sent out
* **Till**: A certain date after which the emails will stop being sent out.
* **Configure frequency:** Specify how often customers will receive the email:
* **Default**: Each customer will keep receiving messages without any capping until the end of the campaign
* **Custom**: Choose the number of times the email should be sent out, the duration between each email, and the maximum number of times the email should be sent.
 Click **Save and Continue**.
***
### Step 3: Compose
Customize the email header with sender information, subject line, and domain.
Design the email body using a range of customization options, including text, images, buttons, links, dividers, menus, and HTML.
Ensure the email content aligns with the campaign goals and resonates with the target audience.
Click **Save and Continue**.
***
### Step 3: Compose
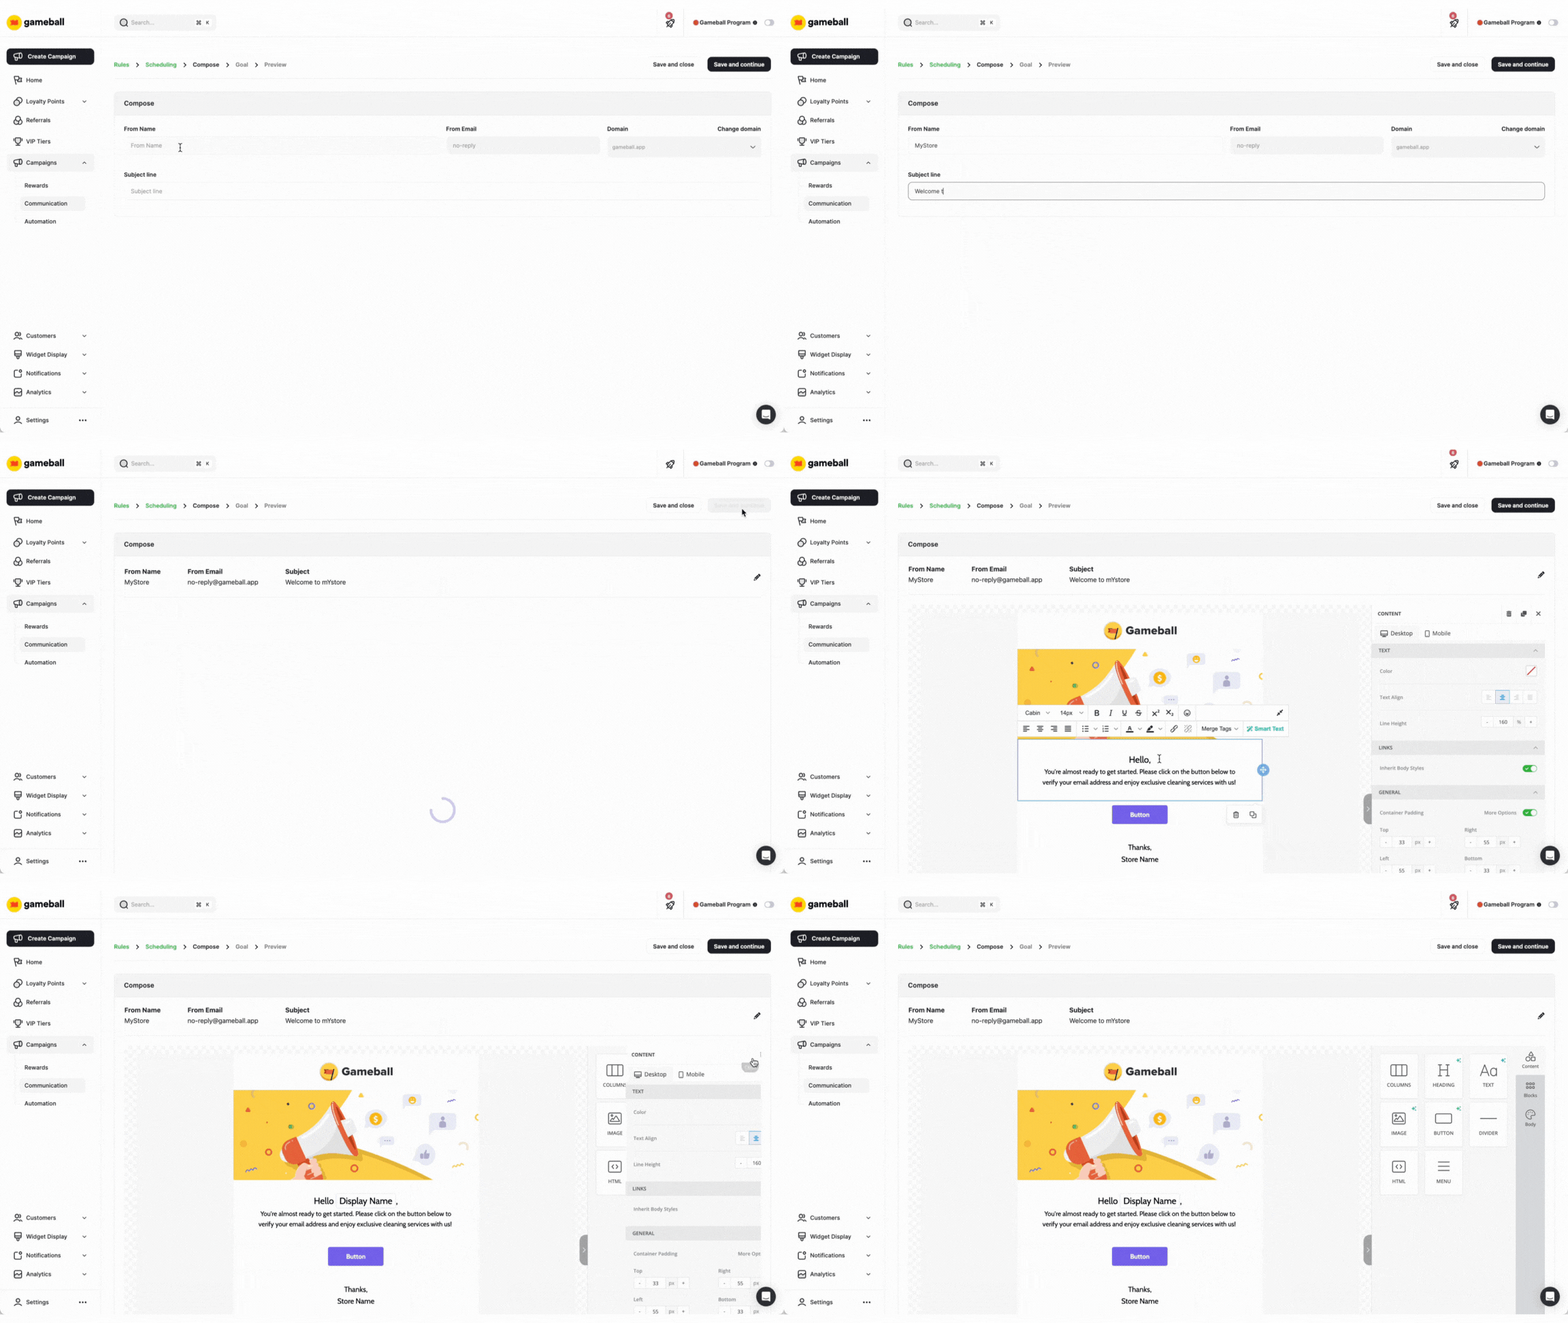
Customize the email header with sender information, subject line, and domain.
Design the email body using a range of customization options, including text, images, buttons, links, dividers, menus, and HTML.
Ensure the email content aligns with the campaign goals and resonates with the target audience.
 Click **Save and Continue**.
***
### Step 4: Goal
Define the goal of the email campaign, such as increasing sales or driving traffic to specific product pages.
Set event triggers and timeframes to monitor customer actions in response to the email.
Include strong calls-to-action in the email content to encourage desired customer behavior.
Click **Save and Continue**.
***
### Step 4: Goal
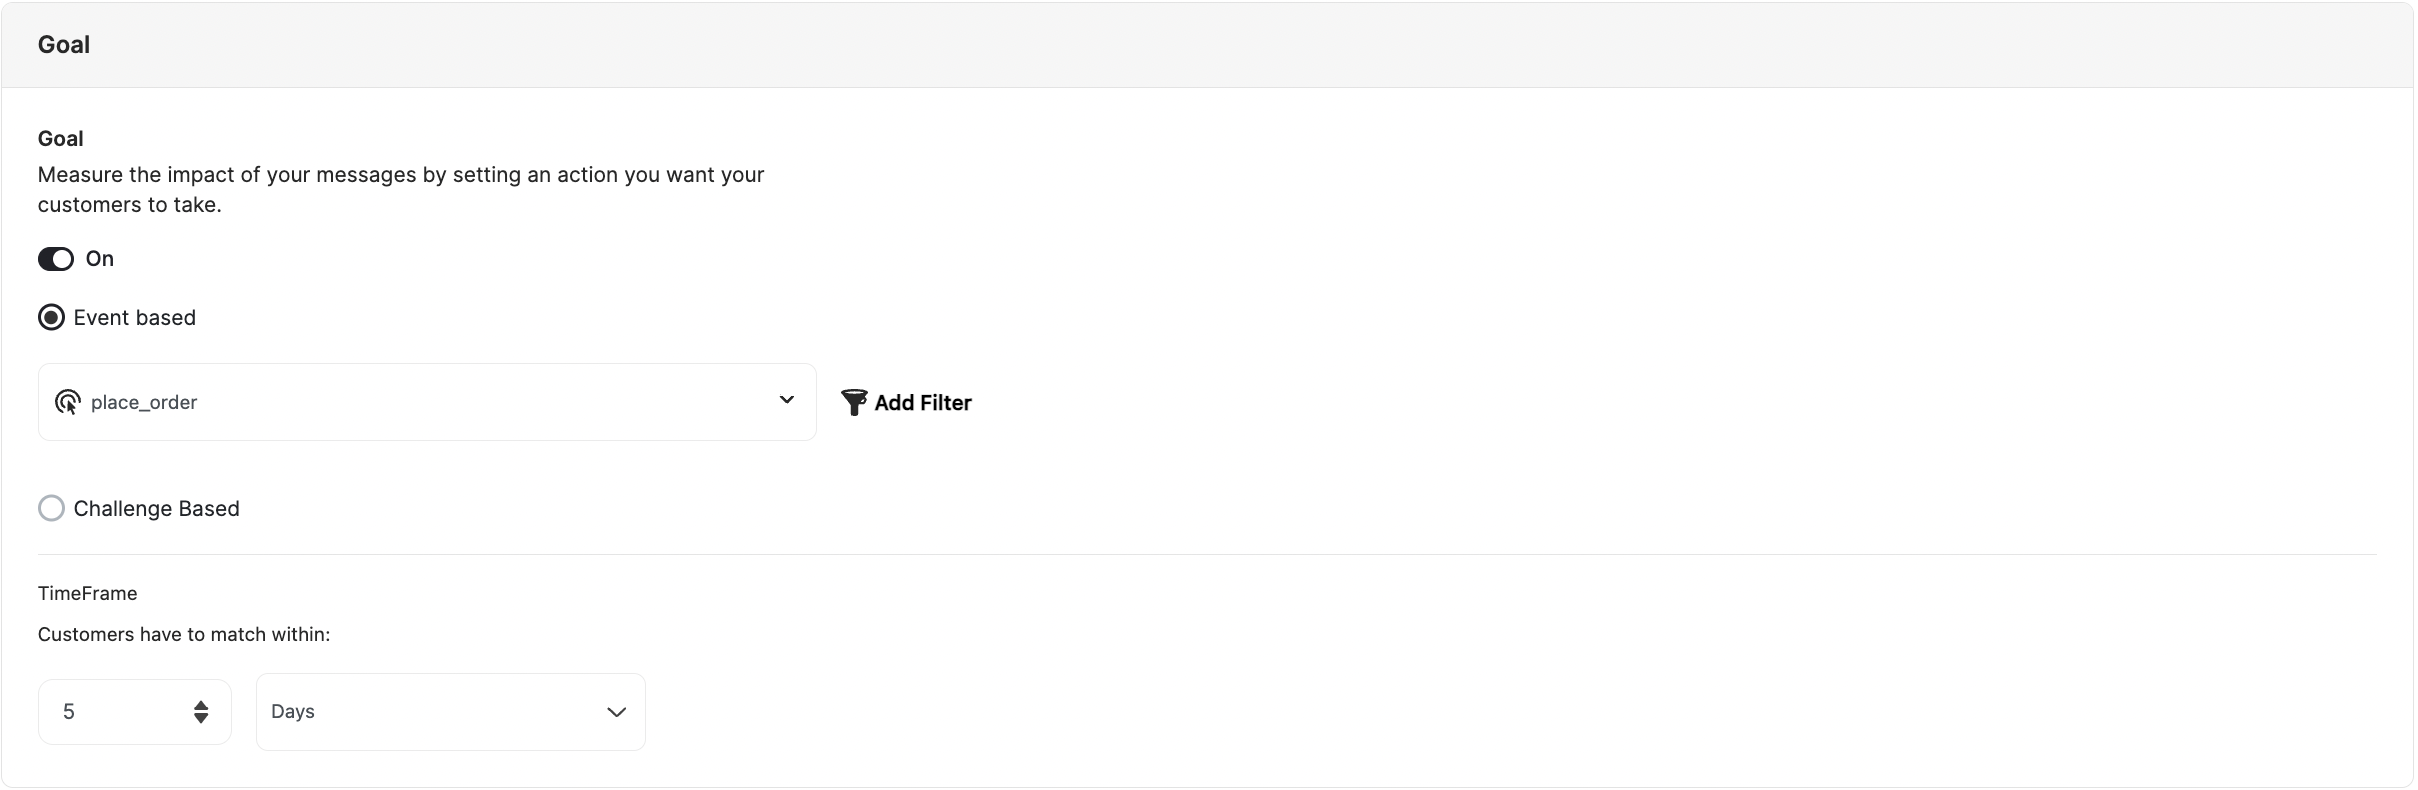
Define the goal of the email campaign, such as increasing sales or driving traffic to specific product pages.
Set event triggers and timeframes to monitor customer actions in response to the email.
Include strong calls-to-action in the email content to encourage desired customer behavior.
 Click **Save and Continue**.
***
### Step 5: Preview
Review and edit configurations as needed.
Send a test message to preview the email before sending it to customers.
Finalize and send the email communication campaign to the target audience.
Click **Save and Continue**.
***
### Step 5: Preview
Review and edit configurations as needed.
Send a test message to preview the email before sending it to customers.
Finalize and send the email communication campaign to the target audience.
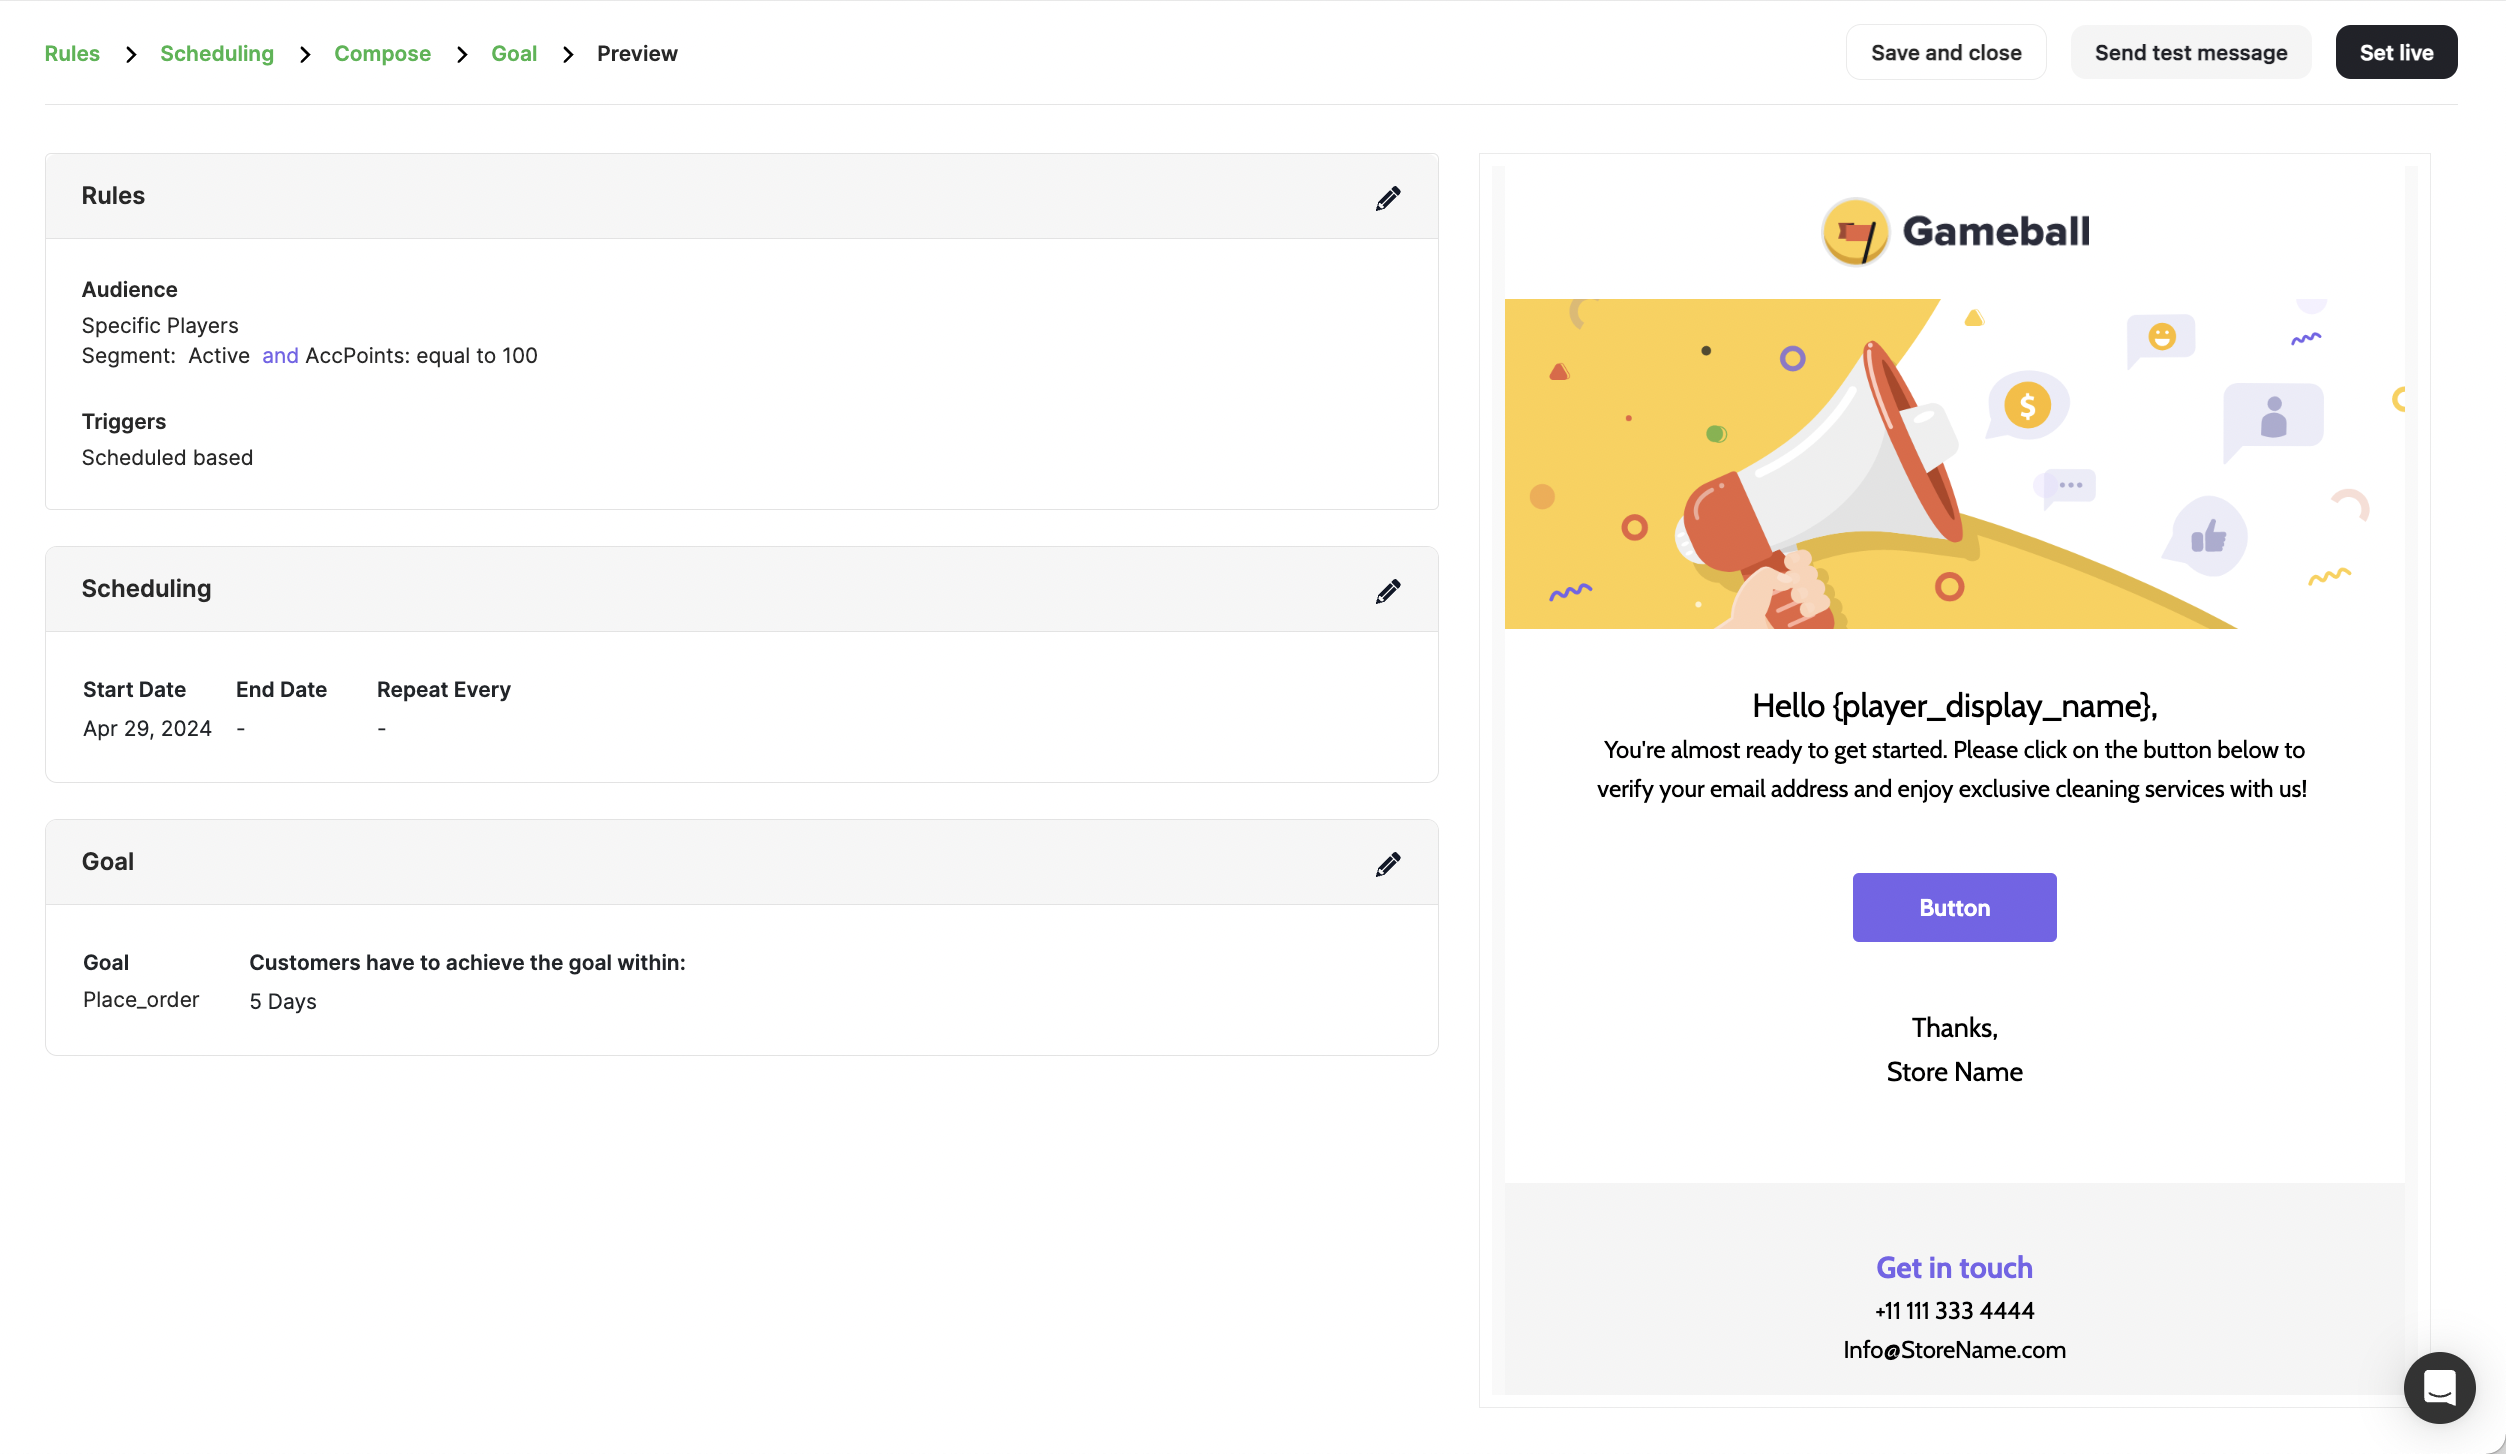 Lastly, click **Set live**.
***
## Viewing and Managing Configured Emails
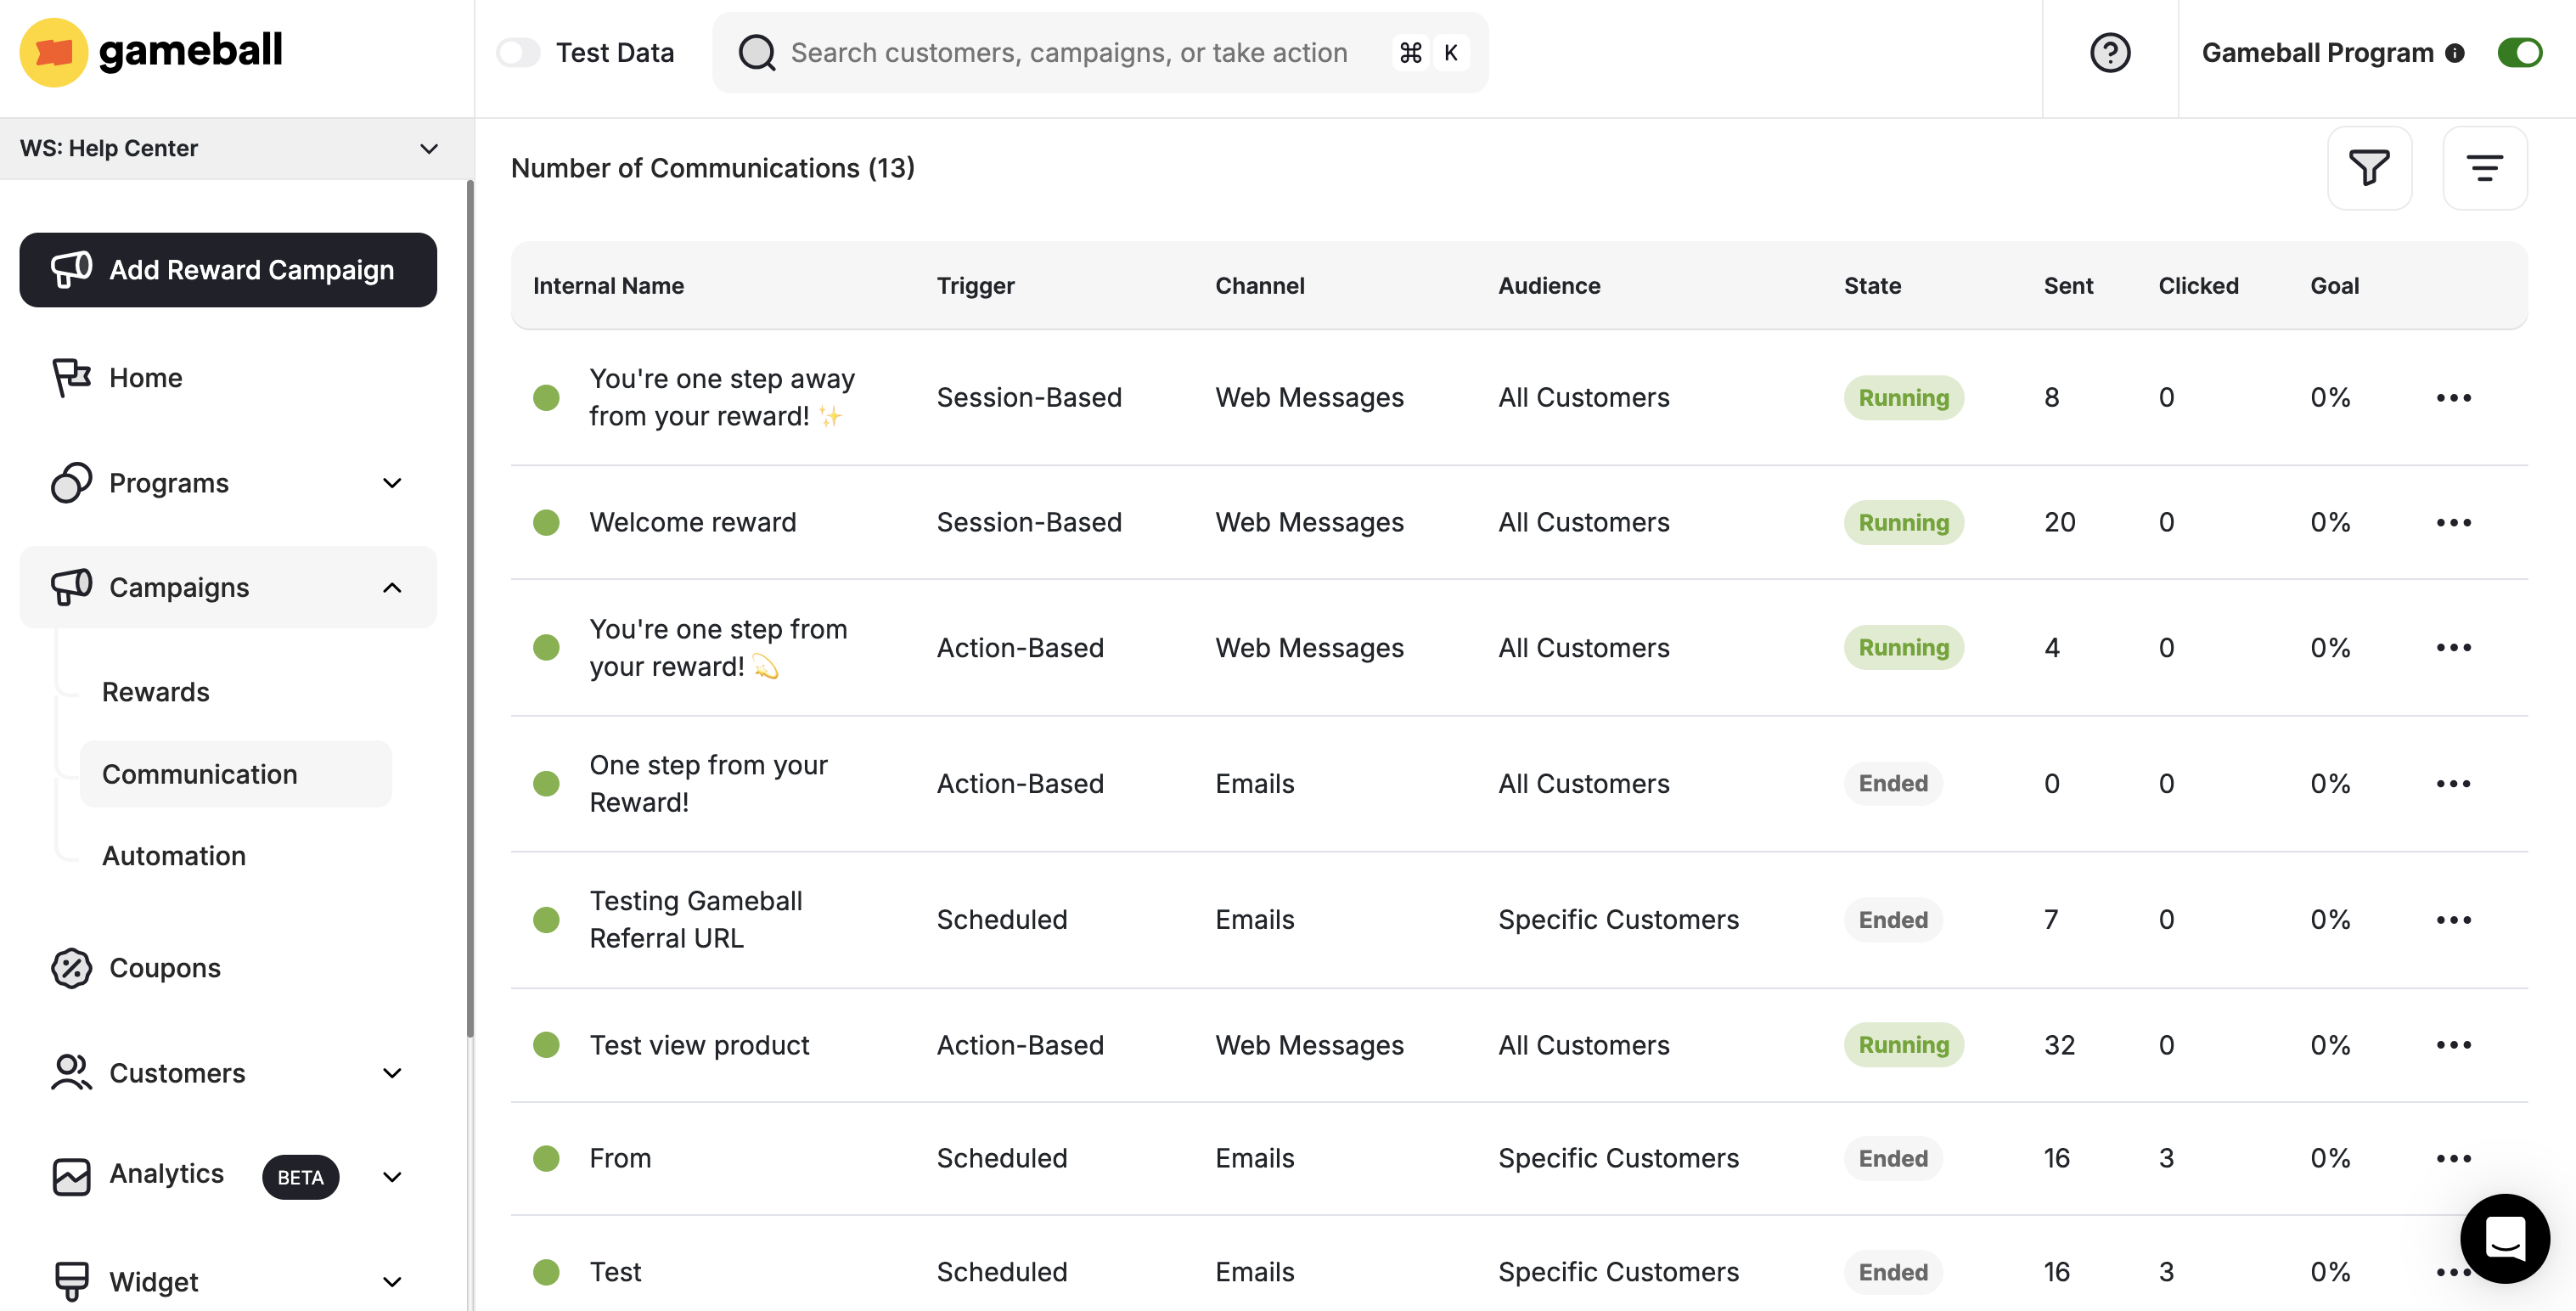
* Access the **Communication Campaigns** section in the **Gameball Dashboard** to view all configured campaigns.
* Monitor key metrics such as triggers, audience, state, number of sent campaigns, clicks, and goal achievement percentage.
Lastly, click **Set live**.
***
## Viewing and Managing Configured Emails
* Access the **Communication Campaigns** section in the **Gameball Dashboard** to view all configured campaigns.
* Monitor key metrics such as triggers, audience, state, number of sent campaigns, clicks, and goal achievement percentage.
 ***
## Tracking Email Performance and Customer Interaction
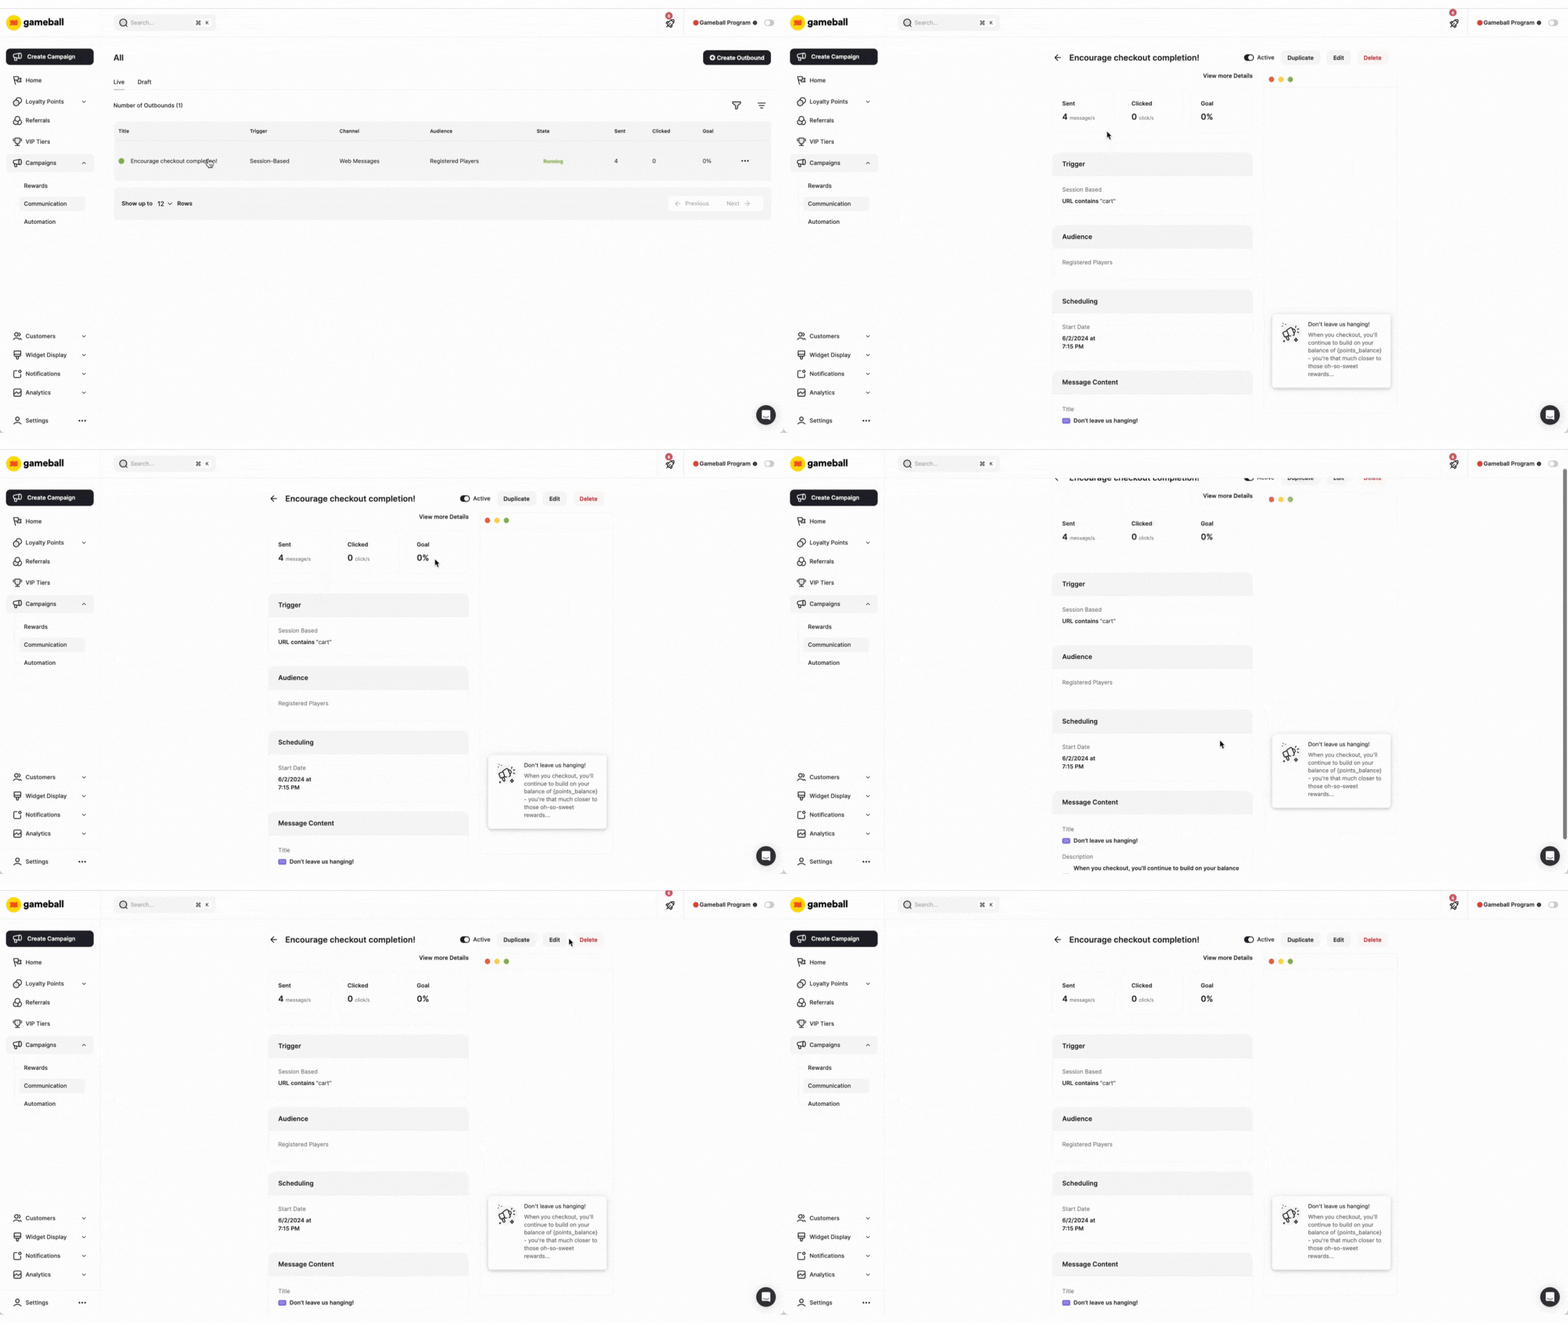
* Gain insights into email performance and customer interaction by **selecting a specific campaign** and viewing details.
* Check the list of customers who received the email and track their engagement, including clicks and goal achievements.
***
## Tracking Email Performance and Customer Interaction
* Gain insights into email performance and customer interaction by **selecting a specific campaign** and viewing details.
* Check the list of customers who received the email and track their engagement, including clicks and goal achievements.
 ***
## Deactivating or Deleting Email Communication Campaigns
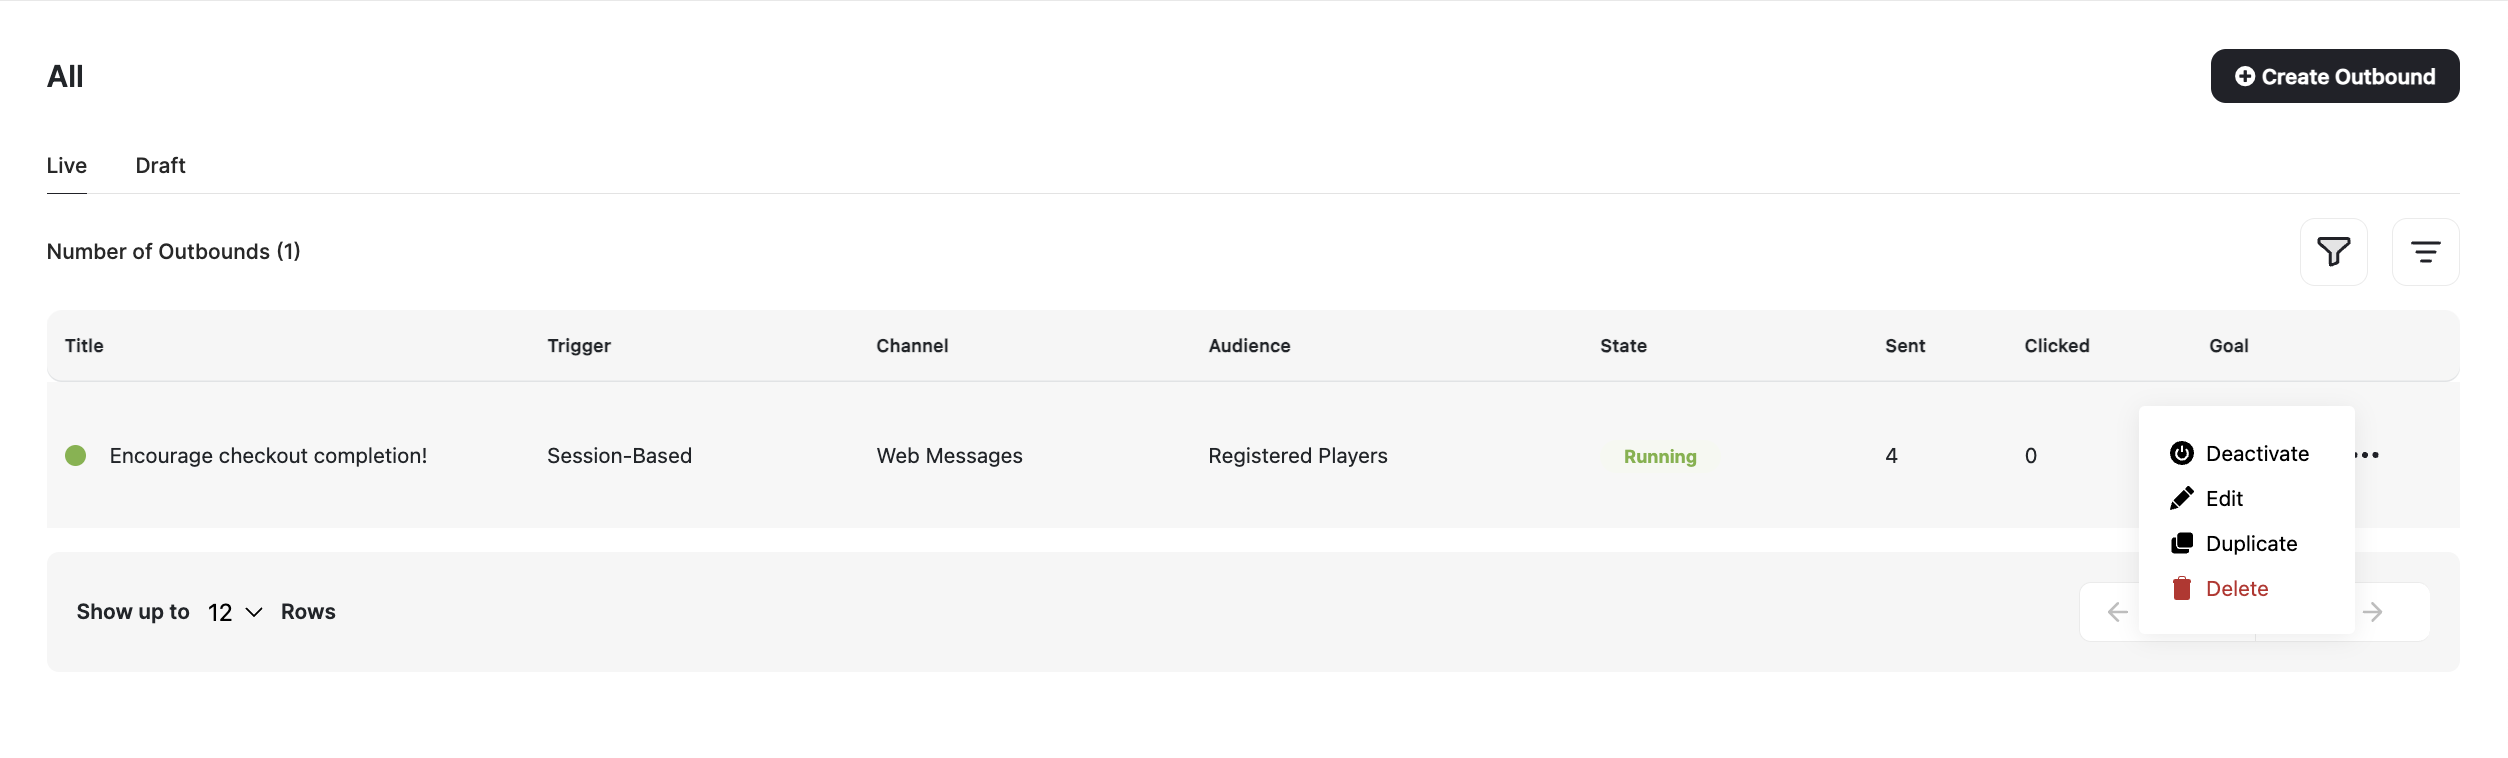
* From the Communication Campaigns section in the Gameball Dashboard, select the desired email campaign.
* Click on the **three dots icon** to choose between **deactivating/activating** or **deleting** the campaign.
***
## Deactivating or Deleting Email Communication Campaigns
* From the Communication Campaigns section in the Gameball Dashboard, select the desired email campaign.
* Click on the **three dots icon** to choose between **deactivating/activating** or **deleting** the campaign.
 ***
Set up web message campaigns to reach customers during their platform journey.
Set up push notification campaigns to engage customers on mobile devices.
Set up SMS campaigns for high-visibility, time-sensitive communications.
***
Set up web message campaigns to reach customers during their platform journey.
Set up push notification campaigns to engage customers on mobile devices.
Set up SMS campaigns for high-visibility, time-sensitive communications.