> ## Documentation Index
> Fetch the complete documentation index at: https://docs.gameball.co/llms.txt
> Use this file to discover all available pages before exploring further.
# How Do I Create and Configure Web Message Campaigns?
> A Step-by-Step guide to create and configure a Web Message Communication Campaign with Gameball.
Web messages play a crucial role in engaging customers, whether it's for up-selling, alerting, or spurring them into action on your platform. These **web-based** messages pop up at strategic moments during a customer's journey, encouraging them to take specific actions or explore new opportunities. Leveraging web messages effectively can significantly boost your platform's conversion rate and enhance overall customer engagement.
***
## Utilizing Gameball's Web Messages Communication Campaigns
Gameball's Web Messages Communication Campaigns feature enables businesses to deliver targeted and personalized messages to customers.
Display timely offers and deals as customers browse to drive immediate purchases.
Introduce customers to new arrivals and collections at the right moment in their journey.
Encourage customers to take action and finish reward campaigns for greater engagement.
These web messages offer a dynamic way to interact with your audience and drive desired behaviors.
***
## Configuring a Web Messages Communication Campaign
To set up a web message communication campaign from scratch in Gameball, follow these steps:
Navigate to the **Gameball Dashboard**.
Click on **Campaigns**.
Choose **Create Communication Campaigns**, then click on the **Create Campaign** button.
From the **Start from Scratch** section, choose **Web Message**.
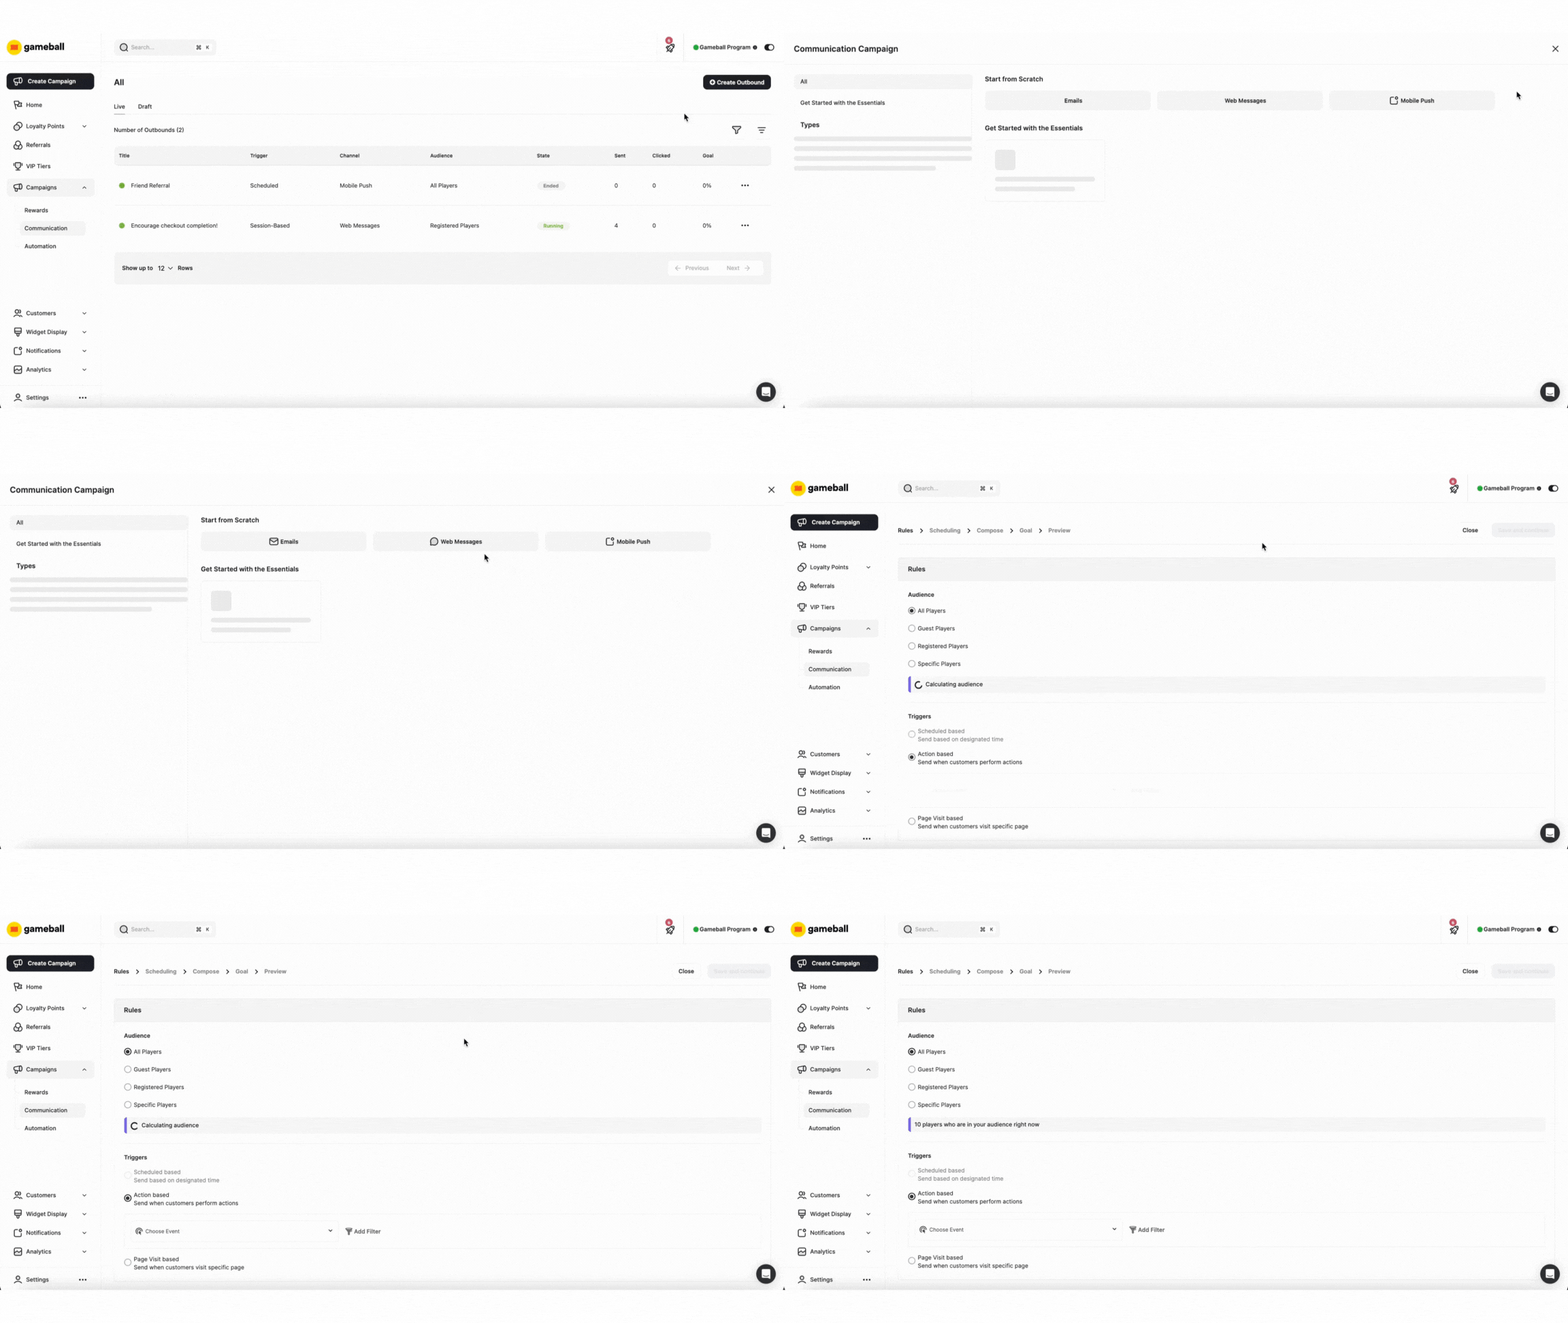 Now you have created a new Web Message communication campaign. Follow these steps to customize it based on your preferences:
***
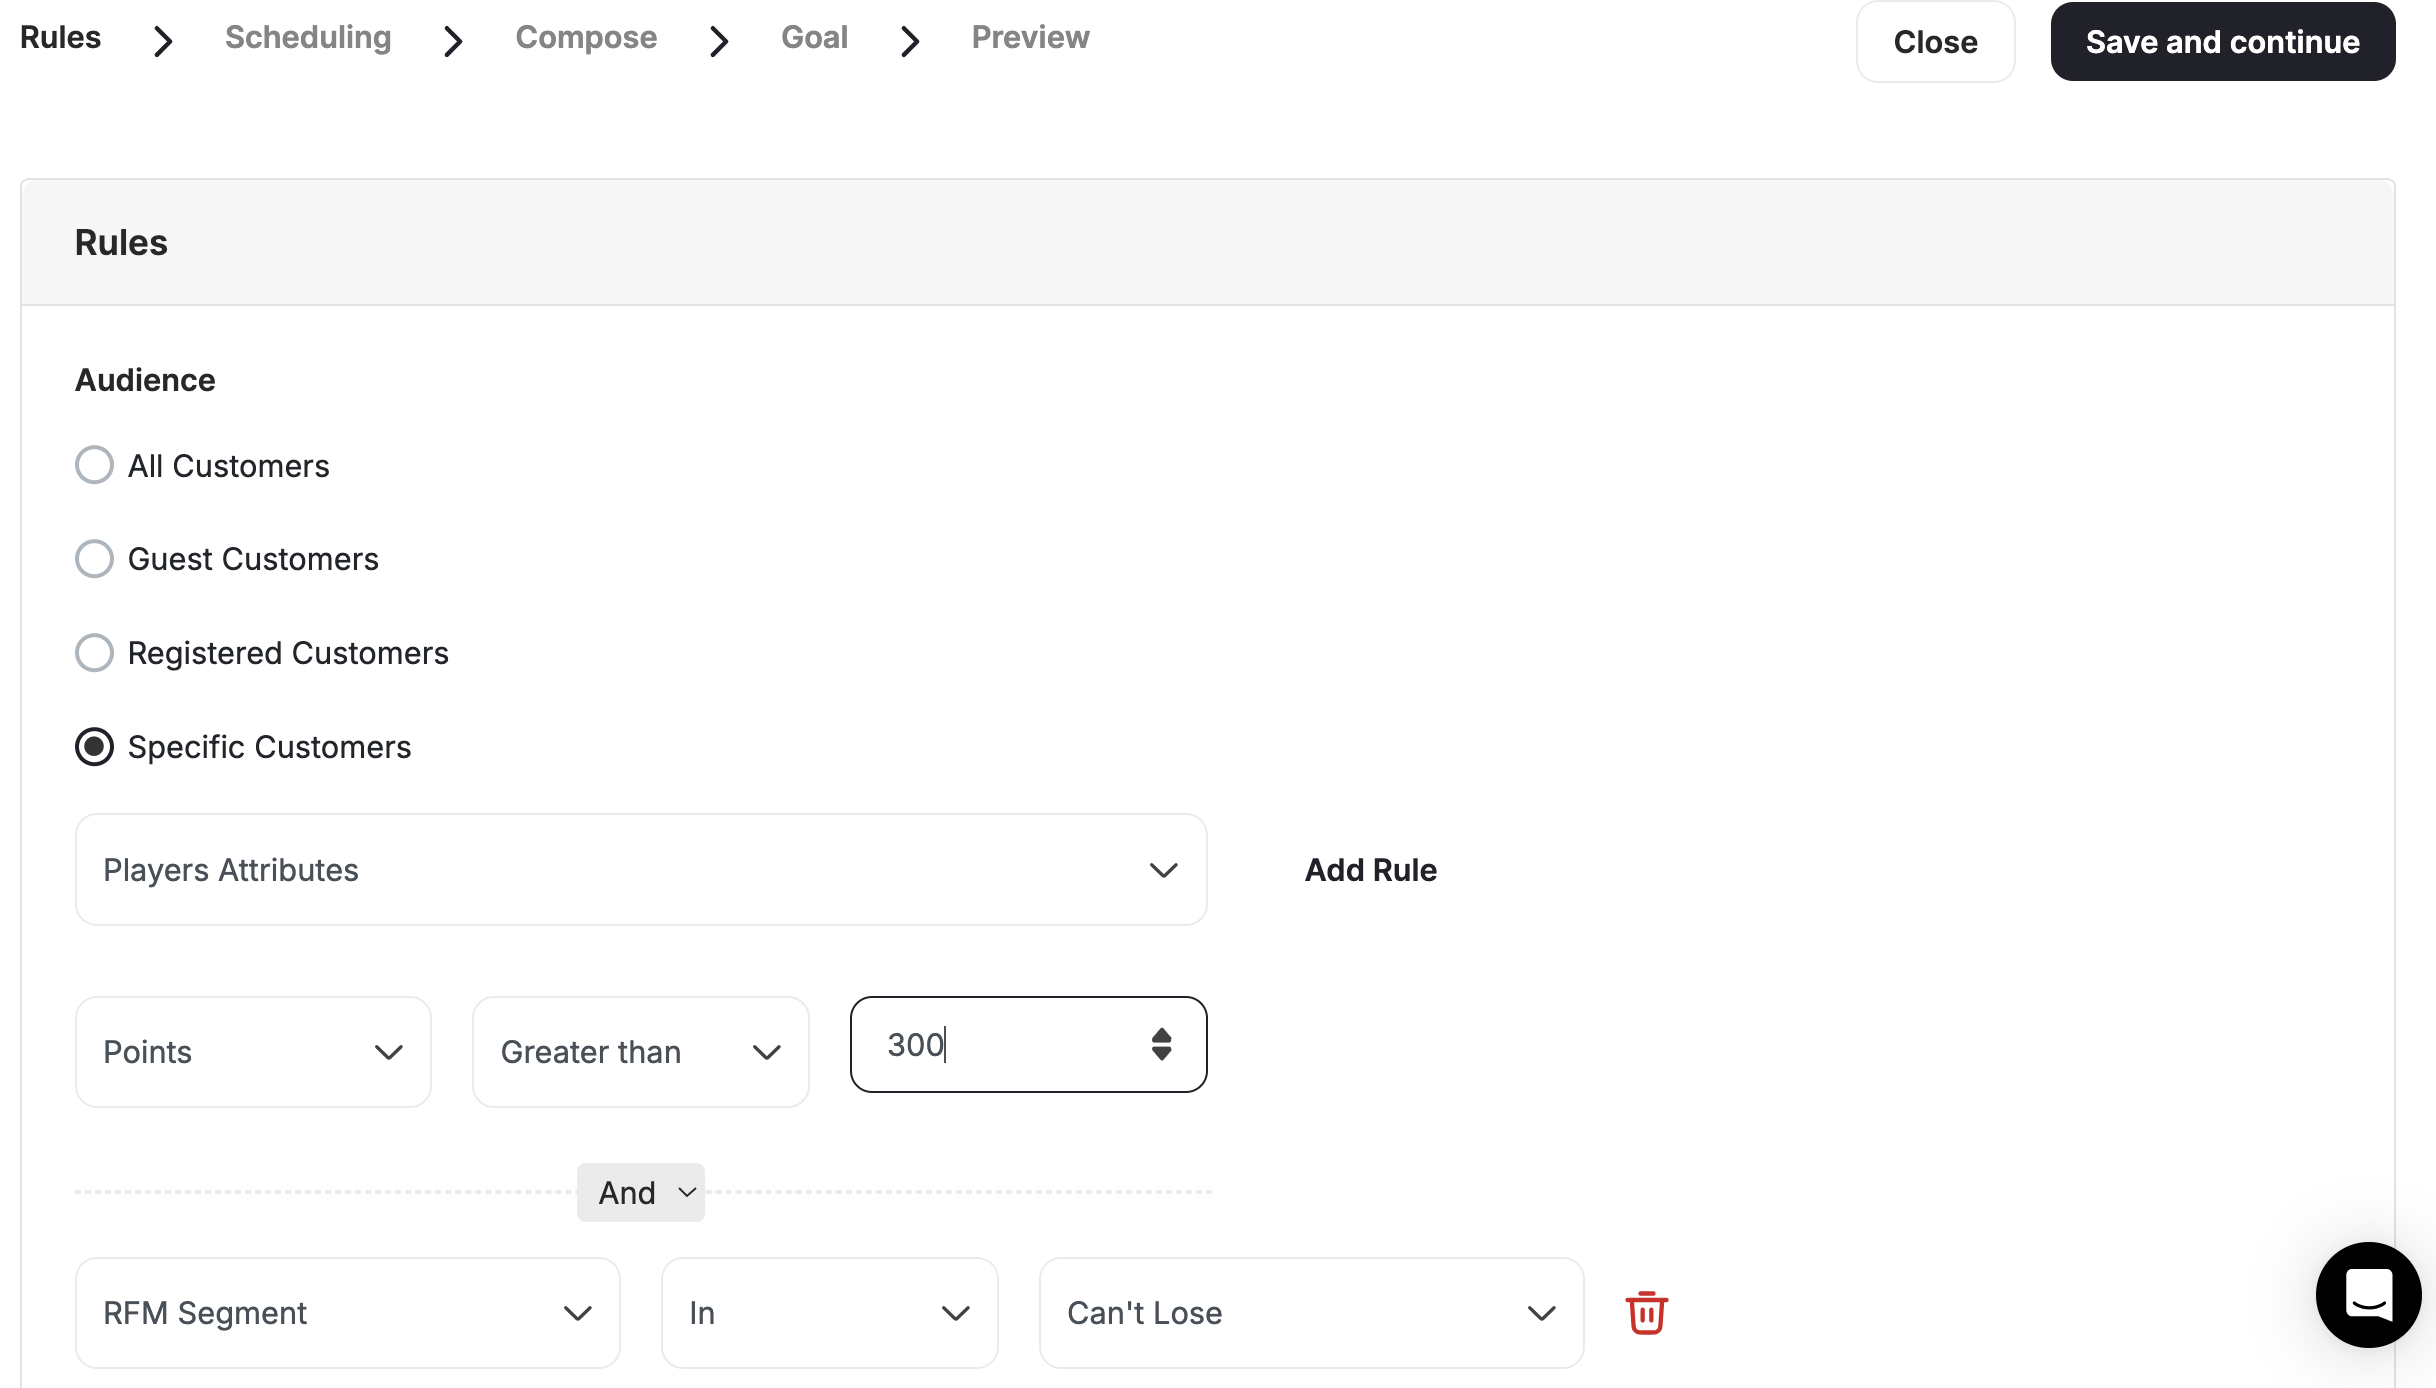
### Step 1: Rules
In the **Audience** section, choose who will receive this message:
* **All Customers** (Registered & Unregistered)
* **Guest customers** (Unregistered Customer)
* **Registered Customers** (Customers with Accounts)
* **Specific Customers** based on:
* Segments
* RFM Segments
* Tags
* Customer Attributes
* Combination for Segments, Tags, or Customer Attributes
Now you have created a new Web Message communication campaign. Follow these steps to customize it based on your preferences:
***
### Step 1: Rules
In the **Audience** section, choose who will receive this message:
* **All Customers** (Registered & Unregistered)
* **Guest customers** (Unregistered Customer)
* **Registered Customers** (Customers with Accounts)
* **Specific Customers** based on:
* Segments
* RFM Segments
* Tags
* Customer Attributes
* Combination for Segments, Tags, or Customer Attributes
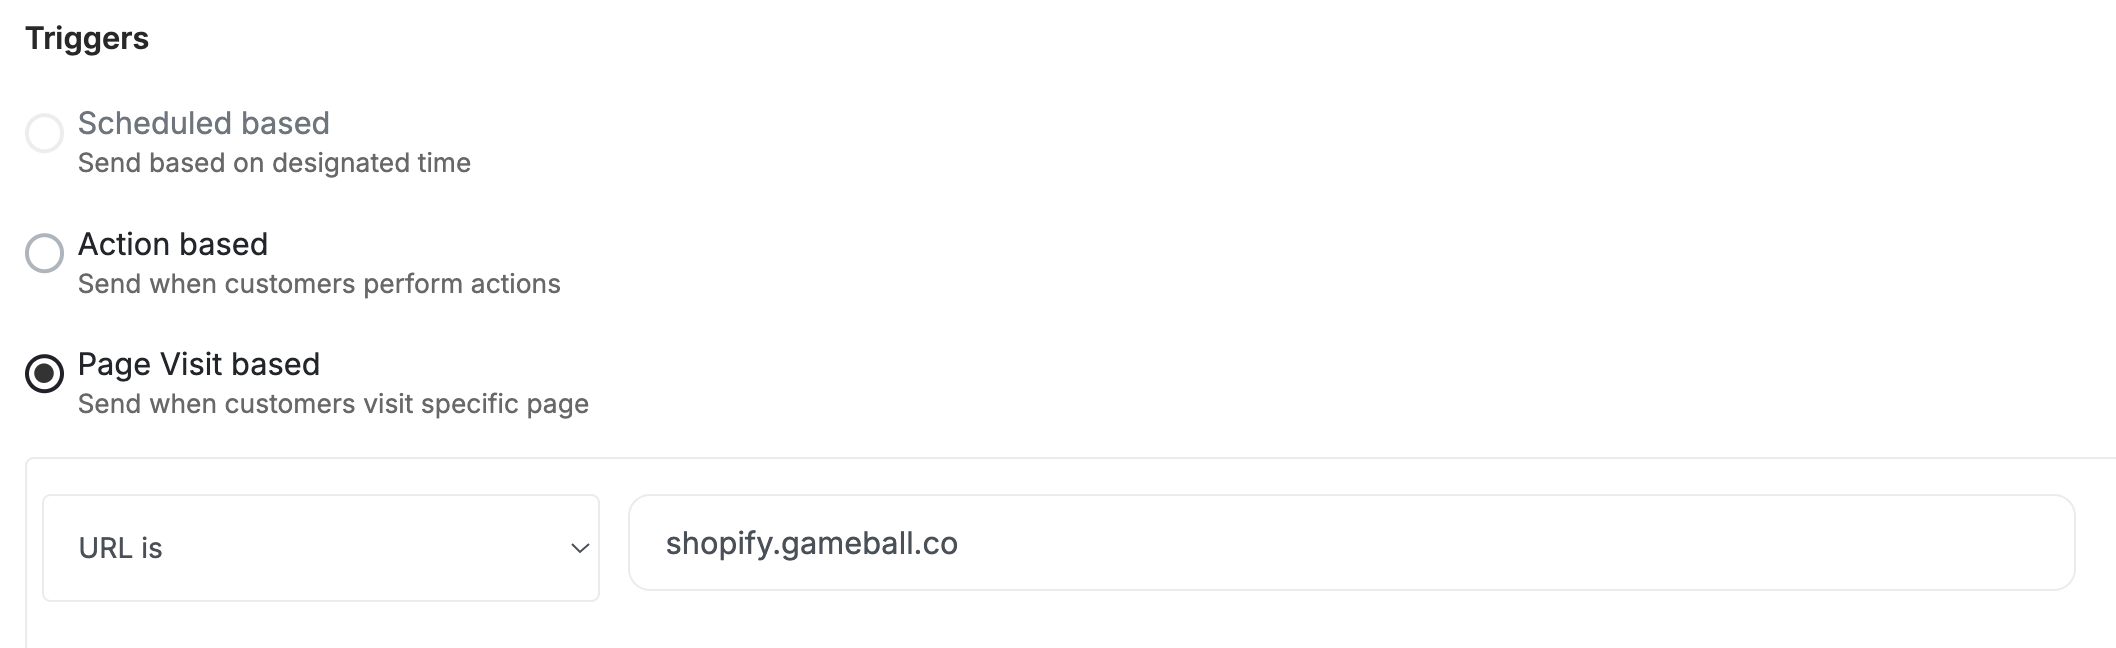
 Define what **triggers** are sending this web message to your audience. You can choose between:
* **Action Based:** All of your audience will receive this web message once they complete a specific action. All you have to do is select the event from the drop-down and add its filters.
* **Page Visit Based:** Each of your audience will receive this message when they visit a specific page on your website.
Define what **triggers** are sending this web message to your audience. You can choose between:
* **Action Based:** All of your audience will receive this web message once they complete a specific action. All you have to do is select the event from the drop-down and add its filters.
* **Page Visit Based:** Each of your audience will receive this message when they visit a specific page on your website.
 Click **Save and Continue**.
***
### Step 2: Scheduling
Now let's set the timing for sending the web message, based on the trigger that you chose in the previous step.
Set up the following:
* **Start Date:** The date that we will start sending the web messages
* **Repetition:** The number of times that the web message should be sent, and the duration between each one.
* **End Date:** The date when we should stop sending the web messages. You can choose:
* **Never**: the web messages will always be sent out
* **Till**: A certain date after which the web messages will stop being sent out.
* **Configure frequency:** Specify how often customers will receive the web message:
* An unlimited number of messages per customer (Default)
* Limit the Number of messages per customer (Choose the Maximum number)
Click **Save and Continue**.
***
### Step 2: Scheduling
Now let's set the timing for sending the web message, based on the trigger that you chose in the previous step.
Set up the following:
* **Start Date:** The date that we will start sending the web messages
* **Repetition:** The number of times that the web message should be sent, and the duration between each one.
* **End Date:** The date when we should stop sending the web messages. You can choose:
* **Never**: the web messages will always be sent out
* **Till**: A certain date after which the web messages will stop being sent out.
* **Configure frequency:** Specify how often customers will receive the web message:
* An unlimited number of messages per customer (Default)
* Limit the Number of messages per customer (Choose the Maximum number)
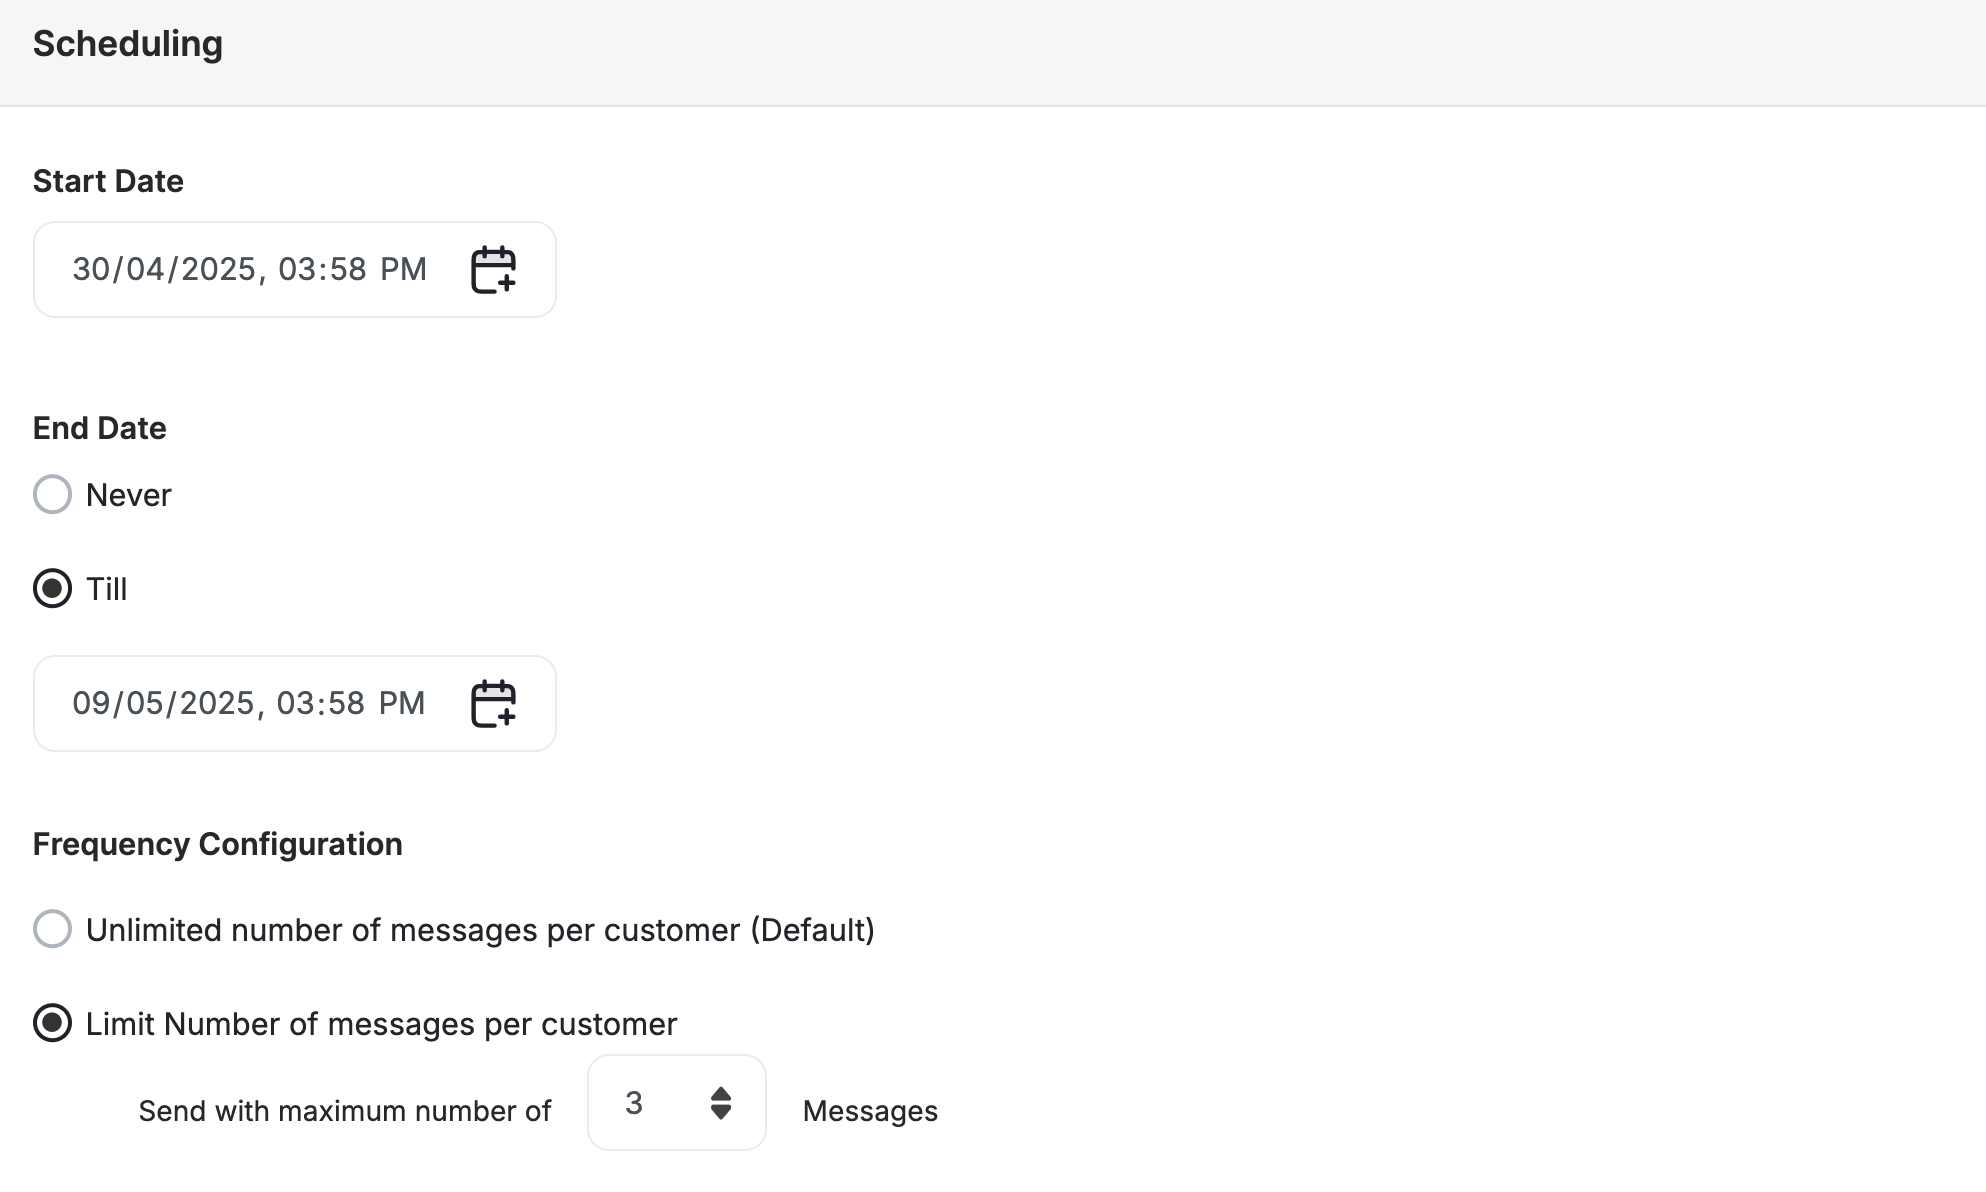 Set up the following:
* **Start Date:** The date that we will start sending the web messages
* **End Date:** The date when we should stop sending the web messages. You can choose:
* **Never**: the web messages will always be sent out
* **Till**: A certain date after which the web messages will stop being sent out.
* **Configure frequency:** Specify how often customers will receive the web message:
* **Default**: Each customer will keep receiving messages without any capping until the end of the campaign
* **Custom**: Choose the number of times the web message should be sent out, the duration between each web message, and the maximum number of times the web message should be sent.
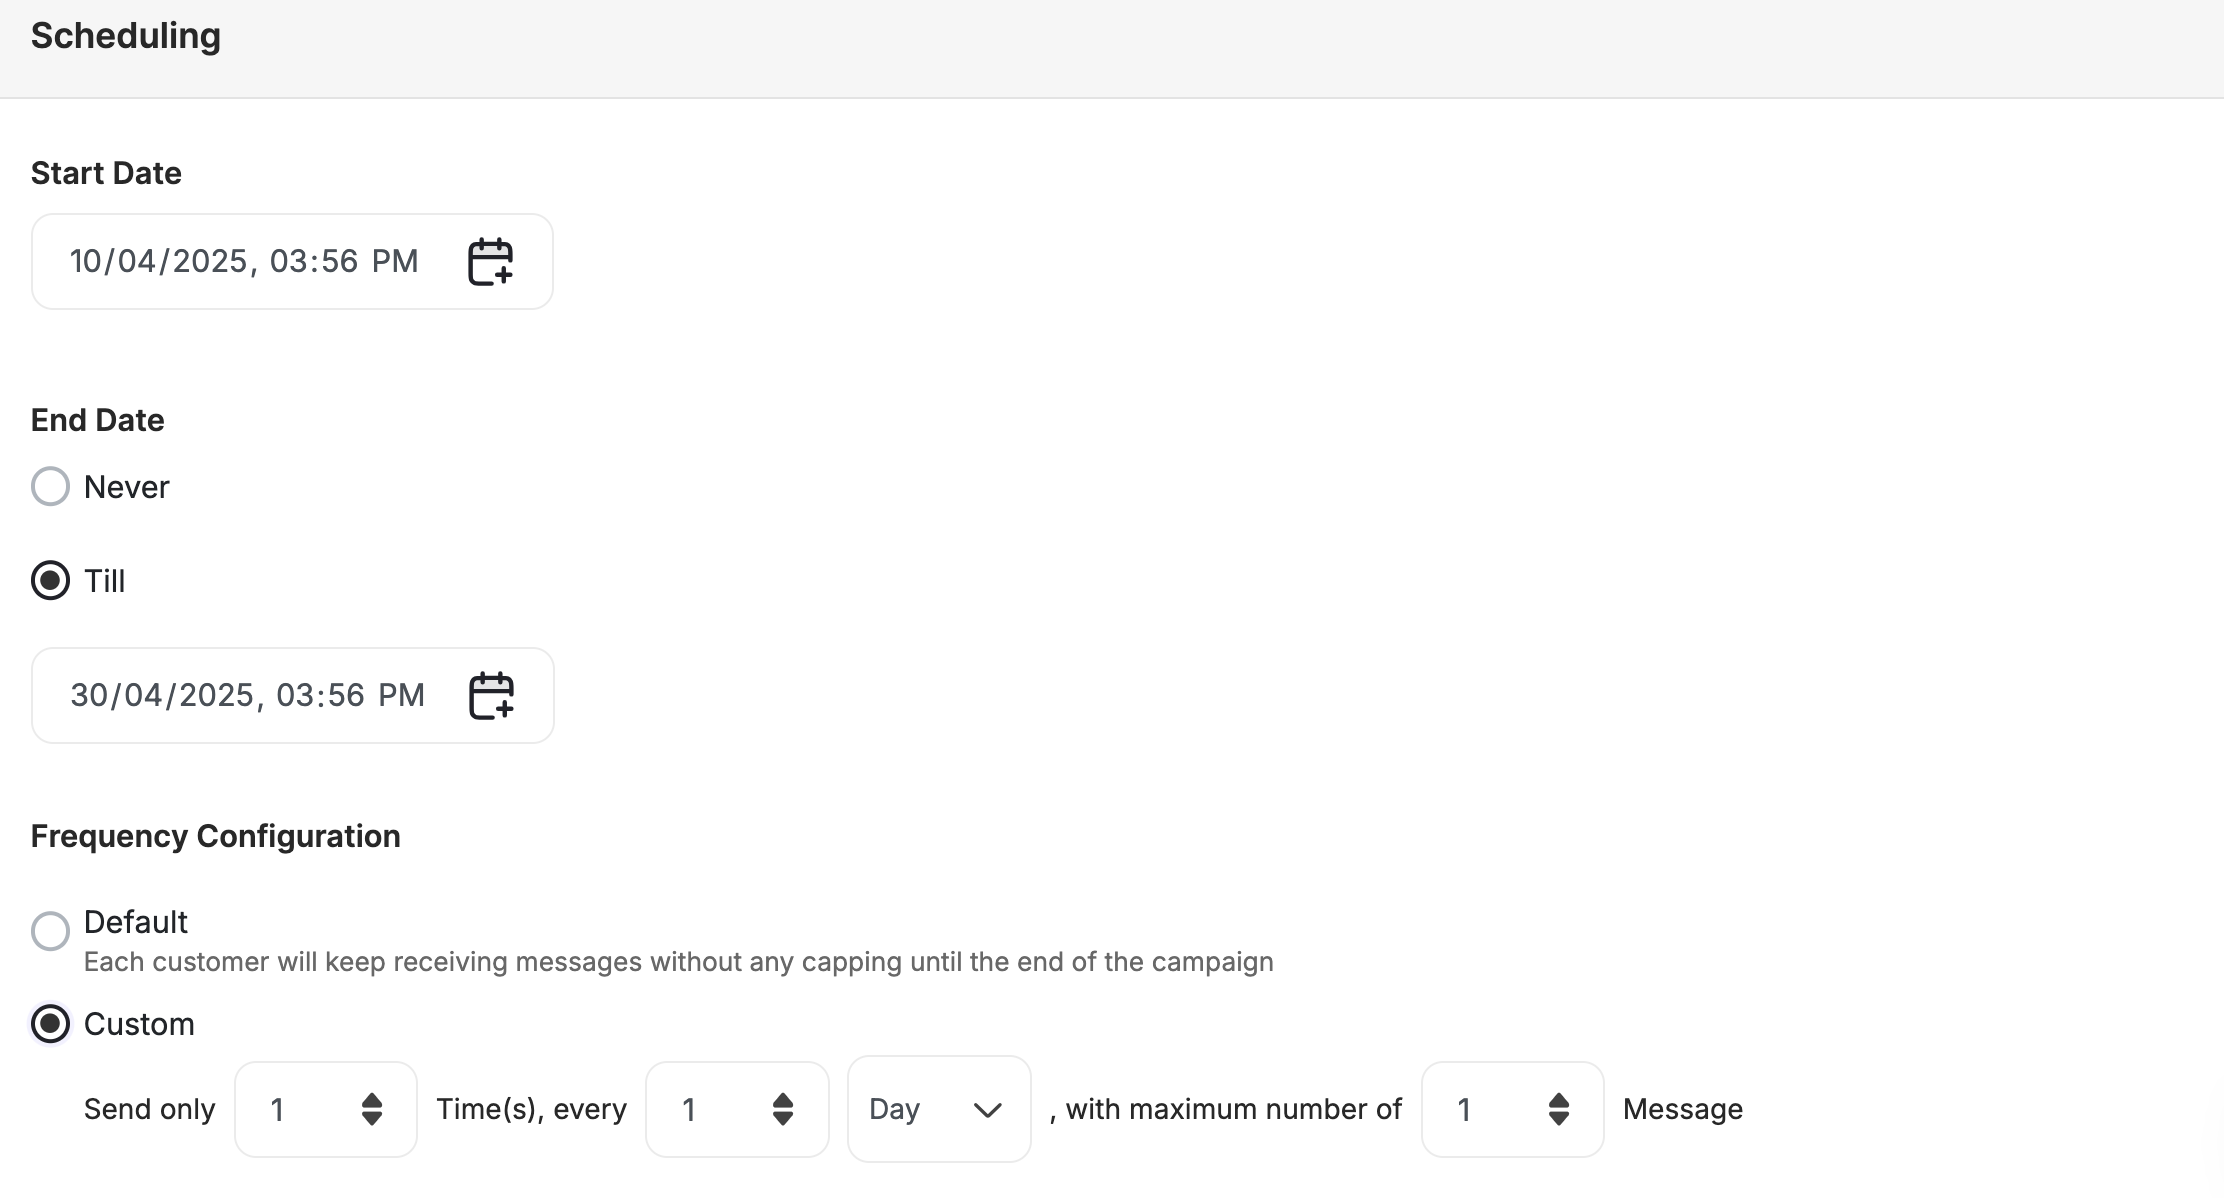
Set up the following:
* **Start Date:** The date that we will start sending the web messages
* **End Date:** The date when we should stop sending the web messages. You can choose:
* **Never**: the web messages will always be sent out
* **Till**: A certain date after which the web messages will stop being sent out.
* **Configure frequency:** Specify how often customers will receive the web message:
* **Default**: Each customer will keep receiving messages without any capping until the end of the campaign
* **Custom**: Choose the number of times the web message should be sent out, the duration between each web message, and the maximum number of times the web message should be sent.
 Click **Save and Continue**.
***
### Step 3: Compose
Customize the content and design of the web message, including the message title, body text, and optional message redirection.
Choose icons from Gameball's library or upload custom images to enhance the message's visual appeal.
Click **Save and Continue**.
***
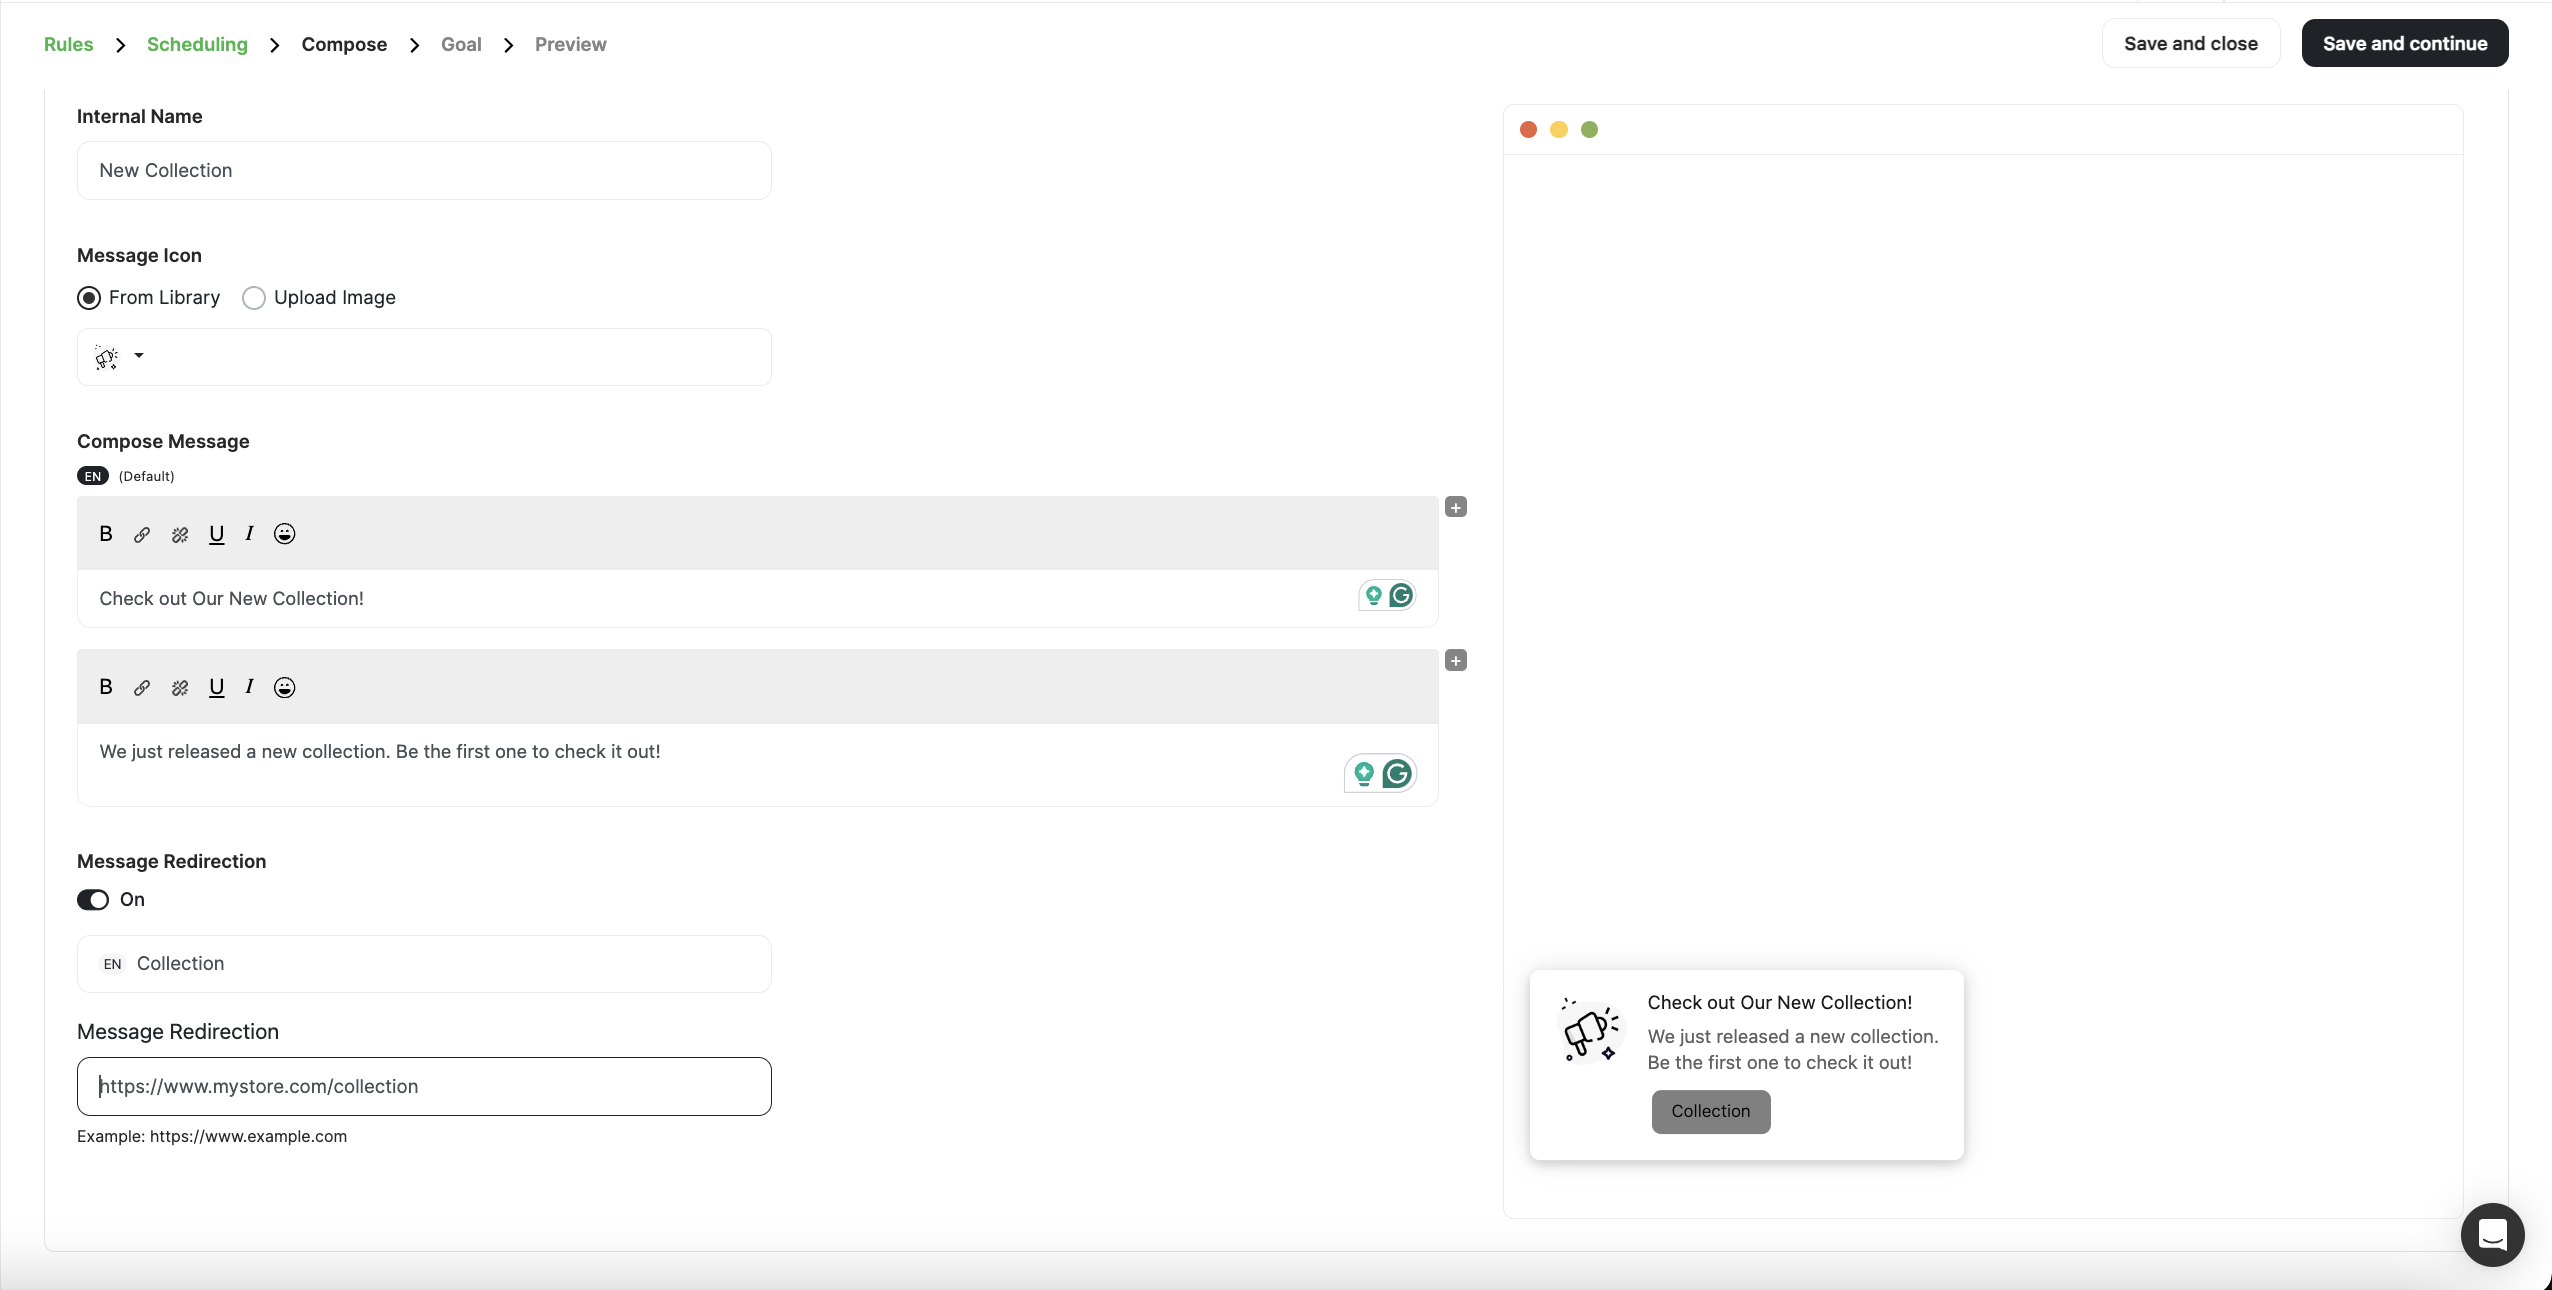
### Step 3: Compose
Customize the content and design of the web message, including the message title, body text, and optional message redirection.
Choose icons from Gameball's library or upload custom images to enhance the message's visual appeal.
 Click **Save and Continue**.
***
### Step 4: Goal
Define the goal of the web message campaign, such as increasing product views or driving conversions.
Set event triggers and timeframes to monitor customer actions in response to the message.
Click **Save and Continue**.
***
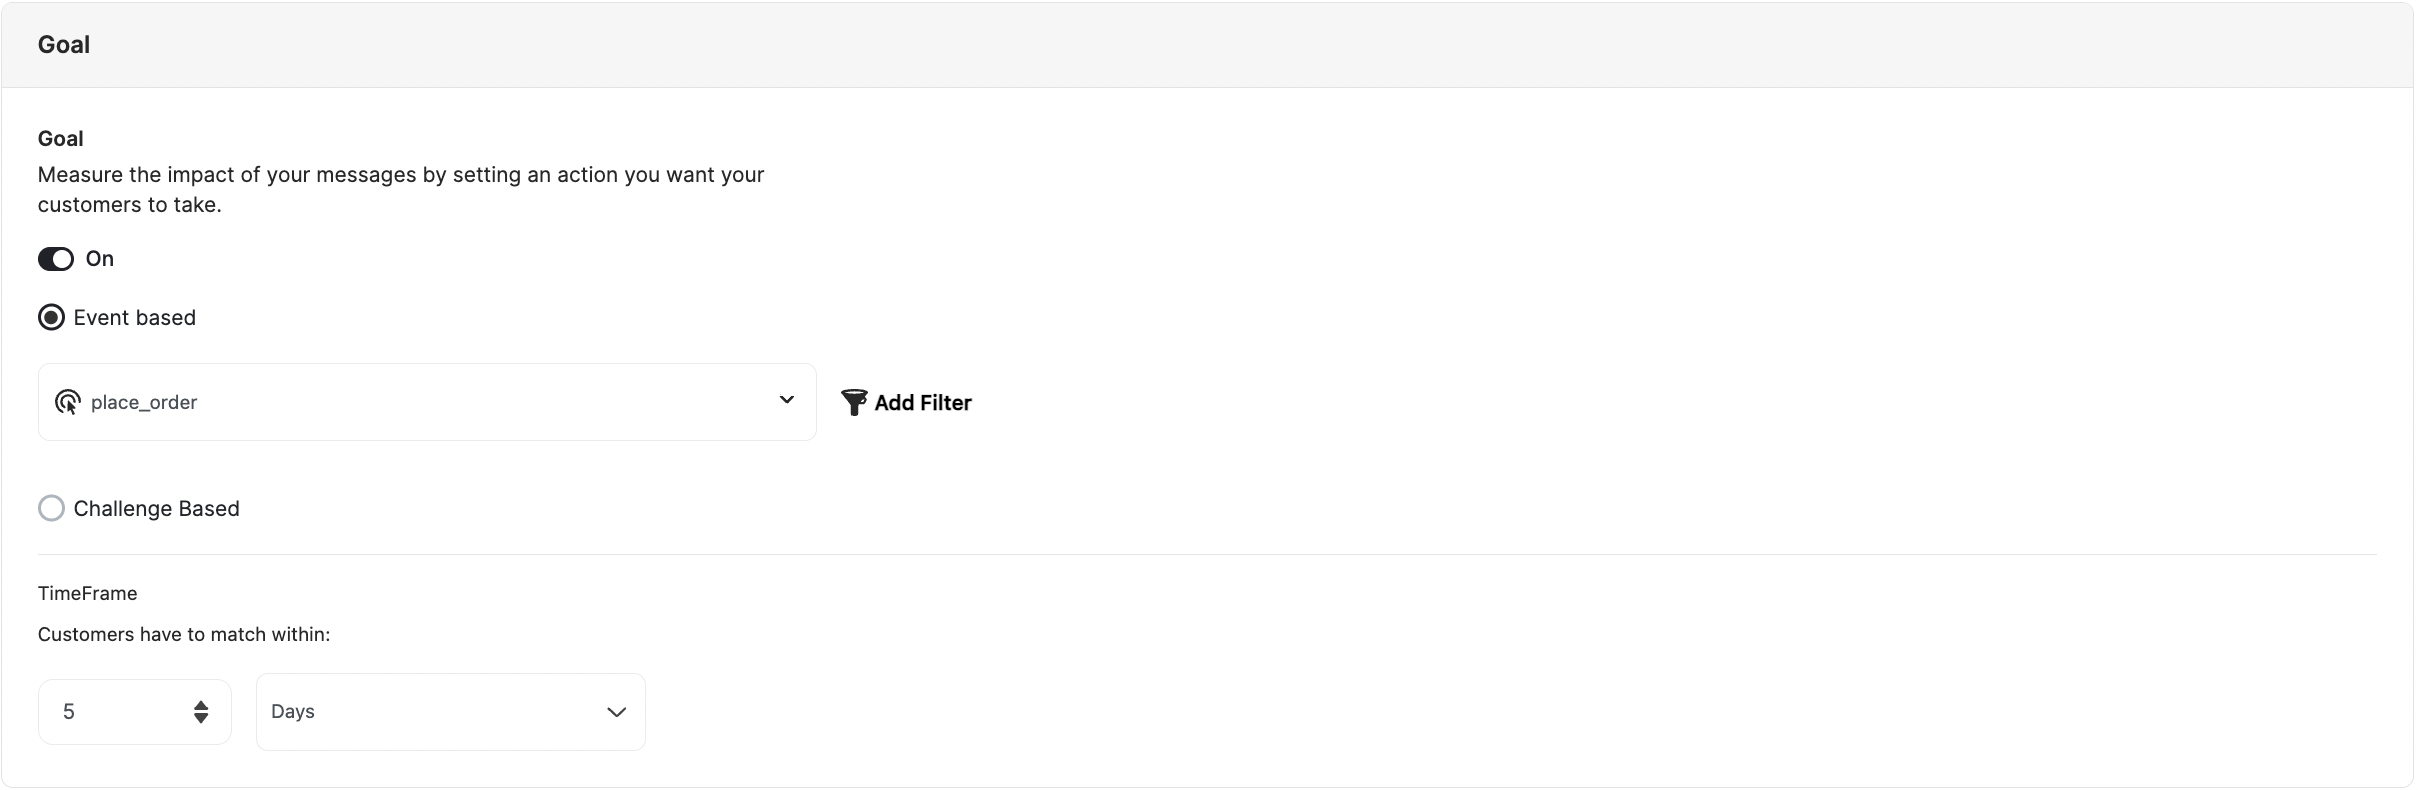
### Step 4: Goal
Define the goal of the web message campaign, such as increasing product views or driving conversions.
Set event triggers and timeframes to monitor customer actions in response to the message.
 Click **Save and Continue**.
***
### Step 5: Preview
Review and edit configurations as needed, ensuring the message aligns with campaign goals and customer preferences.
Send a test message to preview the web message before sending it to customers.
Click **Save and Continue**.
***
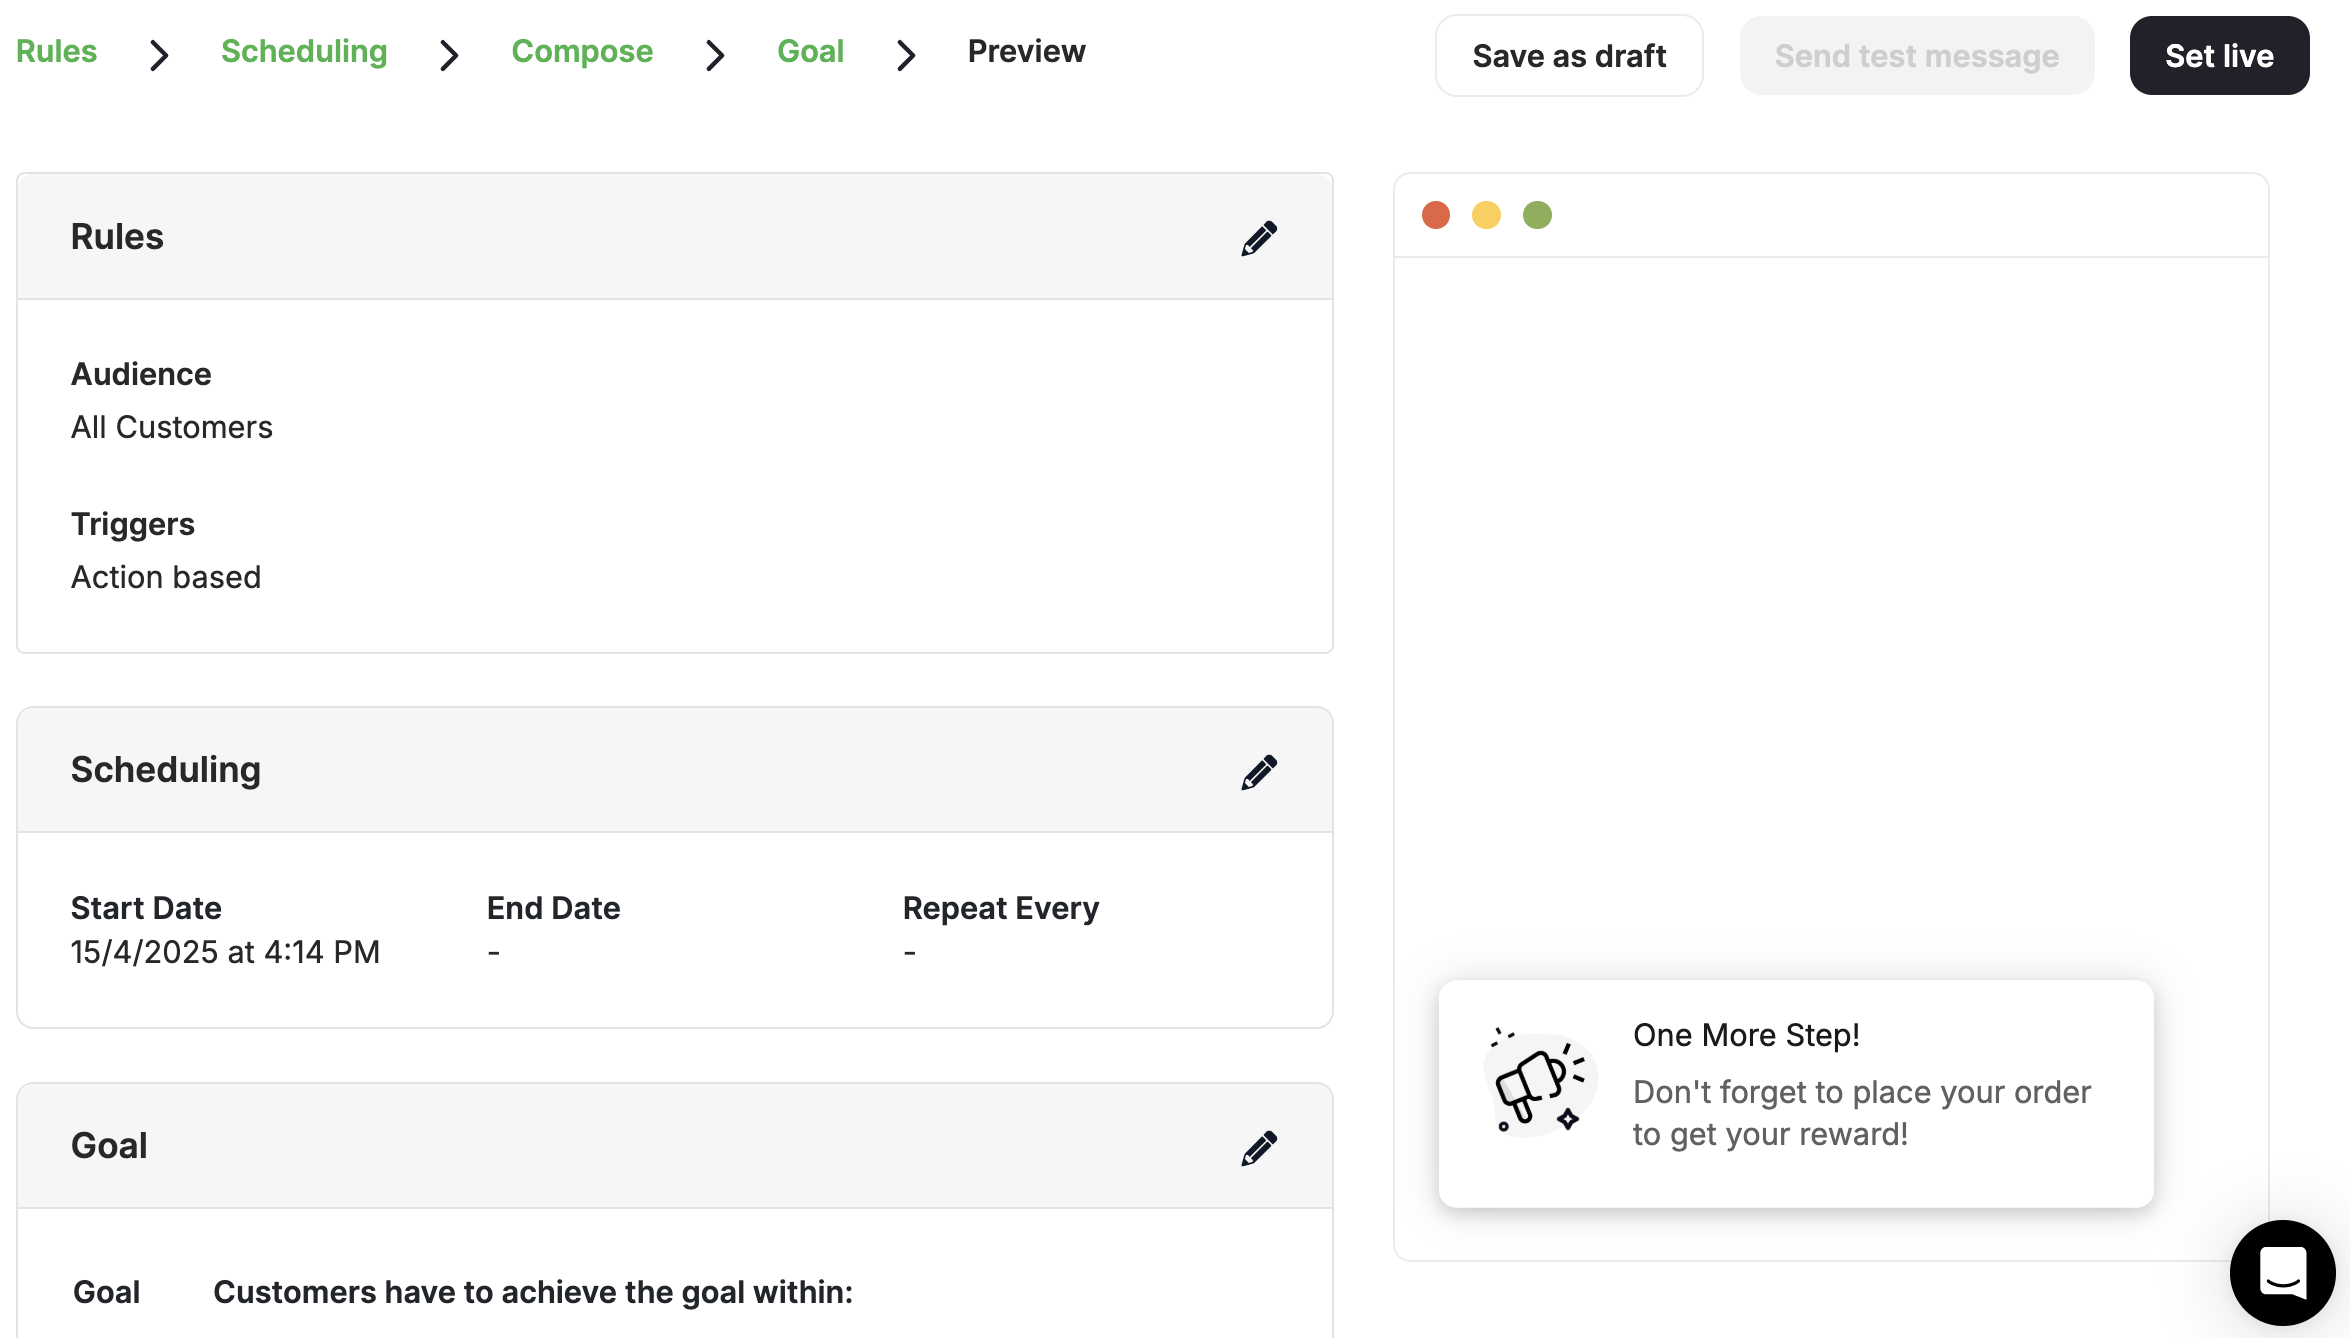
### Step 5: Preview
Review and edit configurations as needed, ensuring the message aligns with campaign goals and customer preferences.
Send a test message to preview the web message before sending it to customers.
 Lastly, click **Set live**.
***
## Viewing and Managing Configured Web Messages
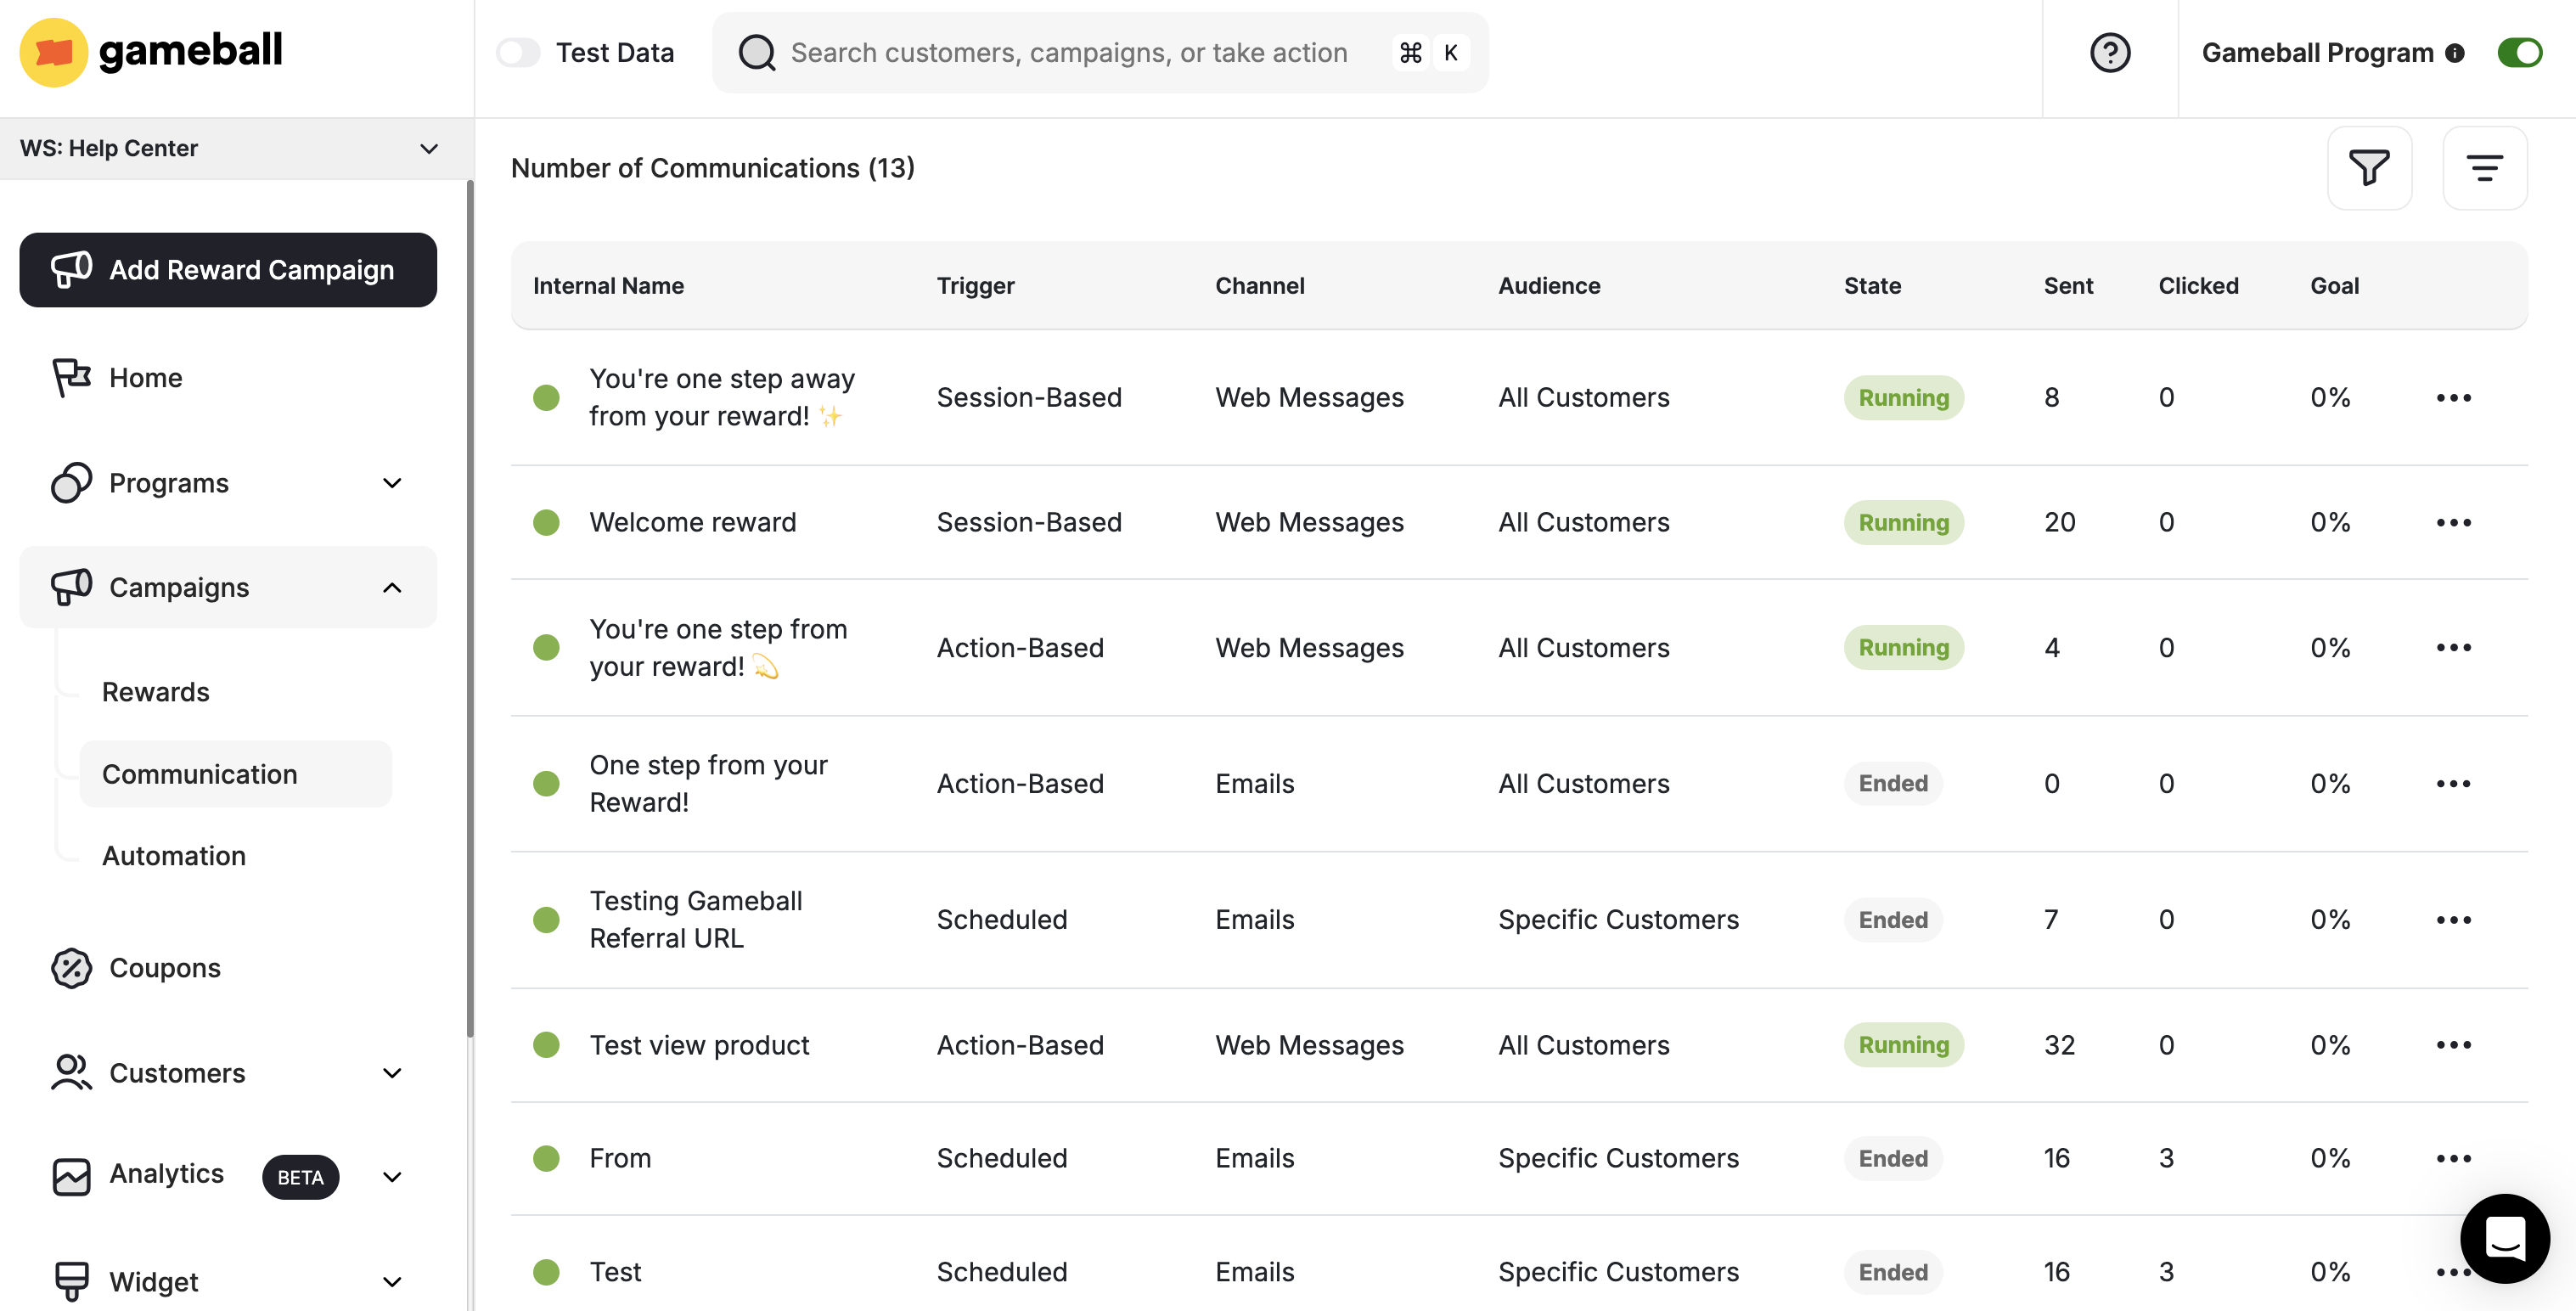
* Access the Communication Campaigns section in the Gameball Dashboard to view all configured campaigns.
* Monitor key metrics such as triggers, audience, state, number of sent campaigns, clicks, and goal achievement percentage.
Lastly, click **Set live**.
***
## Viewing and Managing Configured Web Messages
* Access the Communication Campaigns section in the Gameball Dashboard to view all configured campaigns.
* Monitor key metrics such as triggers, audience, state, number of sent campaigns, clicks, and goal achievement percentage.
 ***
## Tracking Web Message Performance and Customer Interaction
* Gain insights into message performance and customer interaction by selecting a specific campaign and viewing details.
* Check the list of customers who received the message and track their engagement, including clicks and goal achievements.
***
## Deactivating or Deleting Web Messages Communication Campaigns
* From the Communication Campaigns section in the Gameball Dashboard, **select the desired web message campaign**.
* Click on the **three dots icon** to choose between **deactivating/activating** or **deleting** the campaign.
***
Set up email campaigns to reach customers with personalized messages.
Set up push notification campaigns to engage customers on their devices.
Set up SMS campaigns for fast, high-visibility mobile communications.
***
## Tracking Web Message Performance and Customer Interaction
* Gain insights into message performance and customer interaction by selecting a specific campaign and viewing details.
* Check the list of customers who received the message and track their engagement, including clicks and goal achievements.
***
## Deactivating or Deleting Web Messages Communication Campaigns
* From the Communication Campaigns section in the Gameball Dashboard, **select the desired web message campaign**.
* Click on the **three dots icon** to choose between **deactivating/activating** or **deleting** the campaign.
***
Set up email campaigns to reach customers with personalized messages.
Set up push notification campaigns to engage customers on their devices.
Set up SMS campaigns for fast, high-visibility mobile communications.