> ## Documentation Index
> Fetch the complete documentation index at: https://docs.gameball.co/llms.txt
> Use this file to discover all available pages before exploring further.
# How Do I Get Started with Gameball?
> A quick walk-through on the essential steps to take before launching your loyalty experience.
Follow these essential steps to build and launch your loyalty experience on Gameball.
If you installed Gameball on Shopify before April 29, your setup experience looks different. See the **Shopify (Installed Before Apr 29)** tab for your setup guide.
When you first access Gameball on Shopify, you're guided through a quick setup that launches a fully configured loyalty program in just a few minutes. Based on your inputs, Gameball automatically prepares your program and suggests campaigns aligned with your business goals — no technical setup required.
***
### Setting Up Your Loyalty Program
#### Step 1: Meet Sarah
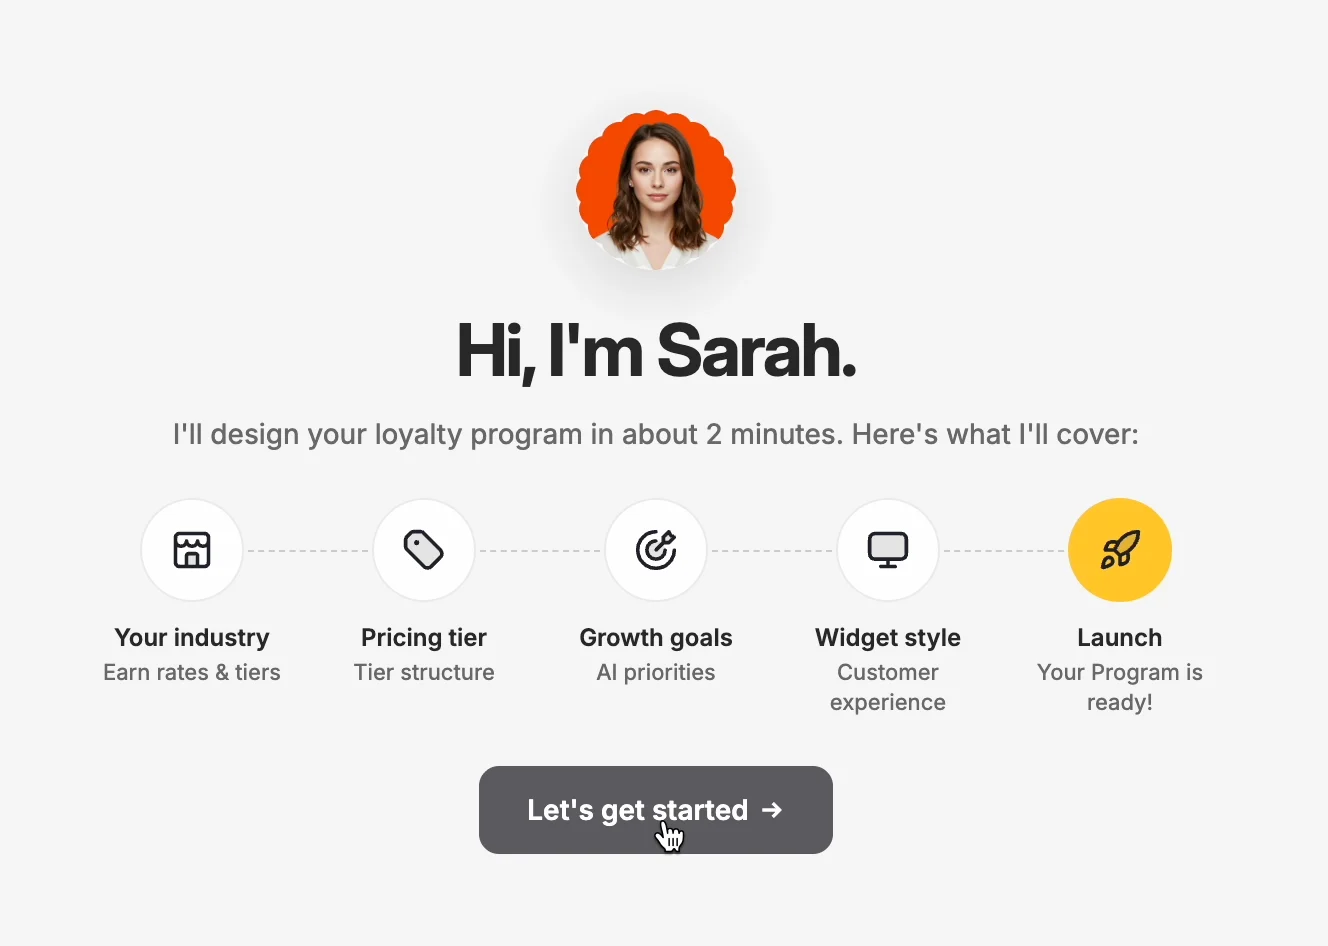
You'll be greeted by Sarah, who walks you through the setup step by step. Click **Let's get started** to begin.
 #### Step 2: Answer a Few Questions
Sarah asks for a few key inputs to tailor the experience to your business:
Sarah uses your industry to set earn rates and tier structure as a starting point. You can adjust everything after setup.
This tells Sarah the price range of your products so she can calibrate reward values that feel meaningful to your customers.
Sarah uses your goals to decide which features to prioritize — for example, if increasing retention is your main focus, she'll configure the program accordingly.
Choose how the loyalty widget looks to your customers. This is what they'll see when they interact with their rewards.
Confirm you're ready to go. Sarah finalizes your program and hands off to Adam for campaign suggestions.
#### Step 3: Your Program Is Ready
Based on your answers, Gameball automatically:
* Sets up your loyalty structure
* Configures your points and rewards logic
* Prepares your customer-facing widget
* Aligns everything with your stated business goals
From here, you can review your setup, make any adjustments, and launch your program. You don't need to handle any technical configuration.
***
### Revenue Risks & Opportunities
Once your program is ready, Adam analyzes your Shopify store — order history, customer behavior, and revenue patterns — and surfaces two types of insights on your homepage:
* **Risk** — A customer segment performing below expected benchmarks on a specific metric, such as AOV, purchase frequency, or basket size. A risk is always tied to a defined segment, not a general signal about overall store performance.
* **Opportunity** — A segment performing at or above the expected benchmark, or showing clear untapped revenue growth potential based on behavioral signals.
#### Step 2: Answer a Few Questions
Sarah asks for a few key inputs to tailor the experience to your business:
Sarah uses your industry to set earn rates and tier structure as a starting point. You can adjust everything after setup.
This tells Sarah the price range of your products so she can calibrate reward values that feel meaningful to your customers.
Sarah uses your goals to decide which features to prioritize — for example, if increasing retention is your main focus, she'll configure the program accordingly.
Choose how the loyalty widget looks to your customers. This is what they'll see when they interact with their rewards.
Confirm you're ready to go. Sarah finalizes your program and hands off to Adam for campaign suggestions.
#### Step 3: Your Program Is Ready
Based on your answers, Gameball automatically:
* Sets up your loyalty structure
* Configures your points and rewards logic
* Prepares your customer-facing widget
* Aligns everything with your stated business goals
From here, you can review your setup, make any adjustments, and launch your program. You don't need to handle any technical configuration.
***
### Revenue Risks & Opportunities
Once your program is ready, Adam analyzes your Shopify store — order history, customer behavior, and revenue patterns — and surfaces two types of insights on your homepage:
* **Risk** — A customer segment performing below expected benchmarks on a specific metric, such as AOV, purchase frequency, or basket size. A risk is always tied to a defined segment, not a general signal about overall store performance.
* **Opportunity** — A segment performing at or above the expected benchmark, or showing clear untapped revenue growth potential based on behavioral signals.
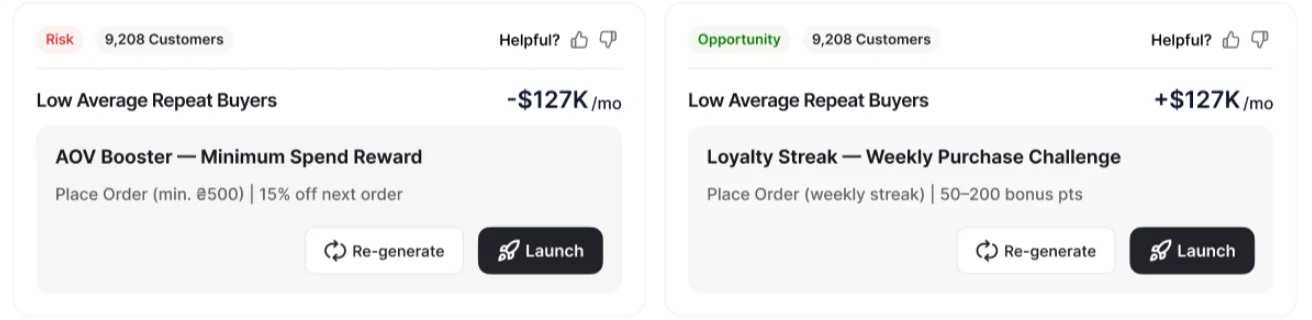 Each card shows a **revenue impact** figure — the dollar amount you stand to gain (opportunities, marked **+**) or lose (risks, marked **−**). This reflects the gap between what the segment generates today and what it could generate if the targeted metric improved, or what you stand to lose if the trend continues (e.g., declining frequency, falling AOV, or customer churn).
Unactioned risks and opportunities stay at the top of your homepage. Once you launch a campaign against one, it moves to **In Progress Campaigns** — keeping what still needs attention front and center.
For each risk or opportunity, Adam recommends a campaign with the segment, reward, and budget pre-configured. You can view the full configuration summary, launch directly from the card, or regenerate an alternative. AI-generated segments and campaign recommendations are labeled with an **AI** badge so you can identify them at a glance.
***
### Re-generating a Campaign
If a campaign doesn't feel right for your store, click **Re-generate** on any card.
When you do this:
* The risk / opportunity stays the same
* A new variation is created with adjusted reward amounts and campaign structure
You can re-generate as many times as you need before launching. This lets you quickly explore different approaches without building a campaign from scratch.
***
### Launching a Campaign
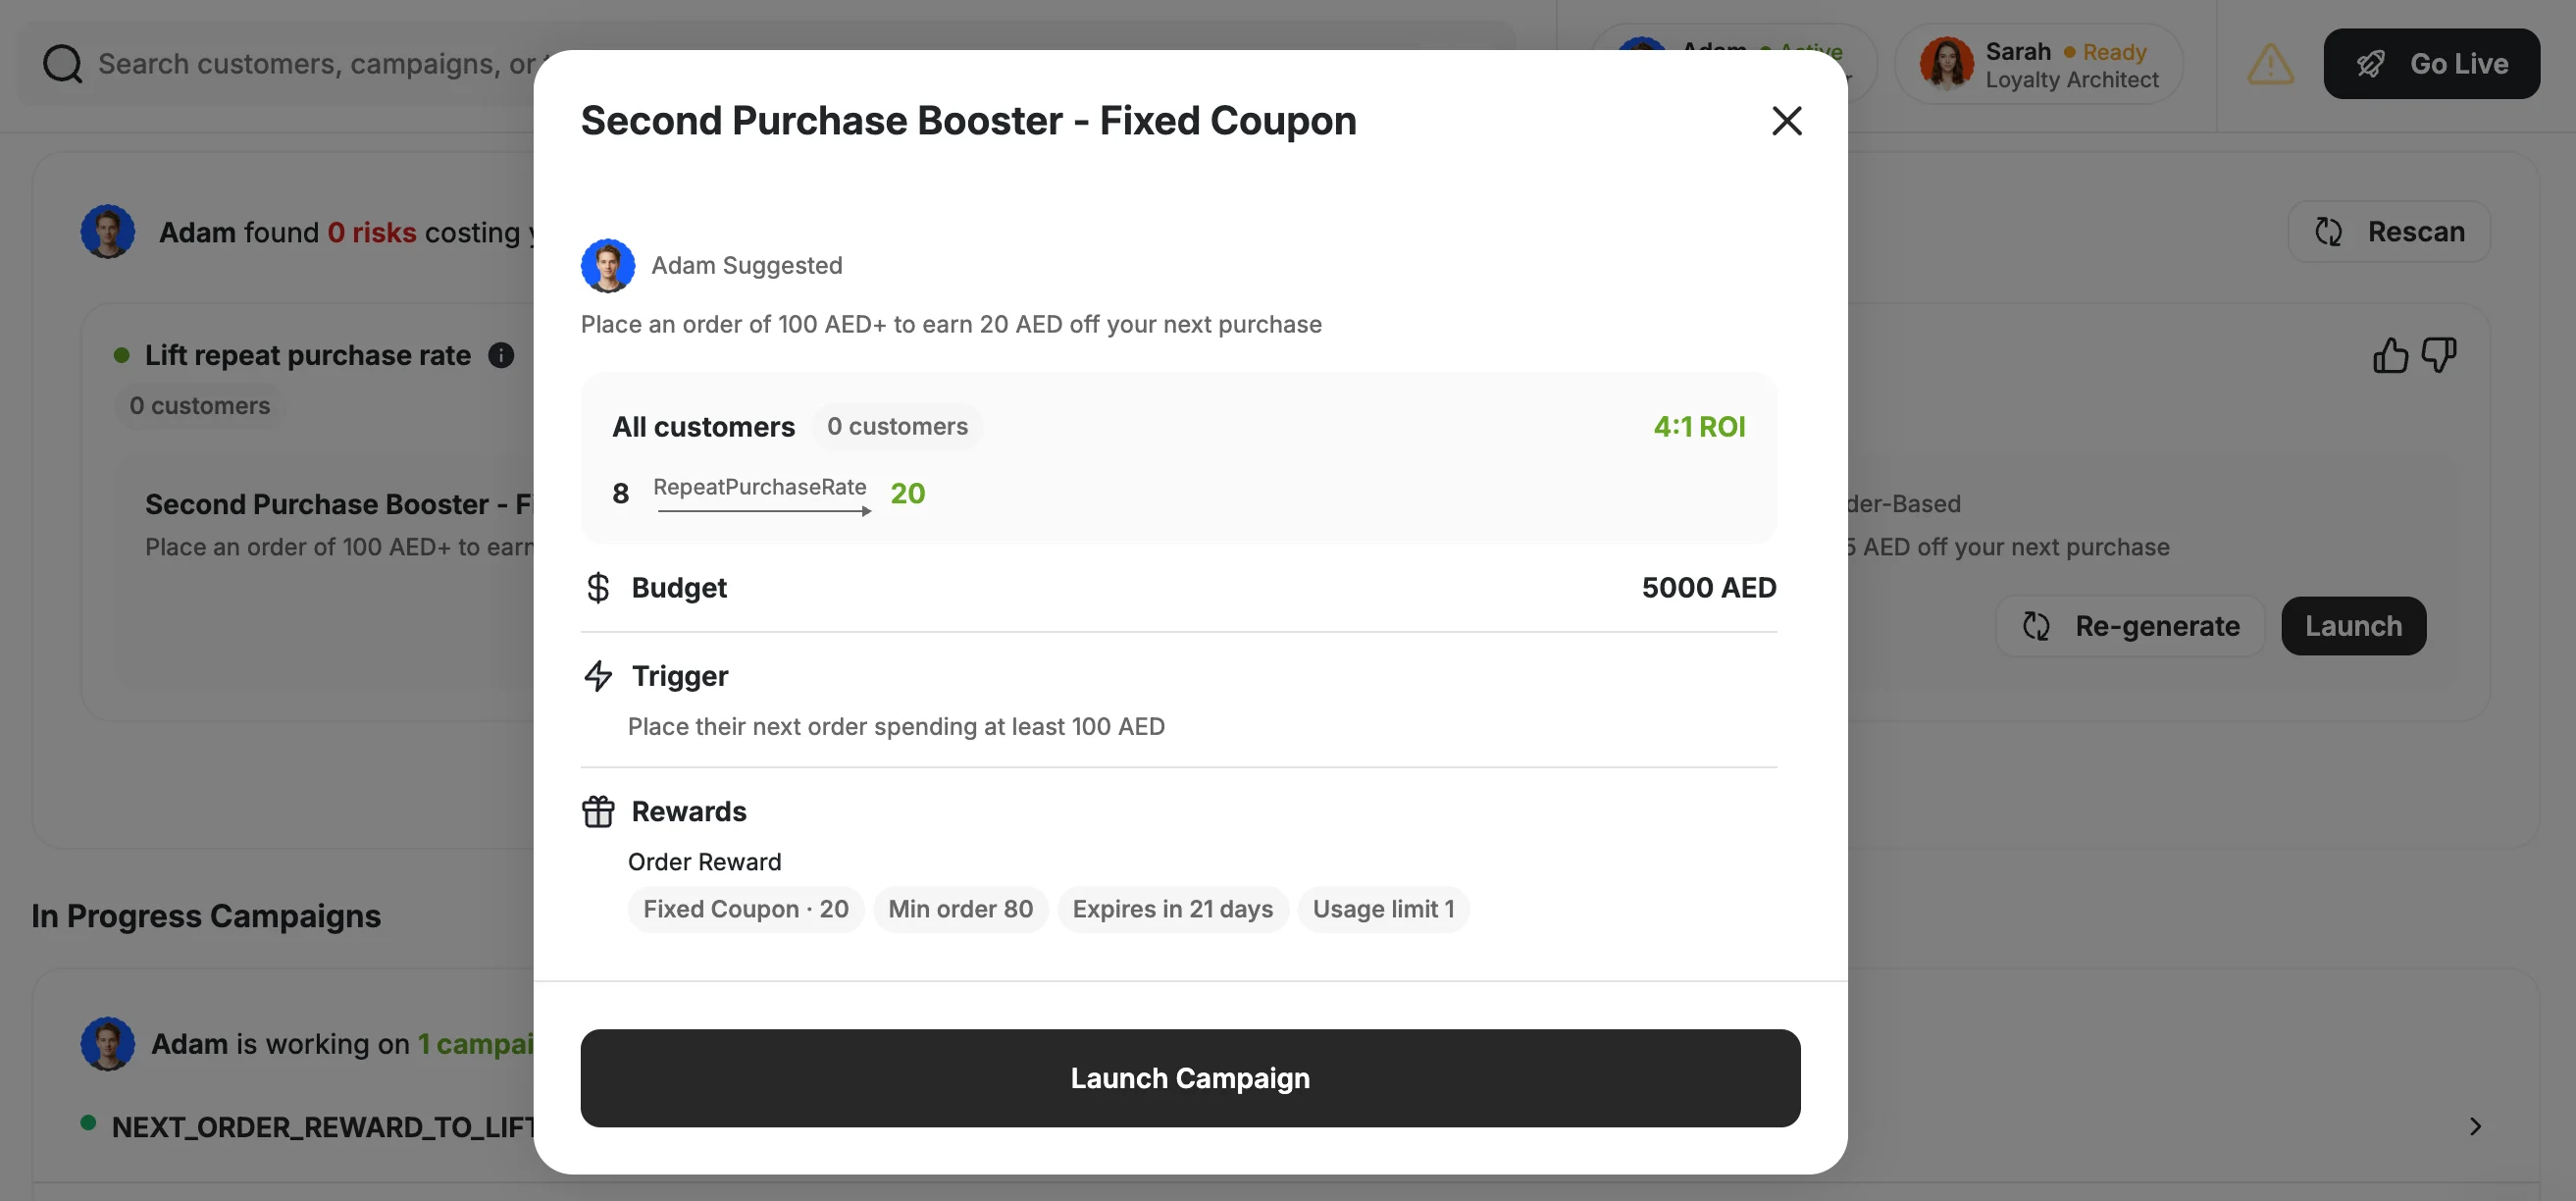
When you're happy with a campaign, click **Launch** on its card to open the campaign detail view. Here you can review everything before it goes live:
* **Audience** — which customers qualify and the estimated ROI
* **Budget** — the total spend cap for the campaign
* **Trigger** — the condition a customer must meet to earn the reward (e.g., place an order of 100 AED or more)
* **Rewards** — the reward type, value, minimum order, expiry, and usage limit
Each card shows a **revenue impact** figure — the dollar amount you stand to gain (opportunities, marked **+**) or lose (risks, marked **−**). This reflects the gap between what the segment generates today and what it could generate if the targeted metric improved, or what you stand to lose if the trend continues (e.g., declining frequency, falling AOV, or customer churn).
Unactioned risks and opportunities stay at the top of your homepage. Once you launch a campaign against one, it moves to **In Progress Campaigns** — keeping what still needs attention front and center.
For each risk or opportunity, Adam recommends a campaign with the segment, reward, and budget pre-configured. You can view the full configuration summary, launch directly from the card, or regenerate an alternative. AI-generated segments and campaign recommendations are labeled with an **AI** badge so you can identify them at a glance.
***
### Re-generating a Campaign
If a campaign doesn't feel right for your store, click **Re-generate** on any card.
When you do this:
* The risk / opportunity stays the same
* A new variation is created with adjusted reward amounts and campaign structure
You can re-generate as many times as you need before launching. This lets you quickly explore different approaches without building a campaign from scratch.
***
### Launching a Campaign
When you're happy with a campaign, click **Launch** on its card to open the campaign detail view. Here you can review everything before it goes live:
* **Audience** — which customers qualify and the estimated ROI
* **Budget** — the total spend cap for the campaign
* **Trigger** — the condition a customer must meet to earn the reward (e.g., place an order of 100 AED or more)
* **Rewards** — the reward type, value, minimum order, expiry, and usage limit
 If the recommended campaign is a game, you'll also see a preview of the game experience before going live.
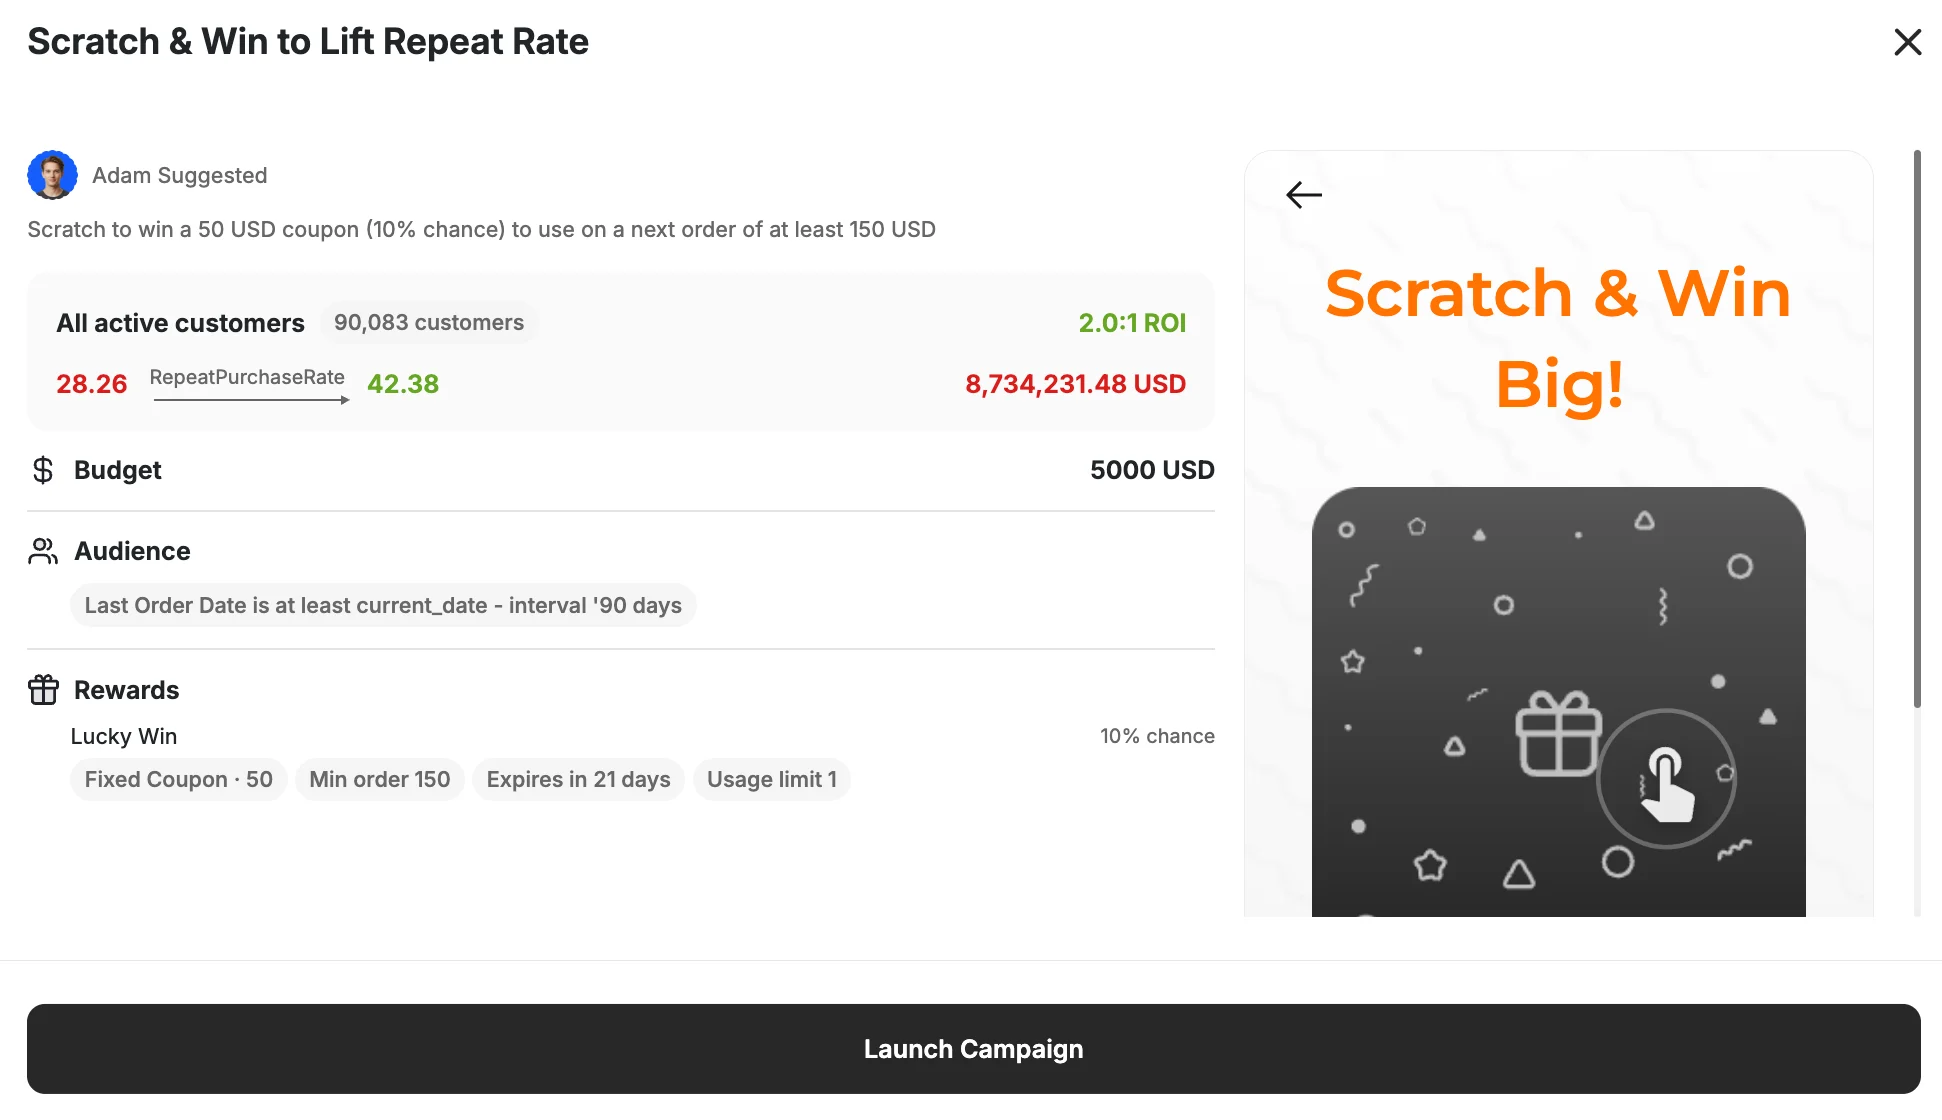 Click **Launch Campaign** to activate it. The campaign starts tracking customer activity immediately, and customers who meet the conditions will see the reward automatically.
Once live, the campaign appears under **In Progress Campaigns** while Adam finalizes the setup.
Click **Launch Campaign** to activate it. The campaign starts tracking customer activity immediately, and customers who meet the conditions will see the reward automatically.
Once live, the campaign appears under **In Progress Campaigns** while Adam finalizes the setup.
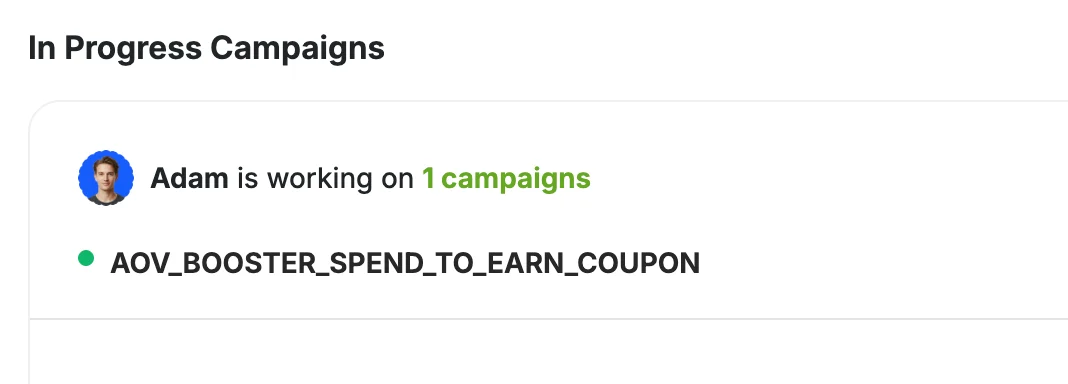 No further action is needed. You can also rate any suggestion using the thumbs up / thumbs down on each card — your feedback helps improve future recommendations.
***
### What You Get With This Onboarding
**Loyalty program setup without expertise** — Gameball generates a complete loyalty program from your Shopify store data, including earning rules, point values, and tier structure. No manual configuration required.
**Revenue risks and opportunities** — Your homepage surfaces active revenue leakage risks and growth opportunities based on your store's data, with projected revenue impact for each. Unactioned items stay at the top; launched campaigns move to In Progress.
**AI-recommended campaigns** — For each identified risk or opportunity, Adam recommends a campaign with segment, reward, and budget pre-configured. You can view the full configuration summary, regenerate alternatives, or launch directly.
**Projected ROI before launch** — Each campaign recommendation includes an estimated revenue impact so you know what to expect before approving.
**AI-generated campaign visuals** — Generate campaign images using a text prompt directly from the dashboard — no design skills or external tools needed.
***
### Good to Know
* You can re-generate campaigns as many times as needed before launching
* You can edit any campaign after launch from your dashboard
* Adam's recommendations are based on your store's actual order history, customer behavior, and revenue patterns
Enable account creation on Shopify to give your customers the ability to create accounts and enroll in your Gameball rewards experience. [Learn more](/product-documentation/getting-started/faqs/enable-customer-account-creation-on-shopify)
You can also make sure that your customers' points and tiers are updated by following the steps in [this article](/product-documentation/understanding-your-customers/your-customers/migrate-your-customers-to-gameball-from-other-loyalty-programs-on-shopify).
Gameball offers programs that help you reach your loyalty goals — whether that's acquisition, activation, engagement, or retention. Configure and activate any of the following:
Set up your earning rules and cashback configuration.
Configure how customers redeem their earned points.
Launch a referral program to grow your customer base.
Create targeted campaigns to reward specific behaviors.
Gamify your experience with tiered loyalty levels.
After setting up your loyalty programs, configure the right methods and rules for how your customers can redeem their points — whether as discount percentages, coupons, free shipping, or other rewards.
[Learn more](/product-documentation/programs/loyalty-points-redeem/launch-and-configure-your-redeem-pointing-system)
* Create a widget profile and configure general settings such as language, program name, tab visibility, and icons. [Learn more](/product-documentation/customer-widget/introduction-to-customer-widget)
* Style Gameball's widget to match your store's theme, making it feel like a seamless extension of your brand. [Learn more](/product-documentation/customer-widget/start-configuring-profile/customize-your-gameball-customer-widget-to-match-your-brand)
Once you've configured the essentials, publish the Gameball widget so your customers can enroll in your reward experience. Follow "Stage 1" in the widget visibility guide to go live.
[Publish Your Widget](/product-documentation/customer-widget/start-configuring-profile/control-gameball-widget-visibility-on-your-platform)
If you have been using other loyalty programs and want your customers' profiles migrated, follow the steps in [this article](/product-documentation/guides-strategies-faqs/supportive-guides/import-customers-csv) to import customer data to Gameball.
Gameball offers programs that help you reach your loyalty goals — whether that's acquisition, activation, engagement, or retention. Configure and activate any of the following:
Set up your earning rules and cashback configuration.
Configure how customers redeem their earned points.
Launch a referral program to grow your customer base.
Create targeted campaigns to reward specific behaviors.
Gamify your experience with tiered loyalty levels.
After setting up your loyalty programs, configure the right methods and rules for how your customers can redeem their points — whether as discount percentages, coupons, free shipping, or other rewards.
[Learn more](/product-documentation/programs/loyalty-points-redeem/launch-and-configure-your-redeem-pointing-system)
* Create a widget profile and configure general settings such as language, program name, tab visibility, and icons. [Learn more](/product-documentation/customer-widget/introduction-to-customer-widget)
* Style Gameball's widget to match your store's theme, making it feel like a seamless extension of your brand. [Learn more](/product-documentation/customer-widget/start-configuring-profile/customize-your-gameball-customer-widget-to-match-your-brand)
Once you've configured the essentials, publish the Gameball widget so your customers can enroll in your reward experience. Follow "Stage 1" in the widget visibility guide to go live.
[Publish Your Widget](/product-documentation/customer-widget/start-configuring-profile/control-gameball-widget-visibility-on-your-platform)
***
## More Features to Explore
Send real-time notifications to keep your customers engaged.
Create targeted email and in-app campaigns.
Enable cross-merchant reward programs for your customers.
No further action is needed. You can also rate any suggestion using the thumbs up / thumbs down on each card — your feedback helps improve future recommendations.
***
### What You Get With This Onboarding
**Loyalty program setup without expertise** — Gameball generates a complete loyalty program from your Shopify store data, including earning rules, point values, and tier structure. No manual configuration required.
**Revenue risks and opportunities** — Your homepage surfaces active revenue leakage risks and growth opportunities based on your store's data, with projected revenue impact for each. Unactioned items stay at the top; launched campaigns move to In Progress.
**AI-recommended campaigns** — For each identified risk or opportunity, Adam recommends a campaign with segment, reward, and budget pre-configured. You can view the full configuration summary, regenerate alternatives, or launch directly.
**Projected ROI before launch** — Each campaign recommendation includes an estimated revenue impact so you know what to expect before approving.
**AI-generated campaign visuals** — Generate campaign images using a text prompt directly from the dashboard — no design skills or external tools needed.
***
### Good to Know
* You can re-generate campaigns as many times as needed before launching
* You can edit any campaign after launch from your dashboard
* Adam's recommendations are based on your store's actual order history, customer behavior, and revenue patterns
Enable account creation on Shopify to give your customers the ability to create accounts and enroll in your Gameball rewards experience. [Learn more](/product-documentation/getting-started/faqs/enable-customer-account-creation-on-shopify)
You can also make sure that your customers' points and tiers are updated by following the steps in [this article](/product-documentation/understanding-your-customers/your-customers/migrate-your-customers-to-gameball-from-other-loyalty-programs-on-shopify).
Gameball offers programs that help you reach your loyalty goals — whether that's acquisition, activation, engagement, or retention. Configure and activate any of the following:
Set up your earning rules and cashback configuration.
Configure how customers redeem their earned points.
Launch a referral program to grow your customer base.
Create targeted campaigns to reward specific behaviors.
Gamify your experience with tiered loyalty levels.
After setting up your loyalty programs, configure the right methods and rules for how your customers can redeem their points — whether as discount percentages, coupons, free shipping, or other rewards.
[Learn more](/product-documentation/programs/loyalty-points-redeem/launch-and-configure-your-redeem-pointing-system)
* Create a widget profile and configure general settings such as language, program name, tab visibility, and icons. [Learn more](/product-documentation/customer-widget/introduction-to-customer-widget)
* Style Gameball's widget to match your store's theme, making it feel like a seamless extension of your brand. [Learn more](/product-documentation/customer-widget/start-configuring-profile/customize-your-gameball-customer-widget-to-match-your-brand)
Once you've configured the essentials, publish the Gameball widget so your customers can enroll in your reward experience. Follow "Stage 1" in the widget visibility guide to go live.
[Publish Your Widget](/product-documentation/customer-widget/start-configuring-profile/control-gameball-widget-visibility-on-your-platform)
If you have been using other loyalty programs and want your customers' profiles migrated, follow the steps in [this article](/product-documentation/guides-strategies-faqs/supportive-guides/import-customers-csv) to import customer data to Gameball.
Gameball offers programs that help you reach your loyalty goals — whether that's acquisition, activation, engagement, or retention. Configure and activate any of the following:
Set up your earning rules and cashback configuration.
Configure how customers redeem their earned points.
Launch a referral program to grow your customer base.
Create targeted campaigns to reward specific behaviors.
Gamify your experience with tiered loyalty levels.
After setting up your loyalty programs, configure the right methods and rules for how your customers can redeem their points — whether as discount percentages, coupons, free shipping, or other rewards.
[Learn more](/product-documentation/programs/loyalty-points-redeem/launch-and-configure-your-redeem-pointing-system)
* Create a widget profile and configure general settings such as language, program name, tab visibility, and icons. [Learn more](/product-documentation/customer-widget/introduction-to-customer-widget)
* Style Gameball's widget to match your store's theme, making it feel like a seamless extension of your brand. [Learn more](/product-documentation/customer-widget/start-configuring-profile/customize-your-gameball-customer-widget-to-match-your-brand)
Once you've configured the essentials, publish the Gameball widget so your customers can enroll in your reward experience. Follow "Stage 1" in the widget visibility guide to go live.
[Publish Your Widget](/product-documentation/customer-widget/start-configuring-profile/control-gameball-widget-visibility-on-your-platform)
***
## More Features to Explore
Send real-time notifications to keep your customers engaged.
Create targeted email and in-app campaigns.
Enable cross-merchant reward programs for your customers.