

Gameball’s Digital Wallet passes let customers save their loyalty card to Apple Wallet or Google Wallet, so they can check their points balance and scan the card in-store without installing an app. You design the pass, choose where it appears on customers’ phones, and send announcements to everyone holding it, all from the Wallet page in your dashboard.
Digital Wallet passes are an add-on feature, available upon request. Contact support@gameball.co or your account manager to enable it for your account.
Benefits
- Always accessible: customers carry their loyalty card alongside their boarding passes, credit cards, and tickets.
- Strengthen your brand: the pass uses your logo, colors, and images.
- Real-time updates: points balance and tier update automatically whenever they change.
- Location-based reminders: the pass appears on the customer’s phone when they are near one of your stores.
- Direct broadcasts: send a notification to every customer holding your pass, with no app or email list required.
- In-store ready: the pass can be scanned at checkout to earn or redeem points.
How Do I Open the Wallet Settings?
Click Wallet in the dashboard sidebar. The page shows two cards:- Apple Wallet: passes distributed to customers on iOS.
- Google Wallet: cards distributed to customers on Android.
How Do I Design My Pass?
Apple Wallet and Google Wallet share the same settings. Click Edit on either card to open the editor. Settings are grouped into three sections (General, Content, and Branding), and a Live Preview on the right updates as you make changes.1
Set the general details
Open the General section and configure: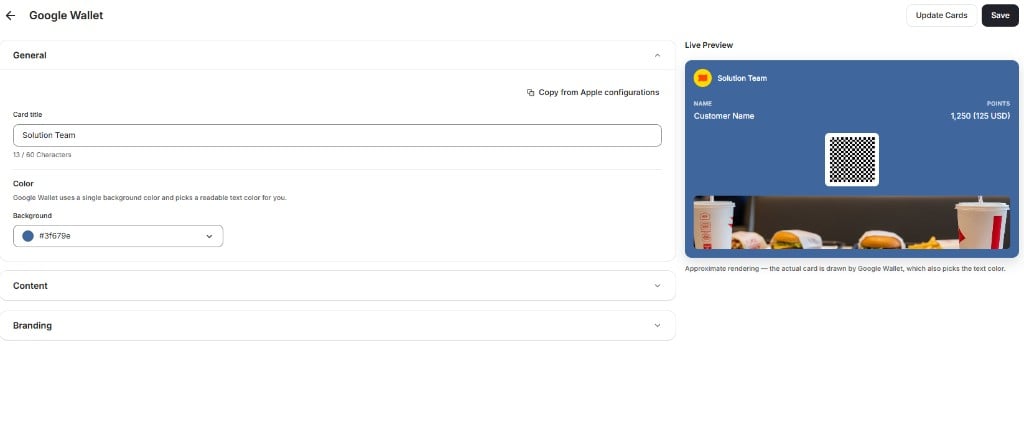
- Card title: the name shown at the top of the pass, up to 60 characters.
- Background color: the color of the pass. Google Wallet uses a single background color and picks a readable text color for you.
2
Choose what the pass shows
Open the Content section and configure: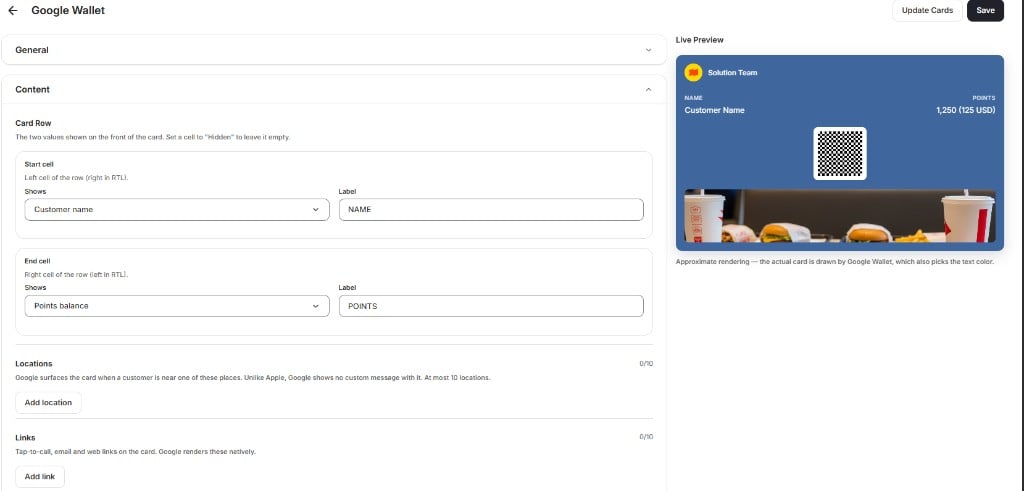
- Card Row: the two values shown on the front of the pass. For both the Start cell and End cell, choose what the cell Shows (for example, Customer name or Points balance) and enter the Label displayed above it. Set a cell to Hidden to leave it empty. In right-to-left languages, the start cell appears on the right.
- Locations: up to 10 places where the pass appears on the customer’s phone. See Location-Based Notifications.
- Links: up to 10 tap-to-call, email, or web links shown on the pass.
3
Upload your branding
Open the Branding section and upload your images as PNG files: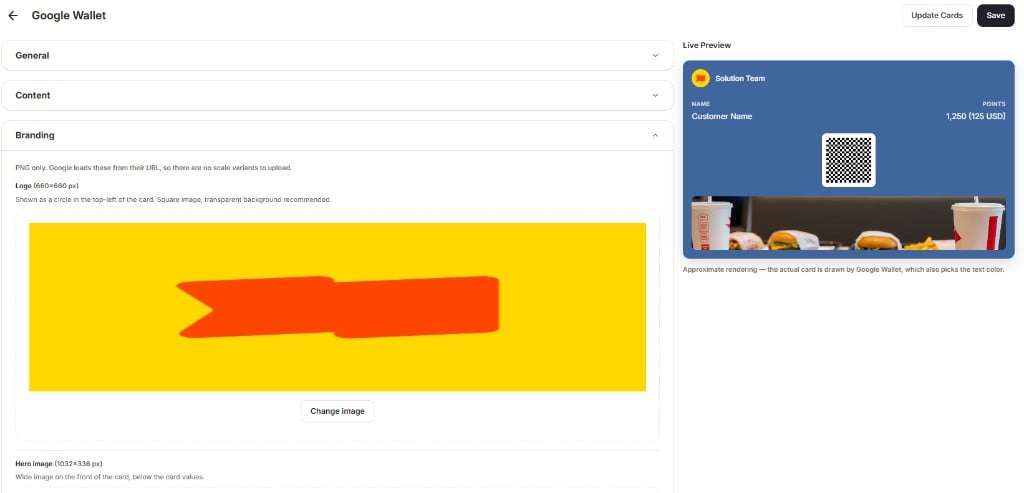
- Logo (660×660 px): shown as a circle in the top-left corner of the pass. Use a square image with a transparent background.
- Hero image (1032×336 px): a wide image on the front of the pass, below the card values.
- Details banner: a banner image shown in the pass details.
4
Save and update existing passes
Click Save to store your settings. Saving does not change the passes customers already have.To push your changes to every pass already saved in customers’ wallets, click Update Cards.
The Live Preview is an approximate rendering. The final pass is drawn by Apple Wallet or Google Wallet, so small differences in layout and text color are expected.
Location-Based Notifications
Add up to 10 store locations in the Locations setting under Content. When a customer who holds your pass is near one of these places, their phone surfaces the pass automatically, reminding them to earn or redeem points while they are close to your store. The two wallets handle this differently:- Apple Wallet shows the pass on the lock screen with a custom message that you write for each location.
- Google Wallet surfaces the card when the customer is nearby, but shows no custom message.
How Do I Add a Location?
1
Open the Locations setting
On the Wallet page, click Edit on the Apple Wallet or Google Wallet card, then open the Content section and scroll to Locations.
2
Add a location
Click Add location, then enter the store’s Latitude and Longitude. The counter in the top-right corner shows how many of your 10 locations you have used.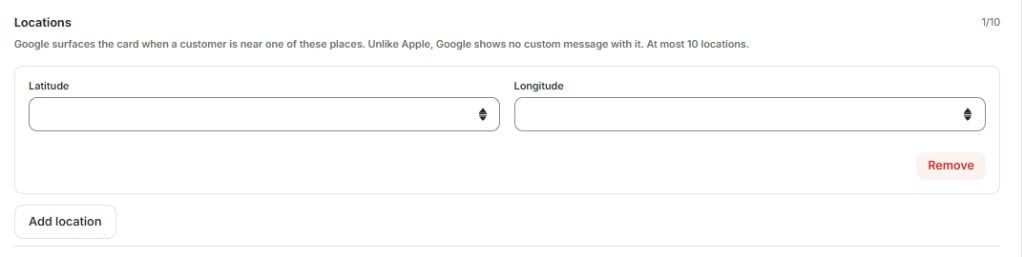
3
Save and update existing passes
Click Save, then click Update Cards so the new location applies to passes customers already have.
At most 10 locations: each pass supports up to 10 locations, so add your highest-traffic stores first.
Broadcast Messages
A broadcast sends a push notification to every device holding your pass, with no app, email address, or phone number required. Use it for announcements such as new offers, store openings, or limited-time promotions. The two wallets display broadcasts differently:- Apple Wallet shows the message only. The title is not displayed.
- Google Wallet shows both the title and the message.
How Do I Send a Broadcast?
1
Open the broadcast screen
On the Wallet page, click Broadcast on the Apple Wallet or Google Wallet card.
2
Compose your message
Under Compose Message, enter: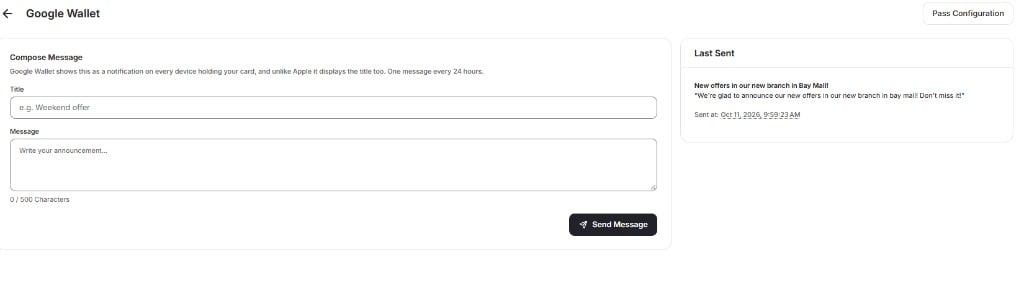
- Title: a short headline, for example “Weekend offer.”
- Message: the announcement text, up to 500 characters.
3
Send the message
Click Send Message. The message goes to every customer holding the pass. The Last Sent panel then shows the title, message, and time of your most recent broadcast.
One message every 24 hours: Google Wallet allows one broadcast per 24 hours. Check the Last Sent panel to see when you can send again.
What Do Customers See?
Each customer receives a unique pass linked to their Gameball account. The pass shows your branding, the values you chose in the card row (such as name and points balance), and a QR code for scanning at checkout. Customers tap Add to Apple Wallet or Add to Google Wallet from your loyalty portal to save the pass. Points and tier updates reflect on the pass automatically.Common Questions
Do I need to set up Apple Wallet and Google Wallet separately?
Do I need to set up Apple Wallet and Google Wallet separately?
Yes. Each wallet has its own pass, settings, and broadcasts. To save time, configure Apple Wallet first, then click Copy from Apple configurations in the Google Wallet editor.
Why don't my design changes show on customers' passes?
Why don't my design changes show on customers' passes?
Save only stores your settings. Click Update Cards to push the changes to passes customers have already saved.
How many store locations can I add?
How many store locations can I add?
Up to 10 locations per pass.
Can I send a custom message when a customer is near my store?
Can I send a custom message when a customer is near my store?
Only on Apple Wallet. Google Wallet surfaces the card near your locations but does not show a custom message.
How often can I send a broadcast?
How often can I send a broadcast?
Google Wallet allows one broadcast every 24 hours.
Who receives a broadcast?
Who receives a broadcast?
Every customer who has saved your pass to that wallet. Apple Wallet and Google Wallet broadcasts are sent separately from each wallet’s Broadcast button.
Related Articles
Apps & Integrations Overview
Explore all available Gameball integrations.
Customer Widget Overview
Configure what customers see in the loyalty widget.